Introduction: The Need for Acoustic Panels
Sound quality plays a crucial role in our everyday lives, whether for music production, home theater systems, or even daily conversations. If you find that your space is lacking in sound clarity, it’s time to consider diy acoustic panels. These panels are an effective solution to reduce noise and echo, providing a more harmonious environment for both work and leisure. In this guide, we’ll walk you through how to create your own acoustic panels step by step, helping you enhance your sound experience at home without breaking the bank.
Understanding Acoustic Panels
1. What are Acoustic Panels?
- Definition: Acoustic panels are sound-absorbing materials designed to improve the acoustics of a room. They reduce echo and sound reflections, making spaces quieter and more pleasant for sound-related activities.
- Common Applications: These panels are often used in recording studios, home theaters, classrooms, and offices. They minimize distractions and provide a comfortable sound environment for both speaking and listening.
2. Why Go DIY?
- Cost-Effectiveness: Creating your own panels allows you to save money compared to purchasing pre-made options. DIY solutions can be tailored to fit your budget and design preferences.
- Customization: Making your own panels enables you to choose the materials, sizes, and colors, ensuring that they blend seamlessly into your existing decor.
- Satisfaction of Craftsmanship: The process of building your own acoustic panels can be gratifying. You gain practical skills while contributing to the functionality and aesthetic of your space.
Materials You’ll Need for Your DIY Acoustic Panels
Before starting, gather the following materials. Having everything at hand streamlines the process, allowing you to work efficiently.
1. Base Material
- Fiberglass Insulation: Fiberglass acoustic panels are popular due to their excellent sound absorption qualities. Use unfaced fiberglass insulation boards for the best results.
- Foam Panels: Alternatively, acoustic foam designed specifically for sound absorption can be used. These come in various shapes and are known for their effectiveness.
2. Frame Material
- Wooden Frames: Construct a wooden frame using 1×3-inch boards. This frame will hold the acoustic material securely and maintain the panel’s structure.
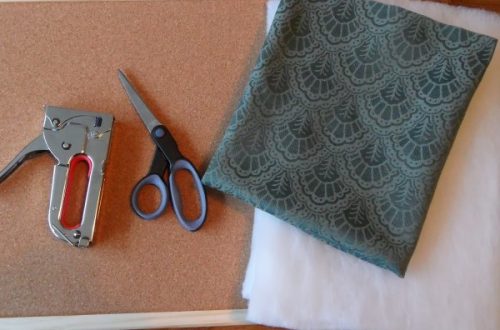
- Staple Gun: A staple gun will secure the fabric covering to the frame, ensuring a clean appearance and durability.
3. Fabric Covering
- Acoustic Fabric: Choose breathable fabric that allows sound to travel through while maintaining aesthetics. Acoustic fabric comes in a variety of colors and patterns, enabling customization.
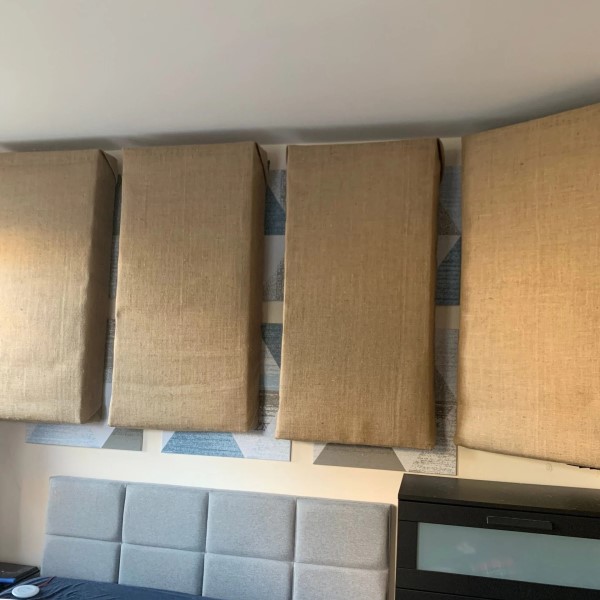
- Backing Material: Optional backing materials like burlap can also be used for added texture and additional sound absorption.
4. Tools
- Basic Tools: Prepare a circular saw or handsaw for cutting wood, a measuring tape for accurate dimensions, and a drill for assembly.
- Safety Gear: Always wear safety goggles and a mask when working with materials like fiberglass or wood to protect yourself from dust and particles.
Step-by-Step Instructions for Creating DIY Acoustic Panels
Creating your own diy acoustic panels can be a fun and rewarding project. Follow this step-by-step guide to ensure you make effective and visually pleasing panels.
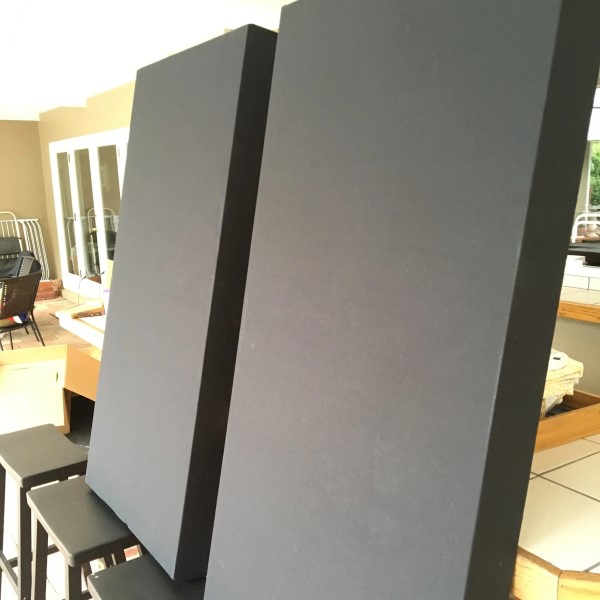
Measure and Cut the Frame
- Determine Size: Decide the size of your acoustic panels based on the available wall space and design preferences. Common sizes include 24×48 inches or 24×24 inches.
- Cutting the Wood: Measure and cut the wooden boards to create a rectangular frame that matches your desired dimensions. Use a saw for clean cuts.
Assemble the Frame
- Joining the Pieces: Using wood screws or a drill, assemble the frame by connecting the corners securely. Ensure that the frame is square, as this alignment is essential for stability.
- Reinforce (if necessary): Depending on the size of the panel, you may want to add a center support piece in larger frames to prevent sagging.
Cut the Acoustic Material
- Measuring Fiberglass/Cutting Foam: Using the frame as a guide, measure and cut your acoustic material to fit perfectly inside the frame. Make sure there’s a snug fit to maximize sound absorption.
Attach the Acoustic Material
- Securing the Material: Use a staple gun to attach the acoustic material firmly to the frame. Lay the material over the frame and gradually staple it around the edges, ensuring it lies flush without gaps.
- Finishing Touch: If using fiberglass, consider wearing gloves and a mask as a precaution while handling the material to avoid irritation.
Cover with Fabric
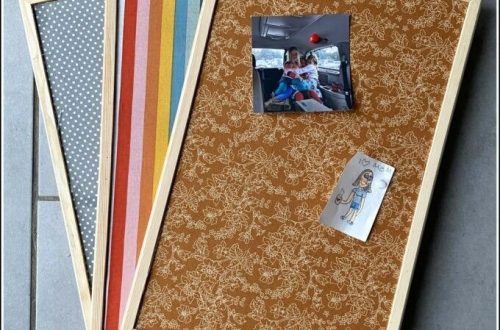
- Select Your Fabric: Choose the fabric covering that will suit your room decor. Make sure it’s breathable to enhance sound absorption.
- Stretch and Attach: Neatly stretch the fabric over the acoustic material and secure it to the frame with staples. Fold the corners neatly for a professional finish.
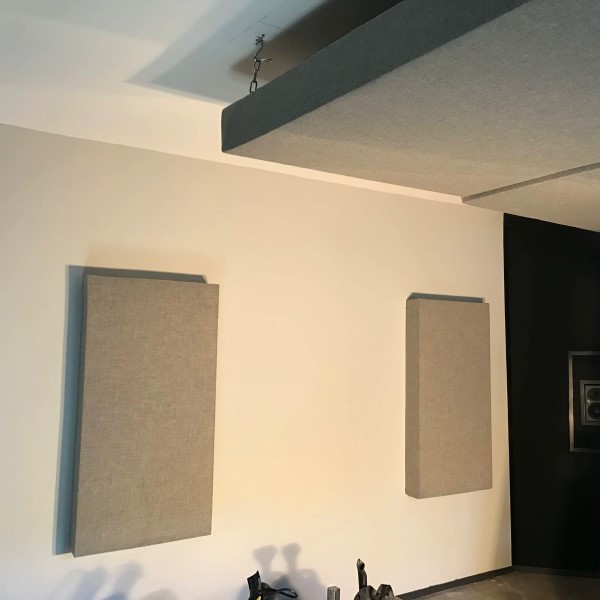
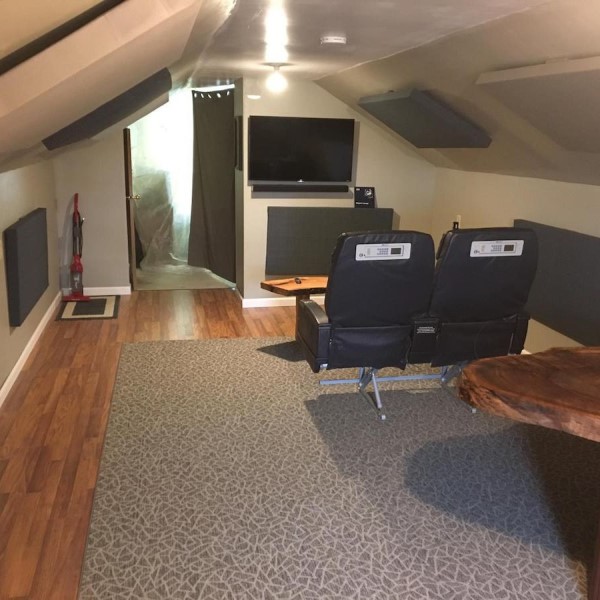
Mount the Panels
- Choosing Location: Decide where to mount your finished acoustic panels. High-traffic areas, corners, or directly behind sound sources are ideal spots for maximum effectiveness.
- Mounting Hardware: Use wall brackets, hooks, or adhesive strips, depending on your wall type and personal preference. Ensure they can support the weight of your panels securely.
Enhancing Your Space with DIY Acoustic Panels
1. Styling Your Panels
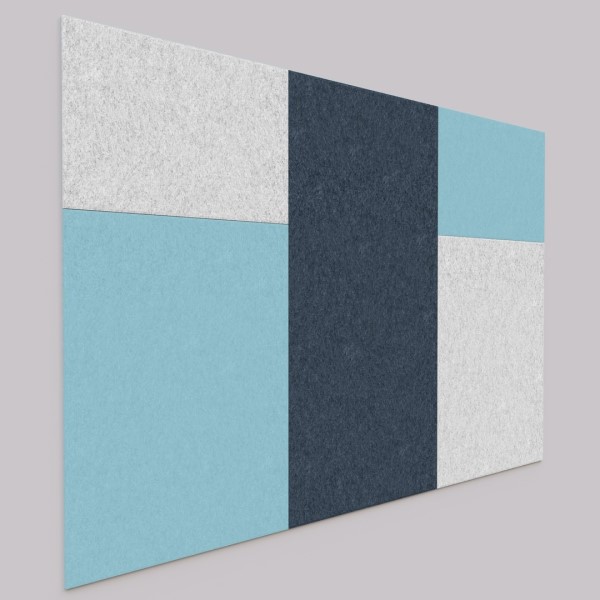
Color Coordination
- Complementing Existing Decor: When selecting fabrics for your acoustic panels, consider how they will work with your current decor. Choose colors that either match or complement the color scheme of your room. This can create a cohesive look and enhance the overall aesthetic.
- Contrasting Colors for Impact: Alternatively, you can opt for fabrics in contrasting colors to create a striking focal point in the room. For instance, if your decor is predominantly neutral, a brightly colored acoustic panel can draw the eye and add character.
- Bright Colors: Bright colors, such as bold reds, blues, or yellows, can make a strong statement in a space. They can energize a room and convey a lively atmosphere, which is especially effective in home offices or creative spaces.
- Neutral Tones: On the other hand, using neutral tones like gray, beige, or soft pastels allows your acoustic panels to blend seamlessly into the background. This can create a more tranquil setting, making it ideal for spaces such as bedrooms or reading nooks.
- Patterns and Textures: Don’t limit your choices to solid colors. Consider utilizing patterned fabrics or textured options that can enhance the visual appeal of your acoustic panels. Patterns can add depth and interest, while textures can invite tactile exploration.
Varied Shapes and Sizes
- Creating a Diverse Collection: To elevate the design of your walls, consider creating a collection of acoustic panels in various shapes and sizes. Instead of uniform squares or rectangles, experiment with circles, triangles, or even abstract forms to maximize visual impact.
- Cohesive Themes: While maintaining variety in shapes and sizes, ensure that the panels share a cohesive theme, such as color scheme, fabric type, or pattern. This unifying aspect will keep the design from feeling chaotic while allowing for individual creativity.
- Arranging Panels Effectively: When arranging the panels on your wall, develop a layout that emphasizes balance and flow. For example, larger panels can serve as primary focal points, while smaller panels can fill in gaps or complement the overall arrangement.
- Enhancing Sound Quality: Utilizing varied shapes and sizes not only benefits the aesthetic of the room but also improves acoustic performance. Different panel sizes can target various frequencies, leading to a more balanced sound environment.
- Adding Visual Interest: The unique arrangement of panels can create a dynamic and engaging visual display, encouraging viewers to explore your design more closely. This approach adds personality to your space while serving its functional purpose of sound absorption.
2. Using Fabrics Thoughtfully
- Textures and Patterns: Incorporating different textures and patterns in your fabric choices can further enhance the aesthetics. Consider using graphic prints or textured fabrics for added dimension.
- Layering Techniques: If you have enough wall space, layering smaller panels can create unique designs, allowing you to express your creativity while maintaining functionality.
FAQs
Can I make my own acoustic panels?
Yes, creating your own acoustic panels is a straightforward process and an effective way to improve sound quality in your space.
What can I use instead of acoustic panels?
Alternative options can include heavy curtains, carpets, or wall-mounted bookshelves, which can absorb sound to some extent.
Is there a cheap way to soundproof a wall?
Using thick blankets, foam insulation, or homemade acoustic panels can be an economical way to soundproof walls while ensuring a reasonable level of sound absorption.
How can I do homemade soundproofing?
Homemade soundproofing can be achieved with various materials. Consider using dense sound-absorbing products like wool, acoustic foam, or even rearranging furniture to optimize room acoustics.
Conclusion: Embrace Your Creativity with DIY Acoustic Panels
In summary, creating diy acoustic panels can be an enjoyable and fulfilling project, enhancing both the sound quality and aesthetics of your space. By following the outlined steps, you will be well-equipped to produce functional and stylish panels tailored to your needs. This project not only improves sound absorption but also provides an opportunity for personal expression in your home decor. So gather your materials, flex your creative muscles, and enjoy the process of transforming your space with your own handmade acoustic panels!