Choosing the Right Supplies and Tools
Choosing the right supplies and tools is essential for your relationship scrapbook. Start by assembling the basic materials to create a strong foundation.
Essential Supplies
- Scrapbook Album: Select an album size that fits your needs. Common options are 8×8, 12×12, or custom sizes.
- Paper: Choose acid-free papers to preserve your memories for years to come. Look for patterned, solid, or themed papers matching your style.
- Adhesives: Use double-sided tape, glue dots, or acid-free glue to attach photos and decorations without damage.
- Cutting Tools: Keep scissors, craft knives, and paper trimmers handy for clean edges and precise cuts.
- Pens and Markers: Pick archival-quality, smudge-proof pens for writing captions and personal notes.
Useful Tools
- Stamps and Ink Pads: Add decorative stamped designs to pages for unique accents.
- Die-Cut Machine: Create intricate designs and shapes quickly with a die-cutting tool.
- Punches: Use hole punches and shape punches for consistent, fun designs.
- Stencils: Add patterns, frames, or lettering using reusable stencils.
- Ruler and Measuring Tools: Ensure straight lines and consistent layouts with rulers or alignment guides.
- Corner Rounder: Soften photo corners for a polished and neat look.
Embellishments
- Stickers: Add themed stickers for fun and personality.
- Washi Tape: Decorate borders or secure lightweight mementos with colorful washi tape.
- Ribbons and Lace: Add texture and softness to your scrapbook pages.
- Buttons and Charms: Enhance layouts with unique decorative accents.
- Flowers and Die-Cuts: Bring your pages to life with dimensional embellishments.
By picking the right supplies and tools, you ensure your relationship scrapbook is both durable and visually stunning. The right materials make creating each page enjoyable and rewarding.
Organizing Photos and Memorabilia
Organizing photos and memorabilia is key for a successful relationship scrapbook. It helps you stay clear, focused, and ensures your scrapbook narrates a coherent story.
Sorting Your Photos
- Start with Categories: Group photos by theme, event, or timeline, such as holidays, birthdays, or milestones.
- Choose the Best Quality: Select high-resolution or well-lit pictures that capture emotions and details.
- Print Favorites: Print digital photos if needed, choosing sizes that suit your scrapbook layout.
- Create a Backup: Save copies of digital photos on a hard drive or cloud for safety.
Preserving Memorabilia
- Gather Special Items: Collect tickets, letters, notes, event programs, and other sentimental keepsakes.
- Use Protective Sleeves: Store frail or delicate items like old letters in acid-free sleeves.
- Label Pieces: Add sticky notes or labels to items detailing the date, event, or personal notes.
Staying Organized
- Use a Sorting Box: Keep photos and memorabilia in separate compartments for easy access.
- Create Folders: Label photo folders by event and date for efficient sorting.
- Plan Placement: Sketch page ideas on paper to visualize where each item will go.
- Avoid Clutter: Only keep memorable pieces, ensuring your scrapbook remains neat.
Organizing photos and memorabilia effectively will make your relationship scrapbook more meaningful and enjoyable. It lays the foundation for your creative storytelling.
Theme Ideas for Your Scrapbook
Choosing a theme for your relationship scrapbook sets the tone for the entire project. It adds cohesiveness and makes the story more engaging. Here are some creative ideas to inspire your scrapbook’s theme:
Milestones and Achievements
Celebrate important moments like anniversaries, graduations, or career milestones. Include photos, messages, and memorabilia from these events. Highlight how these milestones shaped your relationship, capturing the emotions and memories behind them.
Travel Adventures
Create a scrapbook featuring trips and vacations you’ve taken together. Include tickets, postcards, travel maps, and photos from destinations. Use themed paper or stickers for each location to add charm and personality.
Seasonal Celebrations
Design pages around holidays or seasonal events you cherish together. Examples include Christmas, Valentine’s Day, or summer outings. Showcase family traditions, festive decorations, and special memories associated with each season.
Love Story Timeline
Tell your relationship story from the beginning. Start with how you met and showcase each chapter of your journey. Highlight memorable dates, shared achievements, and fun anecdotes that define your bond.
Create pages based on hobbies or activities you both love. Whether it’s cooking, hiking, or gaming, include relevant photos, club memberships, or achievements related to your shared interests.
Favorite Memories
Focus on unforgettable moments that are meaningful to you both. These could be inside jokes, small surprises, or heartfelt gestures. Use captions to explain why these moments matter to your relationship.
Dreams and Aspirations
Document future goals or dreams you share. Include ideas like traveling to new places, starting a family, or professional ambitions. Pair these dreams with motivational quotes and colorful designs.
Artistic Expressions
Showcase creative elements from your relationship, such as drawings, poems, or songs. Use artsy embellishments like watercolor backgrounds, hand-drawn designs, or textured paper to highlight these pieces.
A Year in Review
Highlight significant moments from a specific year of your relationship. Use calendar-style layouts, marking each month with memories, photos, and captions.
Bonding Over Food
Celebrate the joy of shared meals. Include recipes you’ve cooked together, restaurant visits, and pictures of your favorite dishes. Add food-themed embellishments such as forks, plates, or fruit-shaped stickers.
Choosing a theme ensures that your scrapbook has a clear direction and personal touch. Before starting, think about the memories that matter most. Let the theme reflect your unique love story.
Creating a Timeline of Your Relationship
A timeline is a great way to visualize your journey as a couple. It creates a storyline that highlights key moments and memories. Follow these steps to make a meaningful and organized timeline for your relationship scrapbook.
Start with the Beginning
- How You Met: Include details about when and where your love story started.
- First Date: Share photos or tickets from your first outing together.
- Early Milestones: Highlight moments such as the first “I love you” or first trip together.
Important Events and Milestones
- Celebrations: Mark anniversaries, birthdays, or holiday celebrations with photos and mementos.
- Special Achievements: Showcase milestones like promotions, graduations, or moving in together.
- Memorable Trips: Include pictures, travel itineraries, or postcards from significant journeys.
Document Everyday Moments
- Casual Photos: Add pictures of your day-to-day life that showcase your bond.
- Funny Memories: Include anecdotes or moments that made you laugh together.
- Hobbies and Activities: Highlight shared interests and unusual experiences.
Personalize Your Timeline
- Add Dates: Clearly label significant dates to provide a chronological flow.
- Write Captions: Briefly describe why each moment mattered or how it made you feel.
- Use Decorative Elements: Use arrows, stickers, or colors that match the theme of your scrapbook.
Include Future Goals
- Dreams Together: List future plans such as travel destinations, building a home, or starting a family.
- Motivational Quotes: Inspire each other with quotes that reflect your journey and love.
By creating a relationship timeline, you add structure and sentimental value to your scrapbook. It’s a visual journey that lets you relive precious memories and look forward to the future together.
Creative Layout and Design Tips
Creating interesting layouts and designs for your relationship scrapbook can elevate its visual appeal and help you showcase your love story in unique ways. Follow these creative tips to make your scrapbook stand out.
Plan Your Layout
- Sketch Before You Start: Draft a basic layout for each page to maintain consistency.
- Create a Focal Point: Highlight one dominant element per page, such as a special photo or embellishment.
- Balance Your Design: Distribute photos, text, and decorations evenly for an organized look.
- Use Layers: Overlay paper, photos, and embellishments to add dimension and depth.
Play with Colors and Patterns
- Choose a Color Palette: Pick a set of complementary colors that match your theme.
- Incorporate Patterns: Use patterned paper sparingly for backgrounds or as accents.
- Stick to Your Theme: Let your chosen theme guide your design and color choices.
Add Creative Elements
- Photo Frames: Use cutouts, washi tape, or pre-made frames to highlight photos.
- Interactive Features: Add pockets, flaps, or pull-out tabs for a dynamic touch.
- Custom Borders: Make hand-drawn borders or use decorative punches for added charm.
- Mix Fonts: Use different fonts and sizes for titles, captions, or quotes.
Emphasize Storytelling
- Use Captions: Add a line or two to narrate each moment in the photos.
- Include Dates and Locations: This adds more context and meaning to the scrapbook.
- Feature Small Details: Highlight little tokens like stamps, postcards, or pressed flowers.
Experiment with Photo Arrangements
- Vary Photo Sizes: Use a mix of large and small photos for a dynamic look.
- Collages: Combine related pictures into one page for a story-like arrangement.
- Opt for Shapes: Cut photos into shapes like hearts, circles, or stars.
By following these creative layout and design tips, your relationship scrapbook will not only look captivating but also effectively capture the essence of your love story.
Incorporating Personal Notes and Letters
Adding personal notes and letters to your relationship scrapbook brings warmth and authenticity. These elements capture thoughts, feelings, and cherished memories, making the scrapbook deeply sentimental.
Choose Meaningful Messages
- Select Key Moments: Write about milestone events like anniversaries, special dates, or first meetings.
- Include Everyday Thoughts: Add notes about daily joys or heartfelt messages to express your love.
- Use Handwritten Notes: Handwritten messages feel more intimate and personal than printed text.
- Incorporate Letters: Include love letters or important correspondence that hold special meaning.
Create a Unique Presentation
- Decorative Cards: Write your notes on colorful or patterned cards to enhance visual appeal.
- Use Envelopes: Add small envelopes to hold private letters or secret messages.
- Interactive Features: Use flaps or pull-out tabs to hide and reveal special personal notes.
- Add Labels: Write labels to explain the context or date of each included message.
Highlight Your Emotions
- Write in Your Voice: Use simple language to share your feelings directly.
- Incorporate Favorite Quotes: Add quotes that represent your relationship or inspire your bond.
- Share Gratitude: Express appreciation for your partner and your shared journey.
- Reflect on the Past: Write about memorable moments and their emotional significance.
Preserve the Memories
- Use Acid-Free Paper: Prevent letters and notes from aging or discoloring.
- Protect Fragile Notes: Insert old or delicate letters into transparent sleeves for long-term preservation.
- Scan Digital Backups: Save digital copies of handwritten letters for added security.
Including personal notes and letters enlivens your scrapbook. It makes it an unforgettable keepsake, rich with love and meaning.
Adding Fun and Interactive Elements
Adding fun and interactive elements makes your relationship scrapbook more engaging and dynamic. These features surprise readers and keep them involved, adding a unique charm to your creation.
Use Pop-Up Designs
- Pop-Up Photos: Create 3D photo designs that “pop” when pages are turned.
- Pop-Up Notes: Include surprise messages or quotes using folded or layered techniques.
- Themed Shapes: Cut-out themes like hearts or stars can enhance the page excitement.
Include Flaps and Pockets
- Hidden Messages: Write private notes or secrets and hide them under flaps or inside pockets.
- Memory Pockets: Add small mementos like tickets, postcards, or dried leaves within decorated pockets.
- Pull-Out Tags: Create pull-out tags for personal messages or smaller pictures.
Create Spinner Wheels
- Event Reminder: Use a spinner wheel to display memorable dates or events.
- Interactive Facts: Include fun facts about your relationship under each section of the wheel.
Add Accordion Folds
- Photo Timeline: Display multiple photos in a cascading accordion fold.
- Messages Panel: Write a sequence of love notes that unfold story-like.
Use Scratch-Offs for Surprises
- Hidden Surprises: Add scratch-off sections to reveal fun facts or cherished phrases.
- Mystery Prompts: Use scratch-offs for engaging questions or to introduce anecdotal stories.
Make It Musical
- Incorporate QR Codes: Link to your favorite songs, videos, or voice recordings.
- Song Lyrics: Hide verses of meaningful songs behind flaps or reveal them in layers.
Add Movable Elements
- Spinning Photos: Attach photos to brads, creating rotating images.
- Sliding Captions: Insert sliders that can be pulled to reveal texts or more images.
Combine Textures
- Fabric Add-Ons: Use materials like felt, fabric, or burlap for a 3D effect.
- Textured Papers: Add textured or embossed paper for variety.
- Layered Cutouts: Stack cutouts to create a dynamic appearance.
Including interactive designs in your relationship scrapbook keeps it lively. It also evokes joy each time you revisit those precious memories.
Cover and Binding Ideas for a Personal Touch
Creating a unique cover and choosing the right binding can add personality to your relationship scrapbook. These elements provide not just protection but also give a hint of the treasure trove inside.
Cover Design Options
- Personalized Photos: Use a favorite couple photo as the cover for instant sentimental value.
- Themed Designs: Match the cover to your scrapbook theme, like travel or love story motifs.
- Handmade Art: Draw or paint a design that reflects your relationship’s creativity.
- Fabric Covers: Wrap your scrapbook in fabrics like velvet or cotton for a classy, textured finish.
- Stamped Lettering: Add your names, special dates, or quotes using stamps for elegant personalization.
Binding Choices
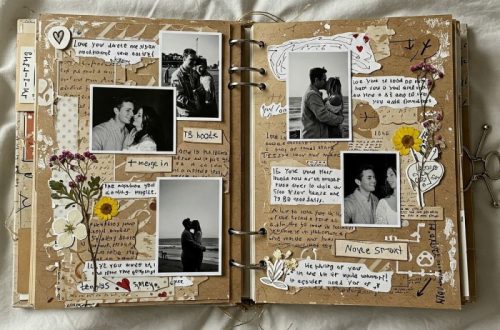
- Ring Bindings: Use ring binders for flexibility, allowing you to rearrange or add pages easily.
- Spiral Binding: Choose spiral binding for a lightweight and durable option.
- Thread Binding: Opt for sewn threads for a vintage and sturdy look.
- Glue Binding: Create a sleek and professional appearance with glue-bound pages.
- Accordion Style: Consider accordion folds for a creative and dynamic scrapbook.
Added Touches
- Decorative Edges: Use scissors with shaped blades to give the scrapbook edges a unique finish.
- Cover Embellishments: Add stickers, die-cuts, or buttons to enhance the cover design.
- Protective Layer: Use a transparent plastic cover to guard your scrapbook against wear.
- Title Tags: Attach a title label with your scrapbook’s theme or year.
- Ribbon Tie: Fasten the scrapbook with a decorative ribbon for an elegant closure.
Focusing on cover and binding elevates your scrapbook’s appeal while ensuring it lasts for years. Let your relationship’s essence shine through every detail of its design.