Understanding the Role of the Diaphragm in a Microscope
The diaphragm on a microscope is one of the most important components for controlling the amount of light that reaches the specimen. It plays a key role in determining the clarity, contrast, and overall quality of the image you see through the lenses. If you’re asking “what does the diaphragm do on a microscope?” the answer lies in its ability to regulate light intensity and focus.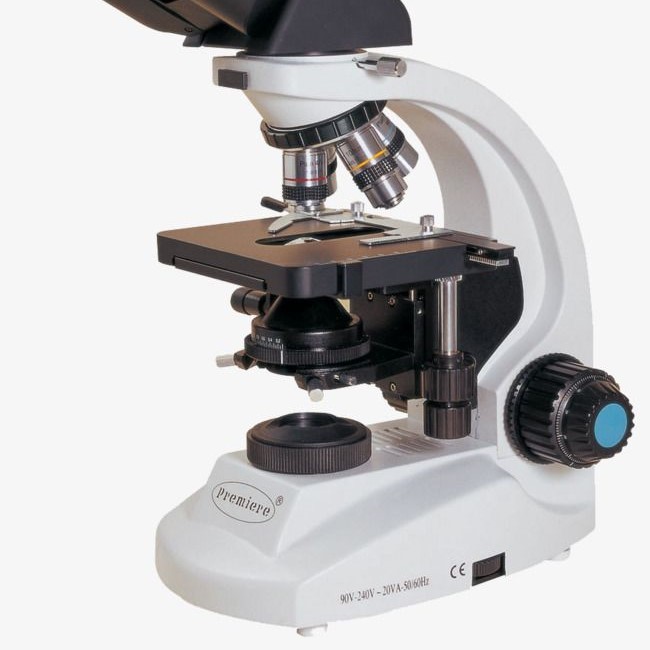
In simple terms, the diaphragm acts like a valve that adjusts the size of the opening through which light passes. By changing this opening, the diaphragm can increase or decrease the amount of light entering the microscope. This adjustment is crucial because too much or too little light can lead to poor visibility, making it difficult to observe fine details.
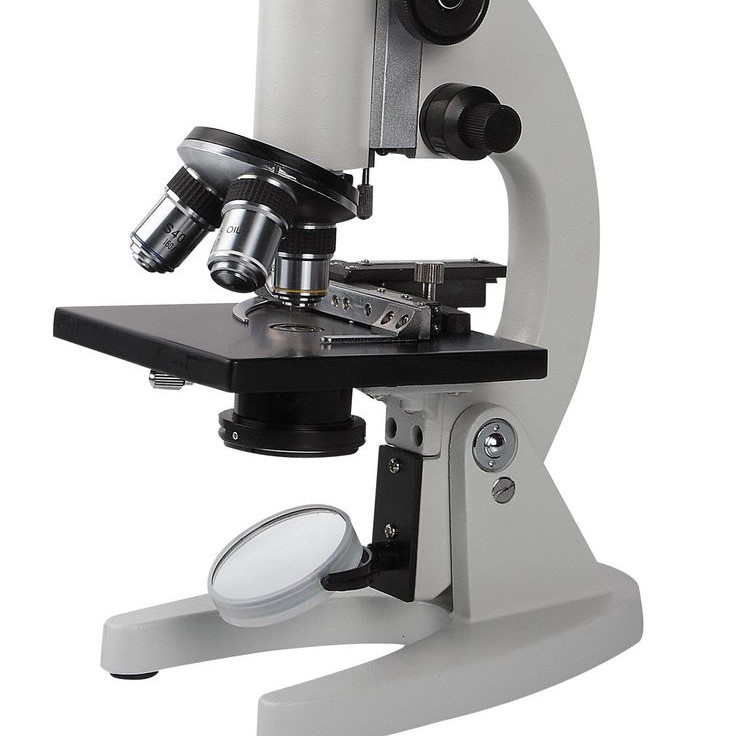
Most microscopes have a diaphragm located near the condenser lens, which is responsible for focusing the light onto the specimen. The diaphragm helps to control the angle and direction of the light beam, ensuring that the sample is illuminated evenly and effectively. This is especially important when working with high magnification objectives, where even small changes in lighting can significantly affect the image quality.
Additionally, the diaphragm can help reduce glare and improve contrast. By narrowing the light beam, it can create a sharper image with better definition, making it easier to distinguish between different structures within the specimen. This is particularly useful when examining biological samples, such as cells or tissues, where detail is essential.
Overall, the diaphragm on a microscope is not just a simple part—it’s a vital tool that allows users to optimize their viewing experience. Whether you’re a student, researcher, or hobbyist, understanding what the diaphragm does on a microscope can greatly enhance your ability to study microscopic structures effectively.
How the Diaphragm Affects Image Quality
The diaphragm on a microscope has a direct impact on the image quality you see under the lens. Its main function is to control the amount of light that illuminates the specimen, which in turn affects factors like brightness, contrast, and resolution. When you ask “what does the diaphragm do on a microscope?” the answer is clear: it fine-tunes the lighting conditions to ensure optimal visualization.
One of the most noticeable effects of the diaphragm is its influence on contrast. If the diaphragm is fully open, more light enters the microscope, resulting in a brighter but potentially less defined image. On the other hand, if the diaphragm is partially closed, the light becomes more focused, increasing contrast and making it easier to see fine details. This is especially important when observing transparent or lightly stained specimens.
Another benefit of the diaphragm is its role in reducing glare. Excessive light can cause reflections and distortions, making it harder to see the actual structure of the sample. By adjusting the diaphragm, you can minimize these unwanted effects and achieve a clearer, more accurate view.
Furthermore, the diaphragm helps balance the light across the entire field of view. Without proper adjustment, some areas of the sample may appear overly bright while others are too dark. The diaphragm ensures that the light is distributed evenly, allowing for a more consistent and reliable observation.
It’s also worth noting that the diaphragm can be used in conjunction with other microscope components, such as the condenser and objective lenses. Together, they work to produce a sharp, well-lit image that is essential for accurate scientific analysis. So, when you ask “what does the diaphragm do on a microscope?” remember that it’s not just about light—it’s about creating the best possible image for your research or study.
Different Types of Diaphragms in Microscopes
Microscopes come with various types of diaphragms, each designed to serve specific purposes. While the basic function of the diaphragm remains the same—controlling light—the way it operates can vary depending on the type of microscope and the user’s needs. Understanding the different types of diaphragms can help you make the most of your equipment and improve your observational skills.
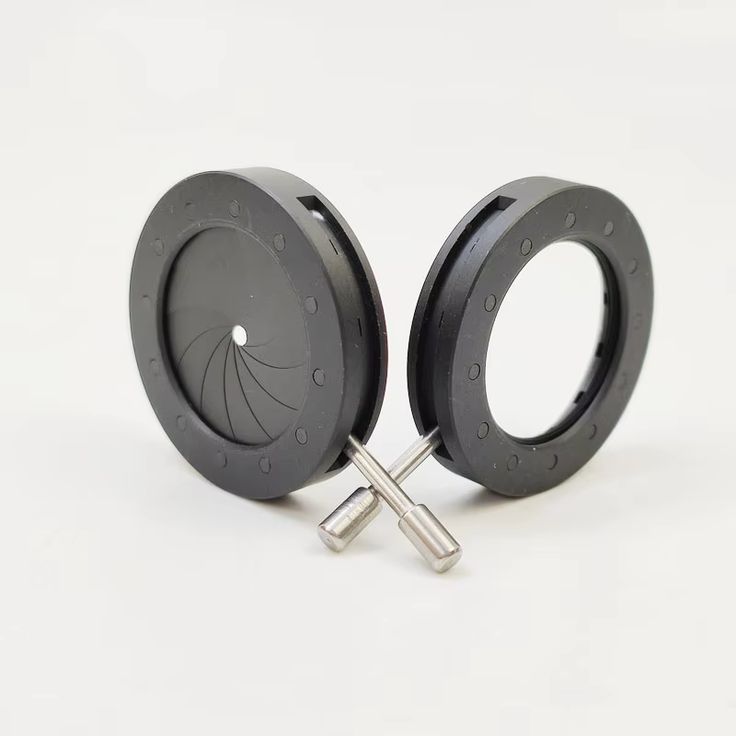
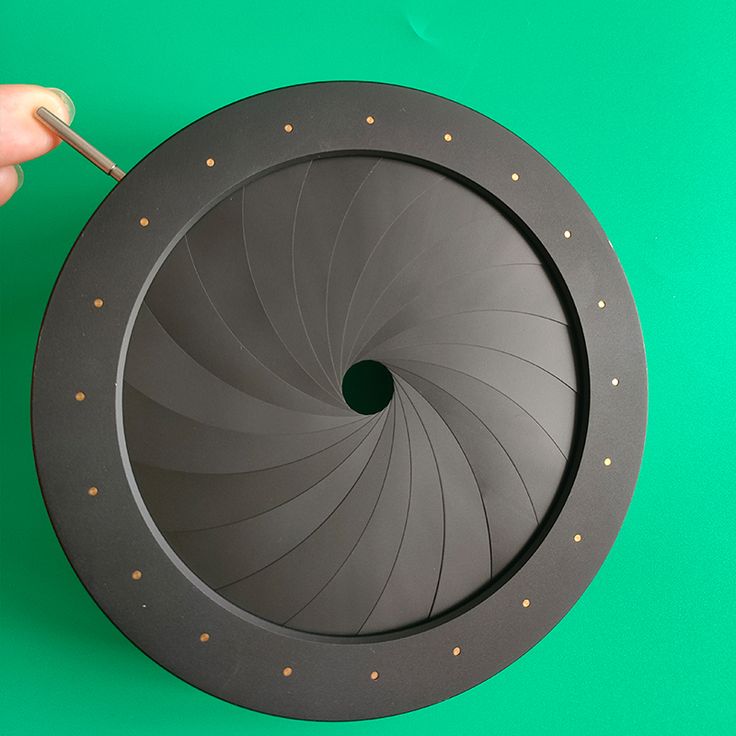
One common type is the iris diaphragm, which is found on many compound microscopes. This diaphragm consists of a series of overlapping blades that can adjuste to change the size of the opening. It allows for precise control over the amount of light entering the system, making it ideal for high-magnification applications.
Another type is the aperture diaphragm, which is typically found in older microscopes or those with simpler designs. Unlike the iris diaphragm, the aperture diaphragm has a fixed or limited range of adjustments. It is used to limit the amount of light that reaches the condenser, helping to reduce glare and improve contrast. While less flexible than the iris diaphragm, it still serves an important role in certain microscopy techniques.
Some microscopes also feature a condenser diaphragm, which is located directly above the condenser lens. This type of diaphragm is used to control the angle of the light beam before it reaches the specimen. It is particularly useful in phase-contrast and differential interference contrast (DIC) microscopy, where precise light control is essential for enhancing image detail.
How to Adjust the Diaphragm for Optimal Viewing
Adjusting the diaphragm on a microscope is a simple yet essential skill for any user. Proper adjustment ensures that the specimen is well-illuminated and that the image is clear, detailed, and easy to interpret. If you’re wondering “what does the diaphragm do on a microscope?” the answer includes its role in light regulation, and learning how to adjust it is key to getting the best results.
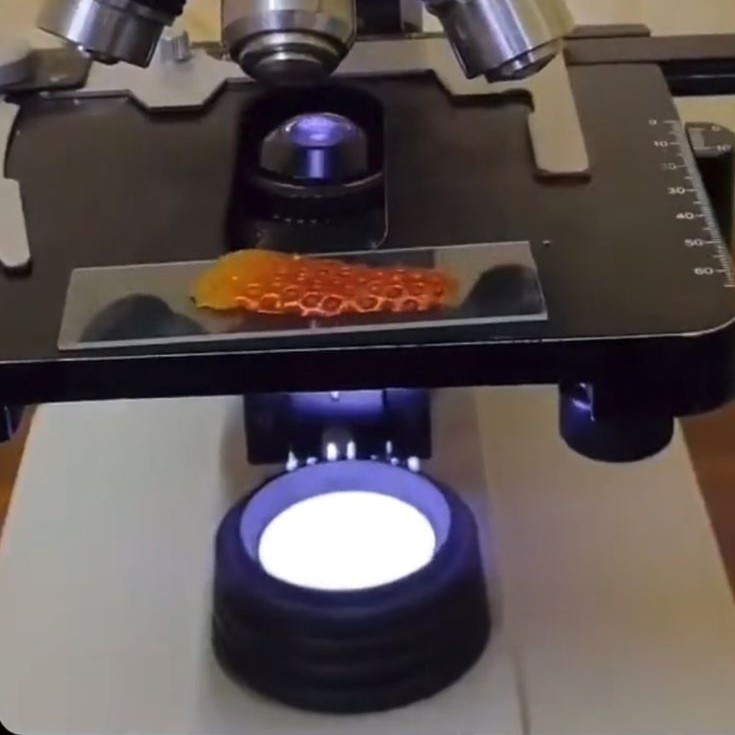
To begin, locate the diaphragm on your microscope. It is usually found near the condenser lens and can control by a lever, knob, or dial. Depending on the model, the diaphragm may have multiple settings, ranging from fully open to completely closed. Start by setting the diaphragm to a mid-range position, which provides a balanced level of illumination.
Next, look through the eyepiece and adjust the diaphragm until the image appears sharp and well-defined. If the image is too bright or lacks contrast, try closing the diaphragm slightly. This will reduce the amount of light and increase the depth of field, making it easier to see fine details. Conversely, if the image is too dark, open the diaphragm a bit more to allow more light to reach the specimen.
It’s also important to consider the magnification level when adjusting the diaphragm. At higher magnifications, such as 40x or 100x, the diaphragm should be set to a smaller opening to prevent excessive light from causing glare or reducing image quality. Lower magnifications, like 10x or 20x, may require a larger opening to ensure sufficient illumination.
Another tip is to use the diaphragm in combination with the condenser. Some microscopes have a condenser adjustment that can use alongside the diaphragm to further refine the lighting. Experiment with both controls to find the best balance for your specific sample.
The Importance of Light Control in Microscopy
Light control is one of the most critical aspects of microscopy, and the diaphragm plays a central role in achieving this. Without proper light management, even the most advanced microscope cannot produce clear, accurate images. This is why understanding what the diaphragm does on a microscope is so important for anyone who uses these tools regularly.
In microscopy, light is essential for revealing the structure and details of the specimen. However, too much or too little light can be detrimental. Excessive light can cause glare, wash out details, and even damage sensitive samples. On the other hand, insufficient light can make it difficult to see the specimen clearly, leading to inaccurate observations.
The diaphragm helps strike the right balance by regulating the amount of light that reaches the sample. It allows users to fine-tune the brightness and contrast of the image, ensuring that the specimen is visible without being overexposed. This is especially important when working with delicate or transparent materials, where even small changes in lighting can have a big impact.
In addition to improving image quality, proper light control also extends the lifespan of the microscope’s components. By preventing excessive light from entering the system, the diaphragm helps protect the lenses and other optical elements from unnecessary wear and tear.
Moreover, the diaphragm can use to enhance specific features of the specimen. For example, in staining techniques, adjusting the diaphragm can highlight certain structures or cell components, making them easier to identify and study. This makes the diaphragm an invaluable tool for both educational and professional use.
Common Mistakes When Using the Diaphragm
Even experienced users can make mistakes when adjusting the diaphragm on a microscope. These errors can lead to poor image quality, wasted time, and missed opportunities for discovery. Understanding these common mistakes can help you avoid them and make the most of your microscope.
One of the most frequent mistakes is leaving the diaphragm fully open. While this might seem like it would provide the best illumination, it often leads to excessive light and reduced contrast. This can make it difficult to see fine details and may even cause eye strain after prolonged use. Instead, start with a moderate setting and adjust as needed.
Another common error is not adjusting the diaphragm at all. Some users assume that the microscope is already set up correctly and don’t take the time to fine-tune the lighting. However, different samples and magnifications require different levels of illumination. Failing to adjust the diaphragm can result in blurry or poorly lit images that are hard to analyze.
A third mistake is using the diaphragm incorrectly in conjunction with other microscope controls. For example, some users rely solely on the diaphragm to adjust brightness, ignoring the condenser and other light sources. This can lead to inconsistent lighting and an uneven field of view. It’s important to use all available controls together for the best results.
Finally, some users overlook the importance of regular maintenance. Over time, the diaphragm mechanism can become dirty or misaligned, affecting its performance. Cleaning and checking the diaphragm periodically ensures that it continues to function properly and maintains optimal light control.
By avoiding these common mistakes, you can ensure that the diaphragm on your microscope works as intended, providing the best possible viewing experience for your specimens.
Practical Tips for Using the Diaphragm Effectively
Using the diaphragm on a microscope effectively requires a combination of knowledge, practice, and attention to detail. Whether you’re a beginner or an experienced user, following these practical tips can help you make the most of this essential component.
First, always start with a mid-range setting. This gives you a good baseline for adjusting the diaphragm based on the specific sample and magnification you’re using. From there, you can gradually increase or decrease the light as needed.
Second, pay attention to the contrast and brightness of the image. If the sample appears too bright or washed out, close the diaphragm slightly. If it’s too dark, open it a little more. Finding the right balance is key to getting a clear, detailed image.
Third, use the diaphragm in combination with the condenser. Many microscopes have a condenser adjustment that can use alongside the diaphragm to further refine the lighting. This is especially useful when working with high-magnification objectives or when trying to enhance the visibility of fine details.
Fourth, experiment with different samples. Each specimen may require a different level of light. For example, thick or opaque samples may need more illumination, while thin or transparent ones may benefit from a narrower diaphragm setting.
Finally, keep the diaphragm clean and well-maintained. Dust, dirt, or debris can interfere with its operation, leading to inconsistent light control. Regular cleaning and inspection will help ensure that the diaphragm functions smoothly and reliably.
By applying these tips, you can improve your ability to use the diaphragm on a microscope and achieve better results in your microscopic observations.
Conclusion – Mastering the Diaphragm on Your Microscope
In conclusion, the diaphragm on a microscope is a crucial component that controls the amount of light reaching the specimen. As we’ve explored, the question “what does the diaphragm do on a microscope?” has a clear and important answer: it regulates light to enhance image quality, contrast, and clarity. Understanding how to use and adjust the diaphragm is essential for anyone who uses a microscope, whether for scientific research, education, or personal interest.
Through this guide, we’ve covered the different types of diaphragms. How they affect image quality, and the best practices for adjusting them. We’ve also discussed common mistakes and provided practical tips to help you get the most out of your microscope. The diaphragm is not just a simple part—it’s a powerful tool that can transform your viewing experience.
Whether you’re a student, a researcher, or a curious learner. Taking the time to master the diaphragm will improve your ability to observe and analyze microscopic structures. Remember, the goal is not just to see the specimen but to understand it in the best possible way.
So, next time you ask “what does the diaphragm do on a microscope?” you’ll know the answer—and you’ll be ready to use it effectively. With the right adjustments, the diaphragm can help you uncover the hidden world of the microscopic universe.


