Introduction to Microscope Anatomy
Understanding the microscope anatomy is crucial for anyone who uses this powerful tool, whether in a lab, classroom, or field. A microscope is an instrument that magnifies small objects, allowing us to see details that are not visible to the naked eye. Let’s dive into the basic structure of a microscope and what the labeled parts are for.
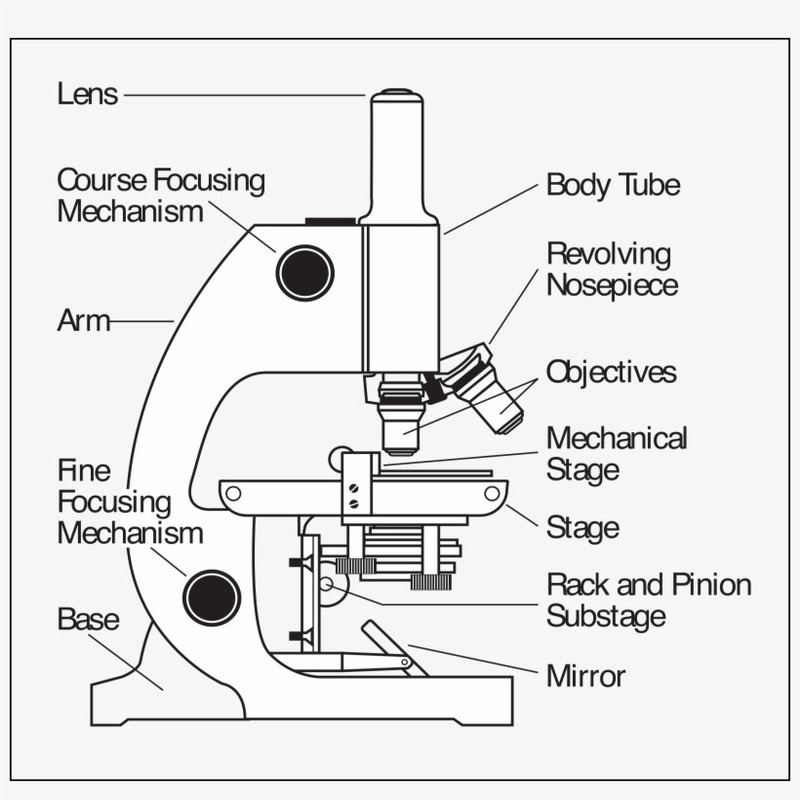
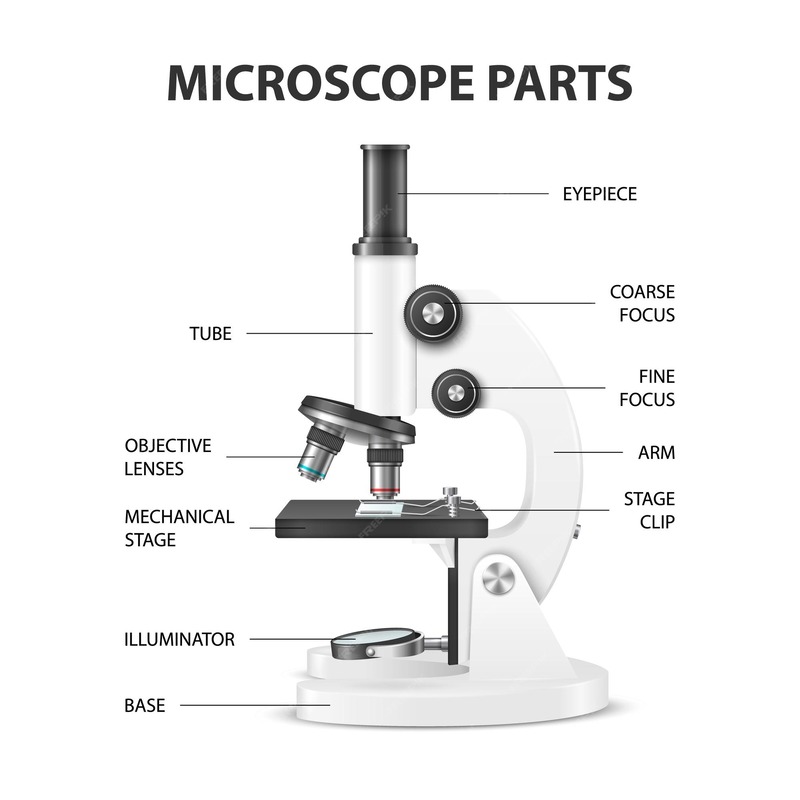
Microscopes often consist of a range of components that work together to magnify and illuminate the specimen. The main parts include the eyepiece, objective lenses, stage, stage clips, illuminator, and condenser. Together, these parts adjust the light and focus to create a clear image of the sample under scrutiny.
Beginning with the uppermost part, the eyepiece or ocular lens is where you place your eye to view the magnified image. Moving down, the objective lenses are the round pieces that rotate to provide different magnification levels. The stage is the flat surface where you place the slides, and it usually includes stage clips to keep the slide in place.
Below the stage, you’ll find key components for lighting and clarity. The illuminator serves as the microscope’s light source, often an LED or halogen bulb, while the condenser focuses that light onto the specimen. These elements are critical for producing a sharp image.
Each part of the microscope has a specific role and together they form a complex, precise optical instrument. As we move forward in our exploration, we’ll examine each of these key components in greater detail, providing insight into their functions and importance. Armed with this knowledge, you’ll be able to use your microscope to its fullest potential and gain a deeper understanding of the microscopic world.
Essential Parts of a Microscope and Their Functions
Understanding each part of a microscope helps us use it effectively. Here, we’ll look at the essential parts and their roles.
The Eyepiece or Ocular Lens
The eyepiece, or ocular lens, is at the top of the microscope. You look through it to see the magnified image. It typically provides 10x magnification, getting you closer to the world of the tiny.
The Objective Lenses
Objective lenses are found on a rotating turret below the eyepiece. They have different magnifications, like 4x, 10x, or 40x. By turning the turret, you can change the lens and therefore the magnification.
The Stage and Stage Clips
The stage is the platform where you place your slide. The stage clips hold the slide securely. This ensures that the specimen doesn’t move while you’re viewing it, keeping your focus sharp.
The Illuminator and Condenser
The illuminator is the microscope’s light source. It shines light upwards into the slide. The condenser sits below the stage. It focuses the light from the illuminator onto the specimen, making the image clear and bright.
Differences Between Compound and Stereo Microscopes
Microscopes come in various forms, each suited for different uses. Two common types are compound and stereo microscopes. Understanding the differences between them is important for selecting the right microscope for your needs.
Compound Microscope labeled parts
A compound microscope, also known as a biological microscope, is designed for viewing small or thinly sliced sections of objects under high magnification. It typically has several objective lenses that provide high magnification levels, ranging from 40x to 1000x. This type of microscope often includes a mechanical stage, which allows for precise control of the slide position. The illumination system usually uses a bright light to transmit through the specimen, and there may be a condenser with an iris diaphragm to focus the light.
Stereo Microscope labeled parts
A stereo microscope, or dissecting microscope, offers a 3D view of the specimen. This is achieved through two separate optical paths providing different viewing angles. Stereo microscopes have lower magnification, usually up to 40x, making them ideal for looking at larger, solid specimens such as insects, plants, and rocks. These microscopes typically feature a large stage for bigger objects and may use reflected light, which bounces off the surface of the object, rather than transmitting through it.
Adjusting and Using the Microscope Controls
Mastering the controls of a microscope is key to obtaining a sharp, clear image. There are two main adjustments you’ll use regularly: the focus knobs and the diaphragm or iris.
Focus Knobs: Coarse and Fine Adjustment
When you first look at a slide, you begin with the coarse focus knob. Turn it to move the stage up or down quickly. This brings the specimen into the general focus range. Once the image is roughly clear, switch to the fine focus knob. This knob allows for smaller, precise adjustments. It sharpens the image details without drastic movements.
Diaphragm or Iris: Controlling Light Intensity
The diaphragm or iris is near the light source and it manages light intensity. By adjusting it, you can increase or decrease the amount of light that reaches the specimen. This control is vital as the right light intensity can reduce glare and improve contrast, leading to a better resolution of the microscopic image.
Properly adjusting the microscope’s controls can have a significant impact on the quality of your observations. By understanding and manipulating the focus knobs and diaphragm, you can greatly enhance your viewing experience.
Microscope Care and Maintenance
Proper care and maintenance are critical for the longevity and performance of Microscope labeled parts. Users of microscopes, from students to professional researchers, must be diligent in keeping their equipment in optimal condition. This section will outline key practices in preserving and ensuring the effectiveness of your microscope.
Cleaning Lenses and Other Components
To maintain clarity and precision:
- Always use lens paper or a soft, lint-free cloth for cleaning lenses.
- Employ a gentle touch to avoid scratching the delicate glass surfaces.
- If needed, use a small amount of isopropyl alcohol to remove oils or residue.
- Clean the body of the microscope with a damp cloth, avoiding harsh chemicals.
Remember, your microscope’s lenses are its most crucial components. Regular gentle cleaning reduces the buildup of dust and prevents potential damage.
Proper Storage and Handling
Following proper storage and handling procedures will protect your microscope:
- Cover the microscope with a dustproof cover when not in use.
- Store the microscope in a dry, cool place to prevent mold and corrosion.
- Carefully handle the microscope, avoiding rough movements that can misalign components.
- Ensure that components such as objective lenses are not left screwed in too tightly after use.
By adhering to these instructions, you can significantly increase the lifespan and reliability of your microscope, thereby enhancing your exploration of the microscopic world.
Advanced Features in Modern Microscopes
Microscope labeled parts come with advanced features that expand their usefulness and enhance user experience. These features bring microscopes into the digital age and allow for new ways to capture, store, and analyze microscopic images.
Digital Cameras and Imaging Software
Digital cameras have revolutionized the way we interact with microscope labeled parts. They allow users to take high-resolution images of specimens. With these cameras, images can be saved directly to a computer. Imaging software then lets users edit and analyze these photos. Users can measure structures, compare samples, or create detailed reports. It makes sharing findings with others easier, whether in a report or during a presentation. This digital integration is key for research and education.
Specialized Lenses and Filters
Specialized lenses and filters are also part of modern microscopes’ line-up. They enhance the microscope’s ability to detect specific details. With them, users can observe specimens under different light conditions. This is especially useful in fields like pathology, where certain stains only show up under specific filters. Lenses can adjust to correct color and improve image contrast. This makes the smallest details crisp and clear. It’s an exciting time for microscope innovation, and these features push the boundaries of what we can explore.


