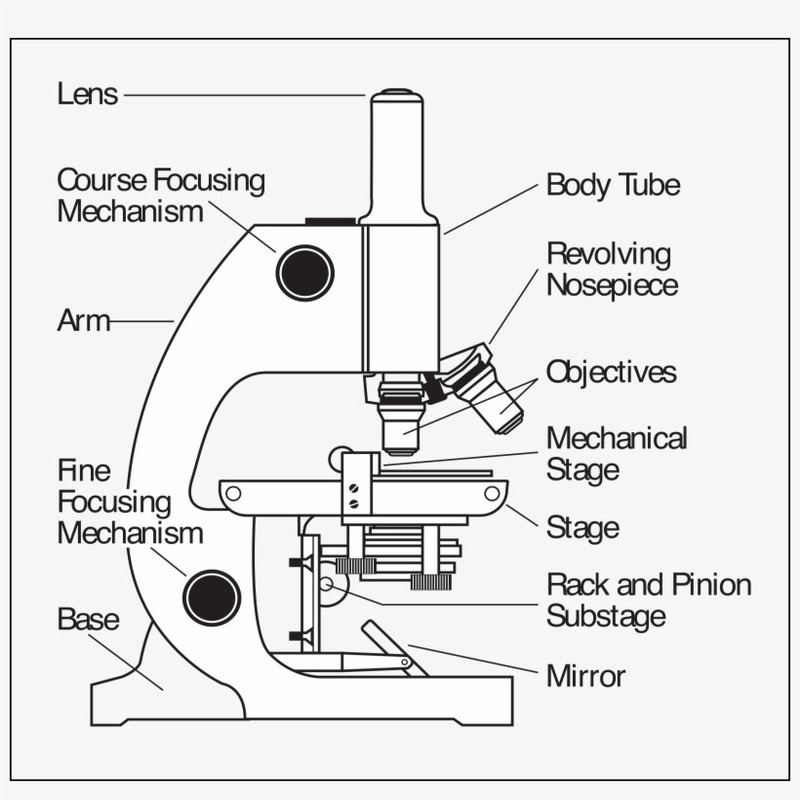
Introduction to Microscope Parts
Understanding the various Microscope parts labeled is crucial. Each part plays a unique role in the microscope’s function.
Significance and History of Microscopes
Microscopes have been vital since the 16th century. They made it possible to see things too small for the naked eye. They have helped advance science significantly, unlocking the world of microbiology.
Their name, from ancient Greek words meaning ‘small’ and ‘look at,’ hints at their purpose. Magnification technology has evolved greatly since then. Today’s microscopes have numerous parts, each critical for detailed observation.
The Role of Magnification in Scientific Discovery
Magnification is key in scientific discovery. It allows scientists to observe details unseen by the naked eye. Microscopes can magnify tiny structures, improving our understanding of life and materials.
Structural Components of a Microscope
Base: The Foundation and Support
The base acts as the microscope’s foundation, providing stability and housing for the illumination components. It’s the bottom part that touches the surface, supporting the entire microscope structure. Inside the base, you can often find the light source, including bulbs like LED or halogen lamps. This section also holds the on-off switch for the microscope’s light, and may include controls for adjusting the light’s intensity.
Arm: Connecting Head and Base
The arm of the microscope serves as the connector between the base and the microscope’s head. It’s a critical structural component that you use to safely pick up and carry the microscope. Robust and sturdy in design, the arm ensures the head remains aligned with the base. Additionally, the arm may provide support for various knobs and controls, necessary for fine and coarse adjustments of the specimen’s focus.
Stage: Specimen Placement and Adjustment
The stage is a flat platform where you place the microscope slides. It’s typically situated above the base and below the lenses, and contains stage clips to secure the slides. The stage also features an opening called the aperture, which lets light pass through for better visibility of the specimen. Many modern microscopes are equipped with a mechanical stage, allowing precise movement of the specimen with control knobs for intricate observations. This platform is essential for the precise placement and adjustment of the specimen during examination.
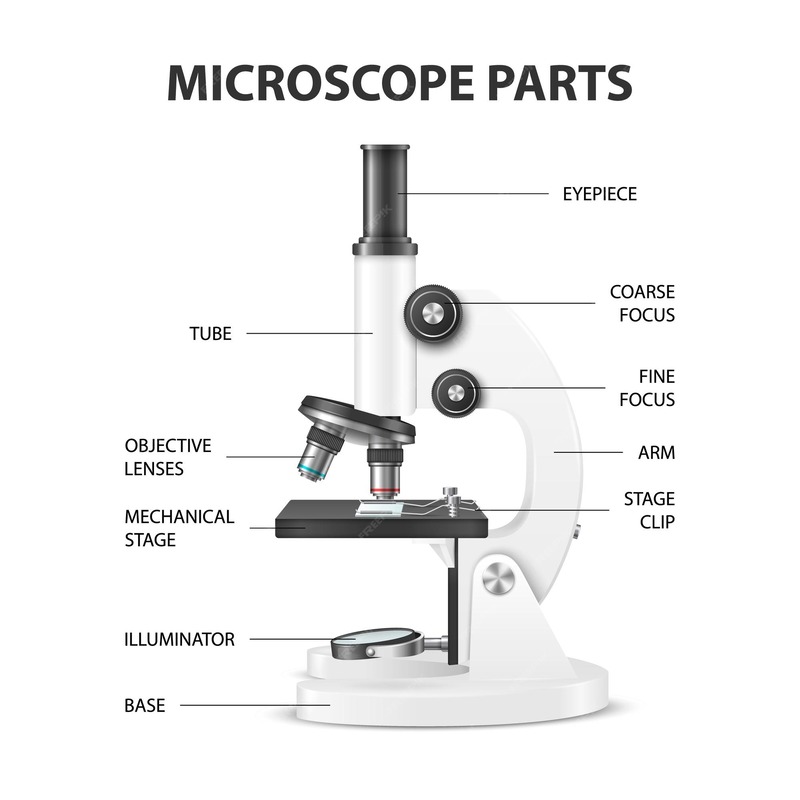
Optical Elements and Their Roles
The optical elements of a microscope work together to magnify and clarify the specimen.
Eyepiece and Ocular Lenses: The View from Above
The eyepiece, or ocular lens, sits at the microscope’s top. It’s the viewer’s window to the magnified world. Most eyepieces magnify images 10 to 15 times.
Objective Lenses: Magnification Closest to the Sample
Objective lenses are near the specimen. They vary in magnification, commonly 4X, 10X, 40X, and 100X. They enlarge the image before it reaches the eyepiece.
Nosepiece: Rotating the Objectives
The nosepiece holds the objective lenses. It turns to change between different magnifications. This helps to examine the sample at various levels of detail.
Condenser and Illumination: Focusing the Light
The condenser focuses light onto the specimen. Illumination, usually from a built-in light, enhances the image. They work together to produce a bright, sharp view.
Focusing Mechanisms
Focus mechanisms are crucial for obtaining clear, detailed views of specimens under a microscope.
Coarse and Fine Adjustment Knobs: Sharpening the Image
Microscopes have two main types of focusing knobs: coarse and fine adjustment knobs. Coarse adjustment knobs allow quick focusing by moving the stage quickly and broadly. This is useful for initial setup or for low magnification viewing. Once the specimen is generally in focus, the fine adjustment knob is used. This knob moves the stage slowly and more precisely, sharpening the image, especially at higher magnifications.
Diaphragms: Controlling Light Intensity
Diaphragms in microscopes, like the iris diaphragm, play a role in image clarity by controlling light intensity. Positioned below the stage, the diaphragm adjusts its size to increase or decrease light. This control is vital for enhancing the contrast and detail of the specimen being observed. By fine-tuning the amount of light, users can ensure that the specimen is neither too bright nor too dark, thus achieving the best possible visualization.
Different Types of Microscopes and Their Functions
Microscopes come in varied types, each suited for specific applications and scientific explorations.
Compound Microscopes: Viewing Cells and Microorganisms
Compound Microscope parts labeled are the cornerstone of microbiological study. They use multiple lenses to magnify tiny cells and microorganisms. These microscopes typically feature a combination of an objective lens and an eyepiece to provide high magnification, up to 1000x or more. This makes them ideal for viewing cellular structures and bacteria in great detail. Application areas include medical diagnostics, biological research, and educational settings where detailed cellular observations are required.
Stereo Microscopes: Examining Larger, Opaque Objects
Stereo Microscope parts labeled, or dissecting microscopes, offer lower magnification compared to compound microscopes, typically between 10x to 40x. They possess two optical paths which allow for three-dimensional viewing. This feature is invaluable for examining larger, opaque objects like insects, plants, and electronic circuits. Stereo microscopes are commonly used in manufacturing, botany, and entomology to provide a topographical view of the specimen, aiding in intricate tasks such as dissection or assembly.
Specialized Microscopes: Darkfield and Phase Contrast
Specialized microscopes cater to unique observational needs. Darkfield microscopes, for example, are perfect for visualizing unstained specimens. They use a special condenser to create bright images against a dark background, enhancing the contrast without dying the sample. This type is favored for viewing live cells and organisms, blood samples, and water organisms.
Alternatively, phase contrast microscopes enhance the contrast in transparent and colorless specimens without staining. This makes them particularly useful in microbiology, cell biology, and medical fields to study protein, fiber structures, and microorganisms in their natural state. They operate by transforming slight differences in refractive index into variations in light intensity, producing clear images of internal structures that are usually not visible with standard optical microscopes.
Understanding Magnification and Resolution
To truly comprehend microscopy, one must grasp magnification and resolution. These concepts define a microscope’s effectiveness in magnifying and clarifying specimens.
Calculating Total Magnification
Total magnification is the combined effect of two lens systems. To calculate, multiply the power of the eyepiece lens by that of the objective lens. For instance, an eyepiece lens magnifying 10x and an objective lens at 40x result in 400x total magnification.
Enhancing Image Quality and Contrast
To improve image quality and contrast, adjust the light and focus accurately. Use the condenser to optimize light direction onto the specimen. The diaphragm regulates light intensity for better contrast. Adjust the fine focus knob for sharpness, particularly at high magnifications.
Microscope Maintenance and Care
Maintaining a microscope is critical for its longevity and accuracy. Proper care involves handling all microscope parts labeled with consideration and following established protocols for cleaning and storage.
Safeguarding the Instrument’s Components
To protect your microscope, handle each part with care. Always carry the microscope with both hands—one on the arm and the other supporting the base. Avoid touching the lenses with your fingers; use lens paper instead. After each use, cover the microscope with a dust cover to prevent accumulation of dirt.
Regular checks on mechanical parts ensure they move smoothly. If there’s resistance, consult the manufacturer’s guidelines or a professional before applying any lubricant. Make sure all the microscope parts labeled are intact and functional. Replace any that are worn or damaged promptly.
Cleaning and Storage Best Practices
Cleanliness is crucial for clear observations. Use lens cleaner and soft, lint-free cloths to wipe the lenses. For the body and stage, a damp cloth with mild detergent is sufficient. Do not use household glass cleaners on lenses, as they can damage anti-reflective coatings.
Store the microscope in a dry, cool place to avoid moisture and heat damage. If you plan to not use the microscope for a long period, remove any batteries to prevent corrosion. Ensure that the microscope parts labeled are stored according to the manual’s guidance, which will assist in maintaining the integrity of the instrument.