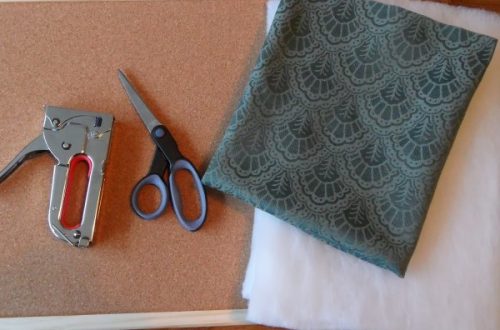
Choosing the Right Materials for Your White Scrapbook
Selecting the right materials is vital for a beautiful white scrapbook. The quality of materials affects both the aesthetic and durability of your project. Here are some helpful tips to guide you:
1. Opt for High-Quality Paper
Choose acid-free and lignin-free paper to avoid yellowing over time. Thick cardstock works well for durability and a professional look. For a purely white scrapbook, pick shades of white, cream, and off-white papers.
2. Consider Adhesives Carefully
Use photo-safe adhesives like double-sided tape or glue dots. Avoid liquid glue, as it can warp pages and damage photos. Look for archival-quality adhesive products.
3. Invest in a Sturdy Scrapbook Album
Select a binder or album with quality binding for long-term use. Flexible ring-bound or post-bound albums allow easy addition and rearrangement of pages.
4. Use Quality Cutting Tools
Get a sharp paper trimmer and scissors for precise cuts. Consider decorative edge scissors for creative borders that add charm.
5. Include Acid-Free Embellishments
Embellishments such as stickers, die-cuts, and ribbons should be acid-free. These keep your pages safe and prevent unwanted damage in the long run.
6. Explore Specialty Pens and Markers
Choose pens and markers that are archival-safe. Fine-tip markers are great for writing and precise doodling. White gel pens work beautifully for creating striking details on colored paper.
7. Keep Protective Sleeves
Use plastic page protectors to shield your finished pages from dust and damage. Ensure they are made of archival-safe materials to protect your efforts.
With the right materials, your white scrapbook can maintain its beauty and sentimental value for years to come. Pay attention to quality at every step to achieve remarkable results.
Designing a Theme for Your Scrapbook
A well-chosen theme brings your white scrapbook to life and gives it a unique character. It sets the tone, guiding your layout, color choices, and embellishments. To design an effective theme, here are some points to consider:
1. Choose a Central Idea
Pick a theme that resonates with your emotions or memories. It could be a wedding, travel, or family history. A clear central idea ties all elements together harmoniously.
2. Focus on Color Coordination
Use various shades of white to match your theme. Subtle hints of cream or pale gray can add depth. Avoid overpowering colors to maintain the scrapbook’s delicate aesthetic.
3. Use Consistent Elements
Stick to patterns, embellishments, or designs that align with your chosen theme. For instance, floral accents may complement a romantic theme, while geometric shapes suit modern designs.
4. Add Inspirational Quotes
Include meaningful quotes or phrases related to your theme. Handwrite them or use decorative stickers. This personal touch enhances emotional impact.
5. Match Fonts and Lettering
Create consistency with fonts and lettering styles that fit your theme. A cursive font works well for elegant themes, while block letters suit minimalist layouts.
6. Experiment with White Space
Use empty areas effectively to highlight your theme. Strategic white space directs attention to central elements and avoids clutter.
7. Include Personal Details
Incorporate dates, locations, or names into your theme. These details transform your scrapbook into a personal story.
8. Gather Inspirational Materials
Use magazines, photos, or items related to your theme for ideas. Build around these visual prompts to guide your design.
With a thoughtful and cohesive theme, your white scrapbook will become a cherished creation that reflects your intentions and imagination.
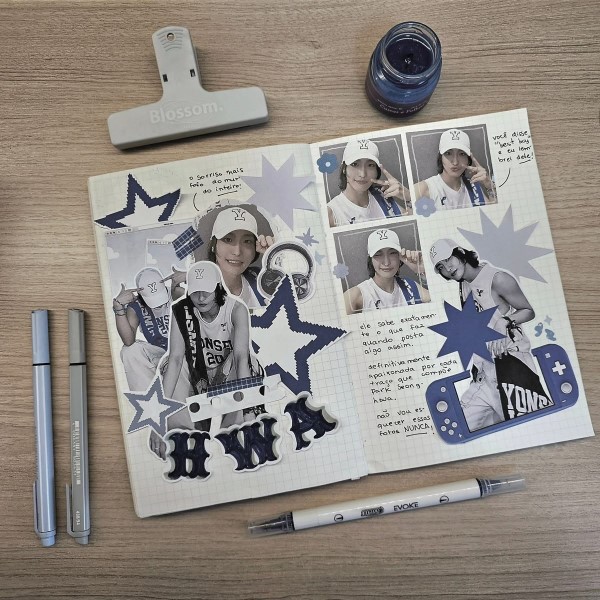
Unique Layout Ideas to Make Your Pages Stand Out
Creating unique layouts adds character to your white scrapbook. A creative approach can make every page memorable and visually engaging. Below are ideas to make your scrapbook layouts remarkable:
1. Try Asymmetrical Arrangements
Break away from traditional layouts. Arrange photos and elements in uneven patterns for dynamic pages.
2. Layer Elements Creatively
Experiment with layering. Place papers, stickers, and embellishments on top of each other for depth.
3. Use Grid and Geometric Patterns
Design your pages with grids or geometric shapes. They bring order and modern appeal.
4. Make Use of Interactive Features
Include pull-out tags and mini envelopes to add interactive elements. These surprises delight viewers.
5. Add Borders and Frames
Frame photos with decorative borders. Use cardstock or washi tape for contrast and charm.
6. Focus on Centerpiece Designs
Create a standout central image or quote. This grabs attention and anchors your layout.
7. Explore Freeform Designs
Allow elements to flow naturally across your page. It adds creativity and flexibility.
8. Mix Text and Images Thoughtfully
Combine handwritten text or printed captions with images. Balance these components for harmony.
9. Use White Space Strategically
Incorporate negative space to emphasize key features. It avoids clutter and enhances focus.
10. Experiment with Shape Cutouts
Cut papers or photos into shapes like circles, hearts, or stars. These add unique flair.
By exploring these layout ideas, your scrapbook will feel extraordinary and bespoke. Let creativity guide every design for impactful results.
Creative Ways to Use White Space Effectively
White space, often referred to as negative space, is an essential design element in a scrapbook. It helps balance the layout, highlight key features, and create a sense of elegance. Here are some creative ways to use white space effectively in your white scrapbook:
1. Highlight Key Elements
Leave ample white space around important photos or decorations. It draws attention to them naturally. Avoid overcrowding to maintain focus on the centerpiece.
2. Create Visual Separation
Use white space to separate different sections or themes. This helps in organizing the content. It also makes pages look clean and clutter-free.
3. Enhance Text Readability
Let white space surround quotes, captions, or text blocks. It improves readability and boosts aesthetic appeal. Minimalist designs thrive on this technique.
4. Balance Visual Elements
Ensure there’s enough empty space between photos and embellishments. This balance fosters harmony in the design. Overcrowded layouts can feel overwhelming.
5. Form Elegant Borders
Use white space to create natural borders around photos and text. This adds sophistication to your pages. Pair it with subtle embellishments for extra style.
6. Focus on Minimalist Designs
A minimalist approach with just one or two key features works wonderfully. Use surrounding white space as a frame for a clean, modern look.
7. Experiment with White Mats
Mat your photos and decorative elements with white borders. These enhance focus and fit your scrapbook’s theme. Layers of white can add depth without making the page busy.
8. Allow for Breathing Space
Give your pages room to “breathe” by leaving intentional gaps. This makes your scrapbook visually calming. It also allows for future additions.
Using white space effectively can elevate your scrapbook’s design. It adds elegance, readability, and balance. Embrace simplicity to enhance your creative masterpiece while staying true to your white scrapbook’s theme.
Adding Personal Touches with Handwriting and Drawings
Adding personal touches with handwriting and drawings makes your white scrapbook unique and heartfelt. These elements reflect your personality and creativity, turning the scrapbook into a valuable keepsake. Here are some ways to include handwritten and drawn details in your project:
1. Write Personal Notes or Stories
Dedicate space for handwritten notes about the memories in your scrapbook. Describe events behind the photos. Write from the heart to make your scrapbook authentic.
2. Include Captions for Photos
Add short captions under photos to describe the moment. It helps viewers connect with the story. Use neat handwriting or personalized lettering that fits your theme.
3. Use Decorative Borders or Patterns
Draw simple borders or patterns around pages. Use stencils or freehand designs for added creativity. These details can frame your photos or text beautifully.
4. Sketch Small Illustrations
Draw meaningful symbols or small objects related to your theme. For example, flowers for weddings or planes for travel. Use fine-tip markers for detailed designs.
5. Experiment with Calligraphy or Lettering
Practice elegant calligraphy or bold creative lettering for headings. They can make your text stand out. Different fonts personalize your scrapbook’s theme further.
6. Create Doodled Embellishments
Add playful doodles like stars, swirls, or hearts to decorate pages. Use them sparingly to enhance details without overwhelming the design.
7. Handwrite Quotes or Sayings
Incorporate meaningful quotes or song lyrics by hand. This gives authenticity to your theme.
8. Use Gel or Metallic Pens for Accents
Highlight your handwritten details or drawings with gel or metallic pens. They add subtle sparkle and elegance to your white scrapbook.
9. Add Interactive Handwritten Elements
Create pull-out tabs, flipcards, or hidden notes. Write messages or drawings on these for a fun surprise.
Through handwriting and drawings, your white scrapbook becomes uniquely yours. These elements bring life and authenticity to your precious memories.
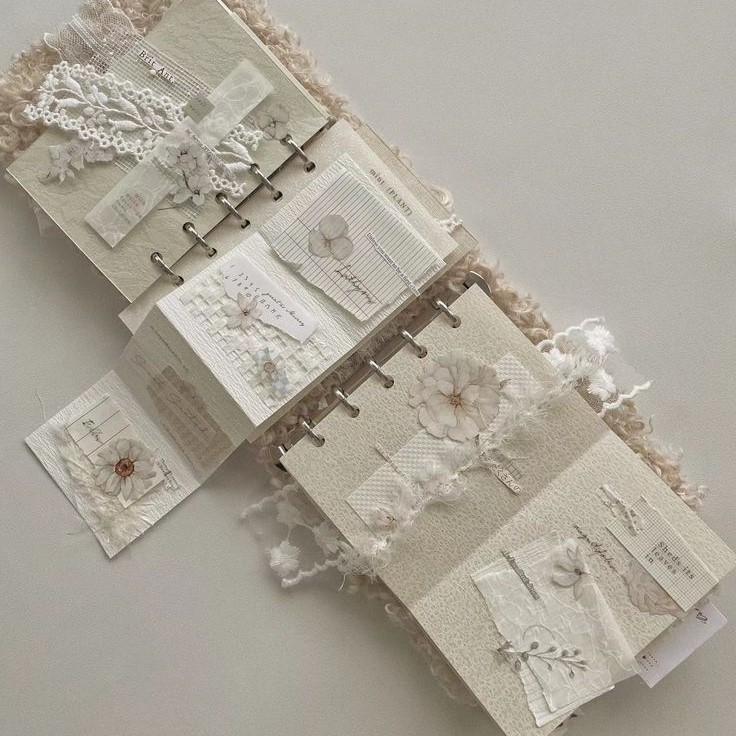
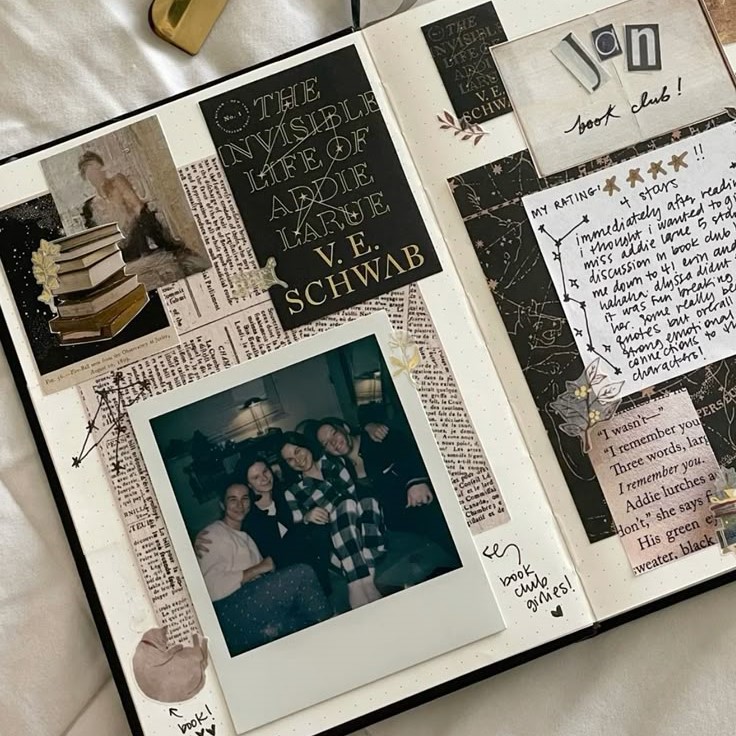
Incorporating Memorable Photos and Keepsakes
Adding photos and keepsakes to your white scrapbook makes it truly sentimental and unique. These items connect your memories and bring the theme to life. Here are some tips to incorporate them effectively:
1. Carefully Select Photos
Choose photos that match your scrapbook theme. Highlight special moments that evoke strong emotions. Print them in sizes that fit your layout, ensuring everything looks cohesive.
2. Use Unique Keepsakes
Include tickets, postcards, or small souvenirs related to the event or story. Flatten keepsakes, where possible, to keep pages smooth. If items are bulky, create pockets or compartments for storage.
3. Highlight Significant Items
Feature your most cherished photos or keepsakes as centerpieces. Use frames or mats to make them stand out. Keep surrounding elements simple to emphasize their importance.
4. Arrange Items Creatively
Layer photos and keepsakes for depth and texture. Combine elements in captivating patterns to enhance visual appeal. Play with symmetry or asymmetry based on your theme.
5. Protect Fragile Keepsakes
Add protective sleeves or covers to delicate items like dried flowers or old notes. This keeps them intact for years.
6. Add Captions and Stories
Write captions or short stories next to photos and keepsakes. Share details about the memory, adding a personal touch. Use neat handwriting or type them for a consistent look.
7. Incorporate Polaroids and Vintage Prints
Use Polaroid or vintage-style prints for added charm. These formats fit seamlessly into a white scrapbook’s aesthetic.
8. Create Interactive Features
Design pull-out tags or flip-ups with notes or photos. These features surprise viewers and make your scrapbook engaging.
9. Layer Keepsakes with Textures
Combine paper, fabric, or lace with your keepsakes for a sophisticated look. White layers blend beautifully and highlight your scrapbook’s theme.
10. Ensure Proper Placement
Place items strategically on pages to prevent overcrowding. Leave room for white space to keep the design balanced.
By thoughtfully incorporating memorable photos and keepsakes, you enhance your scrapbook’s emotional value. Every item tells a story, turning your white scrapbook into a cherished treasure.
Using Textures and Layering for a Stunning Look
Textures and layering add depth to your white scrapbook and enhance visual interest. Thoughtful use of these elements turns simple pages into artistic masterpieces. Combine different textures and layers to elevate your design.
1. Mix Paper Textures
Use textured cardstock, vellum, or handmade paper. Mixing these adds depth and variety. Choose subtle textures to complement your white scrapbook theme.
2. Utilize Fabric Details
Add lace, ribbon, or fabric swatches. White or cream-colored fabrics blend elegantly with the design. They introduce a tactile element that feels luxurious.
3. Experiment with Transparent Layers
Overlay translucent materials like vellum or clear acetate. These layers create soft contrasts and visual intrigue. Use them to highlight specific elements.
4. Include Natural Elements
Add dried flowers, pressed leaves, or twigs. These organic items bring texture and connect to memorable moments. Ensure proper preservation techniques to keep them intact.
5. Layer Decorative Embellishments
Stack stickers, die-cuts, or chipboard shapes. Layering embellishments enhances the page’s depth. Keep designs cohesive by sticking to your theme.
6. Play with Raised Features
Use foam dots or adhesive pads beneath embellishments. These add height, making pages look dimensional. Raised features make elements stand out beautifully.
7. Combine Matte and Glossy Finishes
Balance matte paper with glossy highlights. Use contrasting finishes sparingly for impact. Glossy textures work well with photos, enhancing their presentation.
8. Use Textured Backgrounds
Try embossed patterns or textured backdrops for an artistic touch. White, cream, or muted tones maintain the scrapbook’s subtle elegance.
9. Add Layered Frames
Frame photos, captions, or keepsakes with stacked layers. Try cardstock, fabric, or lace layers for added charm. Multiple borders elevate the focus on special elements.
10. Incorporate Multi-Layer Design
Layer different shapes, papers, or materials into one layout. This technique creates eye-catching complexity. Ensure harmony to avoid overwhelming the design.
Using textures and layering transforms your scrapbook pages into striking visuals. Experiment boldly while maintaining a balanced and cohesive theme.
Tips for Long-Lasting Preservation of Your Scrapbook
Preserving your white scrapbook ensures it remains a cherished keepsake for generations. Proper care extends its lifespan and maintains its beauty. Here are some essential tips for long-lasting preservation:
1. Store in a Cool, Dry Place
Keep your scrapbook in a place with stable temperature and low humidity. Avoid direct sunlight to prevent fading. High moisture levels can cause pages to warp or mold.
2. Use Archival-Safe Materials
Always choose acid-free and lignin-free materials. These prevent yellowing and deterioration over time. Protective sleeves made from polypropylene are ideal for protecting your pages.
3. Handle with Clean Hands
Wash your hands before touching your scrapbook. Oils and dirt can damage photos and pages. Alternatively, use cotton gloves for extra care.
4. Avoid Overloading Pages
Do not overcrowd your scrapbook pages. Bulky designs can strain the binding and lead to wear. Keep elements balanced and secure.
5. Protect Against Dust and Grime
Store the scrapbook in a dust-proof container or album box. This keeps dirt away from your delicate designs.
6. Inspect Regularly
Check your scrapbook for signs of damage every few months. This allows you to address fading, loose items, or other issues early.
7. Keep Away from High Heat
Avoid storing your scrapbook near heat sources like heaters or vents. Extreme heat can damage adhesives and warp materials.
8. Frame or Display Sparingly
If showcasing pages, use UV-resistant glass. Limit exposure to sunlight to prevent fading. Rotate displayed pages to minimize wear.
9. Avoid Using Metal Elements
Metal embellishments can rust over time, damaging your pages. Opt for safe, non-corrosive materials.
10. Create Digital Backups
Scan your pages to create digital copies. This ensures your memories are preserved even if the physical scrapbook sustains damage.
By following these tips, you can protect your white scrapbook’s sentimental value. Thoughtful preservation ensures it remains a lasting symbol of your creativity and memories.
Conclusion
In conclusion, white scrapbooking offers a beautiful way to document your memories. By utilizing creative ideas and the latest trends in scrapbooking, you can design a scrapbook that is not only aesthetically pleasing but also narratively compelling. Remember that each page is a reflection of your style and creativity. As you explore various techniques, themes, and layouts, embrace the journey of crafting your white scrapbook. By following the tips and ideas discussed in this article, you will surely create stunning projects that capture your cherished moments beautifully. Enjoy the experience of white scrapbooking as you bring your stories to life!