Introduction to Candle Wax Removal
Candle wax can bring a cozy atmosphere to any space, providing light and scent that many enjoy. However, accidents can happen, and when candle wax drips onto walls, it can create unsightly stains that are difficult to remove. Knowing how to remove candle wax from wall surfaces safely is essential for maintaining the beauty of your home. Thankfully, with the right tools and techniques, you can efficiently tackle this common issue without damaging your walls. In this comprehensive guide, we will explore effective methods for removing candle wax, offer helpful tips, and answer frequently asked questions related to wax stains on walls.
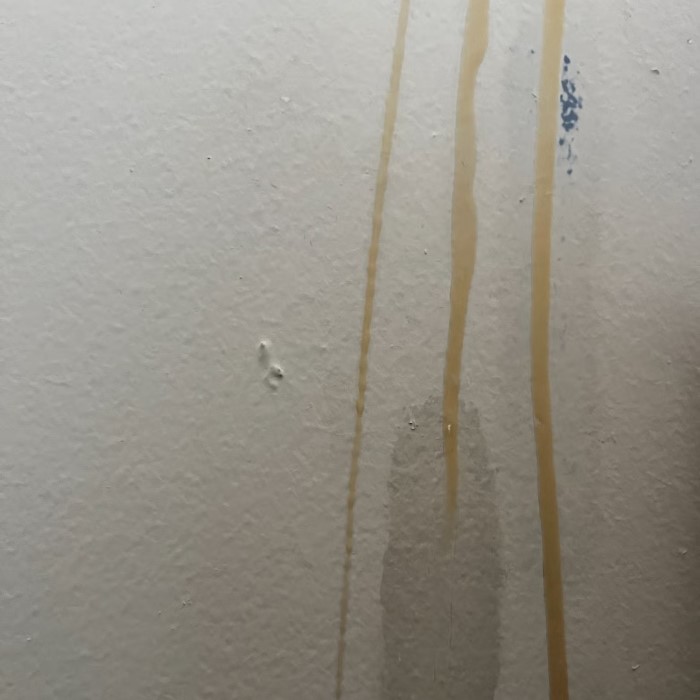
Why Candle Wax Stains Occur
Candle Usage and Placement
When candles burn, they melt and can drip onto various surfaces, including walls. Understanding why this happens can help prevent future issues.
- Incorrect Placement: Placing candles too close to walls or on unstable surfaces can increase the risk of wax dripping. Always choose stable surfaces and keep candles away from wall edges.
- Airflow Effects: Drafts from open windows or air conditioning often cause uneven melting. Candles can drip excessively under these conditions, leading to wax stains on nearby walls.
Types of Candles
The type of candle can influence how much wax drips and how easily it can be cleaned.
- Low-Quality Candles: Cheaper candles often contain fillers that lead to more mess when melted. Invest in higher-quality candles to minimize dripping.
- Multi-Layered Candles: Decorative candles with multiple layers of wax can drip in unexpected ways as they burn, complicating cleanup efforts.
Preparing to Remove Candle Wax
Prior to tackling candle wax stains, it’s crucial to prepare adequately. This preparation helps ensure a smooth and successful removal process.
Gather Your Supplies
Having the right supplies on hand makes a significant difference in the outcome of your cleaning efforts.
Plastic Scraper
- Choose a Soft Material: Opt for a plastic or silicone scraper to ensure that you don’t damage your walls while removing the wax. These materials are gentle enough to lift the wax without scratching the surface.
- Position the Scraper Correctly: Hold the scraper at a slight angle to the wall. This angle allows you to effectively wedge the scraper under the hardened wax, making it easier to lift.
- Apply Gentle Pressure: Start by applying light pressure as you work the scraper beneath the wax. Gradually increase the pressure if needed, but remain cautious to avoid damaging the wall surface.
- Scrape Away Carefully: Move the scraper in a smooth, controlled motion while lifting the wax away. Taking your time reduces the risk of creating additional marks or scratches on your wall.
Hair Dryer or Heat Gun
- Select the Right Tool: Use either a hair dryer or heat gun, depending on your preference and availability. Both tools can effectively warm the wax, making it easier to remove.
- Set the Appropriate Heat Level: On your hair dryer, select a low or medium heat setting to avoid overheating the wall. If using a heat gun, set it on low as well for controlled warmth.
- Maintain Distance: Hold the tool about 6 to 8 inches away from the wax. This distance helps to warm the wax gradually without risking damage to the wall or paint.
- Move Back and Forth: While applying heat, move the tool back and forth over the waxed area. This technique ensures even warming and prevents concentrated heat from damaging the wall.
Paper Towels or Soft Cloth
- Opt for Absorbent Materials: Choose thick paper towels or a soft cloth that can effectively soak up the softened wax. Absorbent materials are ideal as they can contain the mess and make cleanup easier.
- Prepare Multiple Towels or Cloths: Have several paper towels or cloths ready for use. You may need to switch out materials once they become saturated with wax, allowing for effective cleaning.
- Use a Dabbing Motion: When the wax softens, gently dab the area with your chosen material rather than rubbing. This technique helps lift the wax without pushing it further into the surface.
- Dispose of Soiled Materials: Properly dispose of the used paper towels or cloths after cleaning to prevent wax residue from spreading to other areas of your home.
Cleaning Solution
- Prepare a Mild Solution: Mix a small amount of mild dish soap with warm water in a bowl or spray bottle. Aim for a ratio of one tablespoon of soap per cup of water for effective cleaning.
- Consider Commercial Cleaners: If you prefer, opt for a commercial cleaner specifically designed for wax removal. Read labels to ensure compatibility with your wall finish.
- Test First on an Inconspicuous Area: Before applying any cleaner, do a patch test on a small, hidden area of your wall. This ensures the cleaner will not cause damage or discoloration.
- Apply the Cleaning Solution: Use a clean cloth or sponge to apply the solution to the area where wax was removed. Gently wipe the surface to eliminate any remaining wax residue or stains.
- Rinse with Clean Water: After cleaning, use a cloth dampened with clean water to rinse the area. This step removes any soap film and leaves the wall looking fresh and clean.
Choose the Right Time
Timing can be just as important as the techniques used for removal.
- Optimal Conditions: Remove wax when the room temperature is warm. Wax is easier to manage when it is soft and pliable.
- No Rush: Taking your time will yield the best results. Quick actions may lead to mistakes, like damaging the wall surface.
Step-by-Step: How to Remove Candle Wax from Wall
Allow the Wax to Harden
- Wait for Cooling: How to remove candle wax from wall? If the wax is still warm, give it some time to cool and harden. Hardening makes it easier to scrape without spreading.
- Inspect the Area: Take a moment to assess the extent of the wax stains. Knowing how severe the situation is helps gauge the effort required for cleaning.
Scrape Away the Hardened Wax
- Use a Plastic Scraper: With careful handling, begin scraping off the hardened wax using the plastic scraper. Apply gentle pressure to avoid damaging the paint underneath.
- Collect Debris: As you scrape away the wax, collect the debris on a paper towel or cloth. This prevents further mess and makes cleanup easier.
Apply Heat to Soften the Wax
- Opt for a Hair Dryer or Heat Gun: Set your hair dryer or heat gun to low or medium heat. Maintain a distance of several inches to avoid overheating the wall surface.
- Warm the Wax Every Few Inches: Direct the heat at the wax in small sections, allowing it to soften and become easier to wipe away. Monitor for overheating to prevent damage.
Wipe Away the Wax
- Absorb with Cloth or Paper Towel: Once the wax has softened, use a cloth or paper towel to gently blot it away. Dab rather than rub to prevent spreading the wax further.
- Repeat as Needed: If some residue remains, continue applying heat and blotting with a fresh paper towel until the wax is entirely gone.
Clean the Area
- Apply Cleaning Solution: After successfully removing the wax, mix a cleaning solution of mild dish soap and warm water or use a store-bought wax remover.
- Gentle Wipe with Soft Cloth: Damp a soft cloth with the solution and gently clean the area. This step helps to remove any lingering residue or stains, ensuring a complete clean.
How to Remove Candle Wax from Painted Walls
For those dealing with candle wax on painted walls, it is vital to take extra care to avoid damaging the paint.
Follow the Basic Removal Steps
- Use the same techniques as above, including scraping, applying heat, and blushing gently. However, be particularly cautious when applying demonstrations and selecting cleaners.
Test Cleaning Solutions
- Before applying any commercial cleaner directly onto painted walls, test it on a small, inconspicuous area to ensure compatibility with your wall paint.
Use Gentle Force
- Apply minimal pressure during all cleaning steps to prevent damaging the painted surface. Be patient and allow the tools to aid in the process rather than force them.
How to Remove Dried Candle Wax
When dealing with dried candle wax, some additional considerations may apply.
Hydrate with Heat
- Dried wax may require longer heating times to fully soften. Focus on using lower heat settings for gradual warming, which helps eliminate potential damage to the wall surface.
Target Specific Areas
- If the wax has dried substantially, concentrate on individual sections. Heating and removing one small area at a time can yield more satisfactory results.
FAQ About Candle Wax Removal
How do you get candle wax off painted walls?
Begin by gently scraping off the hardened wax with a plastic scraper. Use a hair dryer to soften any remaining wax, and then blot with a cloth. Always test cleaning solutions first on unseen parts of the wall.
How to remove dried candle wax?
For dried candle wax, apply heat first to soften it. Once warmed, scrape it gently with a scraper, and use a cloth to absorb any residual wax. You may need to apply cleaning solutions afterward to clean up any remaining residue.
How to remove wax without damaging paint?
To avoid damaging the paint, use a plastic scraper instead of a metal one and apply heat carefully. Always make sure to test out any cleaning solution on an inconspicuous spot before applying it widely.
What cleaner dissolves candle wax?
Mild detergent mixed with warm water effectively dissolves candle wax residue. Alternatively, you can purchase commercial wax removers that are specifically formulated for this purpose. Ensure the products are safe for your wall surfaces.
Conclusion: Transform Your Walls with Effective Wax Removal
Removing candle wax from walls may seem daunting, but understanding how to remove candle wax from wall surfaces can help restore your living space efficiently. Utilizing the right techniques, tools, and a bit of patience allows you to tackle wax stains and maintain the beauty of your home.
By following the detailed steps outlined in this guide, you can achieve a pristine and wax-free wall, enhancing your space’s aesthetics. Enjoy your next candle-lit evening with confidence, knowing you have the knowledge to quickly address any accidental spills or stains in the future. Keep this guide handy for future reference and ensure your walls stay beautiful and clean, regardless of the occasional mishap!
