
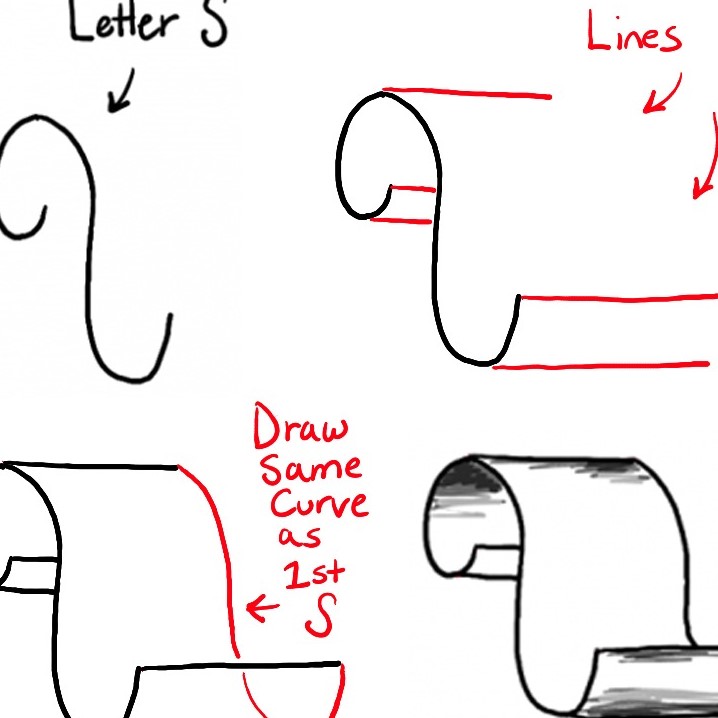
Introduction
When it comes to expressing yourself artistically, few methods are as accessible and rewarding as paper drawing. Whether you are a complete novice or someone looking to refresh your skills, drawing can be both fun and therapeutic. This guide covers various fun paper drawing techniques for beginners, ensuring that you find inspiration and direction. From basic methods to exciting styles, there’s something for everyone to explore and enjoy. Let’s dive in!
![]()
Understanding the Basics of Paper Drawing
Before embarking on your artistic journey, grasping the fundamentals of paper drawing is essential. The right techniques can dramatically enhance your ability to express ideas visually.
Essential Tools and Materials for Paper Drawing
To start paper drawing, having the right tools is important. Good materials will improve your results and make drawing more enjoyable. Beginners should focus on selecting quality items without overspending.
Choosing the Right Paper for Drawing
Paper is the foundation of your artwork. Not all paper is suited for drawing. For pencil drawing, smooth paper works well for fine lines. Textured paper is best for shading and blending. Sketch pads are lightweight but suitable for beginners. Heavier watercolor paper is better for mixed media usage. Always choose paper that can handle your chosen techniques.
Types of Pencils and Their Uses
Pencils come in various grades, each serving a unique purpose. Hard pencils like H are suited for precise lines and light shading. Soft pencils like B create darker marks and blend well. A simple HB pencil is versatile for starting out. Mechanical pencils provide consistent lines but limit shading techniques. Invest in a value pack with multiple grades for versatility.
Erasers, Blending Tools, and Other Accessories
Erasers are essential for corrections and highlights. Kneaded erasers work for soft adjustments and shading. Regular rubber erasers are ideal for clean removals. Blending tools like tortillons or blending stumps smooth out strokes and create gradients. Invest in a ruler to maintain proportions and a sharpener for pencil care. Accessories like fixative spray preserve your finished drawings and prevent smudges.
Basic Drawing Techniques for Beginners
Learning basic drawing techniques builds a foundation for advanced skills. Beginners should focus on precision, control, and creativity.
Holding the Pencil Correctly
Holding your pencil properly affects your control and style. Use a firm but relaxed grip. Experiment with gripping close to the tip for detailed work. Hold further back for lighter strokes or shading. Angle your pencil to suit your desired stroke, whether thin lines or broad shading. Proper positioning prevents hand strain and improves accuracy.
Mastering Lines and Strokes
Lines and strokes are essential building blocks of drawings. Start with straight lines and curves. Vary pressure to control line thickness and darkness. Practice hatching and cross-hatching to build texture. Circular strokes are helpful for shading and blending. Smooth, controlled motions improve your confidence and precision over time.
Understanding Shading and Textures
The Importance of Shading:
Shading is a crucial element in art that adds depth and dimension to your work. It transforms flat images into three-dimensional forms, bringing your subjects to life.
Understanding Light and Shadow:
Begin by familiarizing yourself with the concepts of light and shadow. Consider how light interacts with objects and creates areas of illumination and darkness. This understanding is fundamental to effective shading.
Using Gradients:
Incorporate smooth gradients into your shading to create soft transitions between light and dark areas. Smooth gradients can add realism to your artwork. Conversely, use hard edges when you want to depict bold shadows that create striking contrasts.
Experimenting with Pencil Grades:
Experiment with various pencil grades to achieve different shading effects. Softer pencils (like 2B or 4B) produce darker marks and are great for creating rich shadows, while harder pencils (like H or 2H) yield lighter, finer lines that can be used for delicate highlights.
Observing Textures:
Textures, such as wood grain or fur, require careful observation. Take the time to study the surface characteristics of the materials you want to replicate in your artwork. Notice the details that make each texture unique.
Methodical Strokes:
Apply methodical strokes when illustrating textures. The direction and speed of your strokes can significantly affect the final look. For example, downward strokes may mimic a fur texture, while cross-hatching can create the illusion of wood grain.
Blending Techniques:
Learn how to blend tones effectively using tools like blending stumps or tissues. Blending helps to smooth out harsh lines and create a more cohesive look to your shaded areas. This technique enhances realism and softness in your artwork.
Practice and Patience:
Shading and texturing require practice and patience. Don’t be discouraged if your first attempts don’t turn out as expected. Continuously refining your skills and techniques will lead to improvement over time.
Study from Life:
When possible, practice shading and texturing from life. Set up still-life compositions or observe real objects to better understand how light and texture interact in the real world, which will enhance your artistic abilities.
Seeking Feedback:
Finally, don’t hesitate to seek constructive feedback from fellow artists or instructors. Their insights can provide valuable perspectives on your shading and texturing techniques, helping you to grow and improve as an artist.
Step-by-Step Guide to Start Drawing
Starting with a step-by-step approach makes paper drawing easier for beginners. Build confidence by focusing on small tasks before advancing.
Practicing Simple Shapes
Begin with basic shapes like circles, squares, and triangles. Practice drawing multiple copies of each. Pay attention to symmetry and proportions. Focus on clean lines and avoid erasing too much. Gradually experiment with combining shapes to form objects or patterns.
Creating Contour Drawings
Learn contour drawing to outline objects. Observe and trace the outer edges carefully. Use a light pencil stroke to define the shape without focusing on details. Practice contour drawing by studying simple objects like fruits or cups. This step improves observation and forms the basis for detailed sketches.
Adding Depth with Shading and Highlights
Add depth by incorporating shading and highlights. Identify the light source in your drawing. Use darker pencil strokes for shadows and lighter strokes for highlights. Blend pencil marks smoothly using blending tools or tissue paper. Gradually build layers for a realistic effect. This step enhances the three-dimensional aspect of your drawing.
Common Mistakes Beginners Should Avoid
When starting paper drawing, it’s common to make mistakes. Recognizing these early helps you improve faster.
Overworking the Paper
Overworking the paper happens when you go over the same area too many times. This can damage the paper surface, causing it to tear or lose texture. Avoid erasing excessively or layering too heavily in one spot. Use light strokes initially and gradually build layers. If you need corrections, do so gently.
Improper Proportions and Perspectives
Getting proportions and perspectives wrong can distort your drawing. Always plan your composition before starting. Use basic shapes to outline objects. A ruler or grid can help maintain accurate proportions. Observe your subject closely to ensure correct angles and dimensions. Practice perspective techniques, like vanishing points, to make drawings look realistic.
Using Too Much Pressure While Drawing
Pressing too hard can create unwanted indentations in the paper. This makes shading and blending difficult. Start with light strokes and increase pressure gradually for darker lines. Use softer pencils, like B grades, for dark tones instead of pressing harder. Always handle your tools gently to keep the paper smooth.
Tips to Improve Your Drawing Skills
Improving paper drawing skills takes practice and the right techniques. Focus on consistency and creativity.
Regular Practice and Maintaining a Sketchbook
Regular practice builds confidence and refines skills. Dedicate time daily or weekly to draw. Use a sketchbook to track progress and try new ideas. Experiment with different techniques and subjects to enhance creativity. Sketching regularly improves precision and understanding of various styles.
Observing Real-Life Objects and Sketching
Observation is key for realistic drawings. Study your surroundings or objects closely. Notice details like shape, texture, and shadows. Sketch regularly from life instead of copying photos. Practice drawing everyday items such as fruits, furniture, or landscapes. This step improves perception and adds authenticity.
Learning from Tutorials and Art Classes
Tutorials provide detailed guidance for techniques and styles. Find online videos or books specific to paper drawing. Art classes offer interactive learning with professional feedback. Learning from others helps correct mistakes and understand advanced skills. Apply concepts taught in tutorials or classes to your practice.
Exploring Various Drawing Styles and Techniques
Experimenting with diverse drawing styles sharpens skills and nurtures creativity. Each style offers unique possibilities.
Realistic Drawing Techniques
Realistic drawing focuses on lifelike details and accuracy. Study proportions, light, and shadow carefully. Use fine pencil grades for delicate textures. Blend tones smoothly to create depth. Practice observing real objects or photos. Study anatomy, perspective, and reflection for accuracy. Layer shading to build realistic effects. Patience and observation are crucial for mastering this style.
Abstract and Expressive Styles
Abstract drawing prioritizes emotions and ideas over realism. Use bold lines, shapes, and colors freely. Break traditional rules to explore creativity. Try spontaneous strokes to express feelings. Combine textures and patterns for visual interest. Focus on the message or emotion rather than details. This style allows experimentation and personal interpretation.
Experimenting with Mixed Media
What is Mixed Media?
- Mixed media is an artistic technique that involves combining different materials and mediums within a single artwork. This approach allows for a diverse range of textures, colors, and effects that traditional methods may not achieve. By blending mediums like drawing tools, paints, and even found objects, artists can create exciting and unique compositions.
Combining Traditional Drawing Tools
- Pencils and Ink: Start by using pencils for the initial sketching phase, allowing you to define shapes and forms. Afterward, enhance the drawing with ink to add depth and contrast. Inking can bring clarity and boldness to your work, making the overall piece more dynamic.
- Charcoal and Markers: Charcoal provides rich, dark lines and can create dramatic effects when blended with markers. Use charcoal for the main forms and markers for brighter colors or sharper details. This combination can create visually striking contrasts.
Choosing the Right Paper
- Watercolor Paper: When combining wet and dry media, it’s essential to use durable paper. Watercolor paper is an excellent choice due to its thickness and ability to withstand moisture without warping or tearing. This durability allows you to layer various mediums without compromising the integrity of the artwork.
- Experiment with Textured Papers: In addition to watercolor paper, consider using textured papers to add extra dimension. Textured surfaces can enhance the effects of your mixed media, giving your artwork a unique character.
Layering Techniques
- Building Layers: Begin by applying a base layer with one medium, then allow it to dry completely before adding subsequent layers with other materials. Layering can enhance depth and bring complexity to your artworks. For instance, starting with a watercolor wash followed by pencil illustrations can yield stunning results.
- Creating Textures: Utilize techniques such as sponging, dripping, or scraping to develop interesting textures. Combining these various methods within a single artwork can lead to unexpected yet harmonious outcomes.
Incorporating Collage and Unconventional Materials
- Collage Elements: Integrating collage into your mixed media can significantly expand your creative possibilities. Use magazine clippings, photographs, or fabric pieces to add new visual elements. These additions can tell a story or evoke emotions that support your main theme.
- Unconventional Mediums: Don’t shy away from applying unconventional materials like pastels or acrylic paints. Combining these with traditional drawing techniques enriches your work. Pastels can provide vibrant colors, while acrylics can add a glossy finish or texture.
Embracing Creativity and Experimentation
- Explore Your Imagination: Mixed media encourages artists to think outside the box. Embrace experimentation by trying out different combinations of materials, styles, and techniques. There are no strict rules in mixed media; allowing your intuition to guide you can lead to stunning and unique results.
- Recording Your Process: Document your experiments to keep track of what materials and combinations work well together. This practice can serve as a reference for future projects or ideas.
Limitless Artistic Possibilities
- Mixed media offers a world of opportunities for creative expression. Each layer, material, and texture you introduce can produce entirely different results, making the possibilities endless. Engaging with mixed media allows you to push the boundaries of your artistic practice and discover new ways of communicating your ideas visually.
Preserving and Displaying Your Artwork
Taking care of your artwork ensures it lasts for years. Proper preservation also enhances its appearance. Displaying your work thoughtfully showcases your talent and keeps it safe from damage.
Fixatives and Protecting Your Drawings
Fixatives help prevent smudging and preserve pencil drawings. Spray fixative lightly over the finished piece. Use in a well-ventilated area to avoid inhaling fumes. Choose workable fixatives for layering and permanent ones for finalizing. Avoid touching the artwork directly after applying fixatives. Test the spray on a small section first to prevent damage.
Framing and Presenting Your Work
Framing protects your art and elevates its presentation. Use acid-free mats to prevent discoloration. Ensure the frame size matches your artwork. Glass or acrylic covers shield your drawing from dust and moisture. Hang your work in areas with minimal sunlight to avoid fading. Position frames securely to prevent accidents. For added flair, choose frames that complement your art style.
Storing Drawings Properly for Longevity
Store drawings in a cool, dry place away from sunlight. Place sheets of non-acidic paper between drawings to prevent smudging. Use portfolios, folders, or drawers for safe storage. Avoid rolling artwork as it might cause creases. Keep humidity levels low to prevent damage to the paper. Periodically check stored drawings to ensure they remain in good condition.
Conclusion: Embrace Your Artistic Journey
In closing, exploring paper drawing through fun techniques can ignite your passion for art. As you practice and experiment with different methods, remember to enjoy the process. The skills you develop will build over time, leading to personal growth and artistic expression. Whether through doodles, contour sketches, or vibrant illustrations, there’s no wrong way to create. So grab your materials, unleash your imagination, and enjoy the wonderful world of drawing!


