Introduction to the Bunsen Burner
The Bunsen burner is an essential tool in science labs. It provides a controlled flame for various experiments. The bunsen burner diagram is known for its reliability and simplicity.
History and Development of the Bunsen Burner
The Bunsen burner was invented in 1855 by Robert Bunsen and Peter Desaga. Their goal was to create a safer and more efficient heating tool. Bunsen needed this tool for his chemical research. Desaga designed the barrel to mix gas and air evenly. Their innovation became a significant milestone in heat-based experiments.
Since its invention, the design has remained mostly unchanged. Minor updates have made the burner safer and easier to use. Today, labs worldwide rely on the Bunsen burner.
Importance in Scientific Applications
The Bunsen burner plays a vital role in many scientific processes. It provides a controlled heat source for experiments. Scientists use it for sterilization, combustion studies, and flame tests.
This tool helps researchers achieve accurate results. The adjustable flame provides flexibility for delicate procedures. Safety features ensure secure usage even in complex experiments.
Without the Bunsen burner, many chemical and biological studies would be more difficult. Its contribution to science and education remains significant.
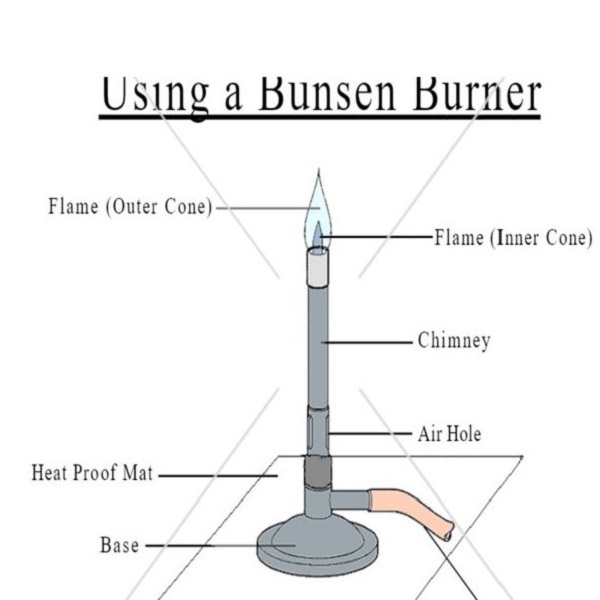
Key Components of a Bunsen Burner
Understanding the key components of a Bunsen burner is essential for safe and efficient use. The burner is made up of several parts that work together. Each component plays a unique role in the system’s operation. Below, we break down these parts and their functions.
Base and Gas Inlet
The base is the foundation of the Bunsen burner. It provides stability during use. It ensures the burner stays upright and secure on lab surfaces. The gas inlet connects the burner to a gas source. It supplies the fuel needed to create a flame. The connection must always be tight to prevent leaks.
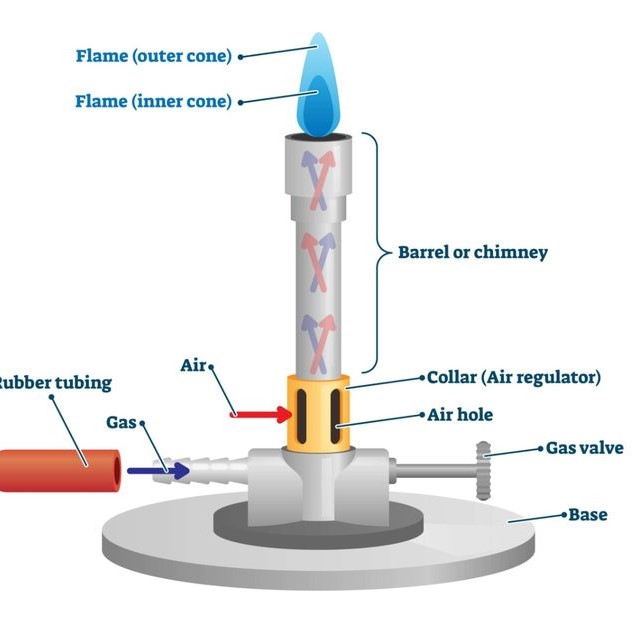
Barrel and Air Holes
The barrel is the vertical tube at the center of the burner. It directs gas upward for ignition. Air holes are located near the base of the barrel. These holes allow air to mix with the gas. This mix is critical for proper combustion. Adjusting the air flow controls flame characteristics, such as color and heat.
Collar and Its Function
The collar surrounds the barrel and adjusts the size of the air holes. Turning the collar opens or closes these holes. This regulates the amount of air mixing with the gas. More air creates a hotter, blue flame. Less air results in a cooler, yellow flame. The collar is an important feature for controlling the flame type during experiments.
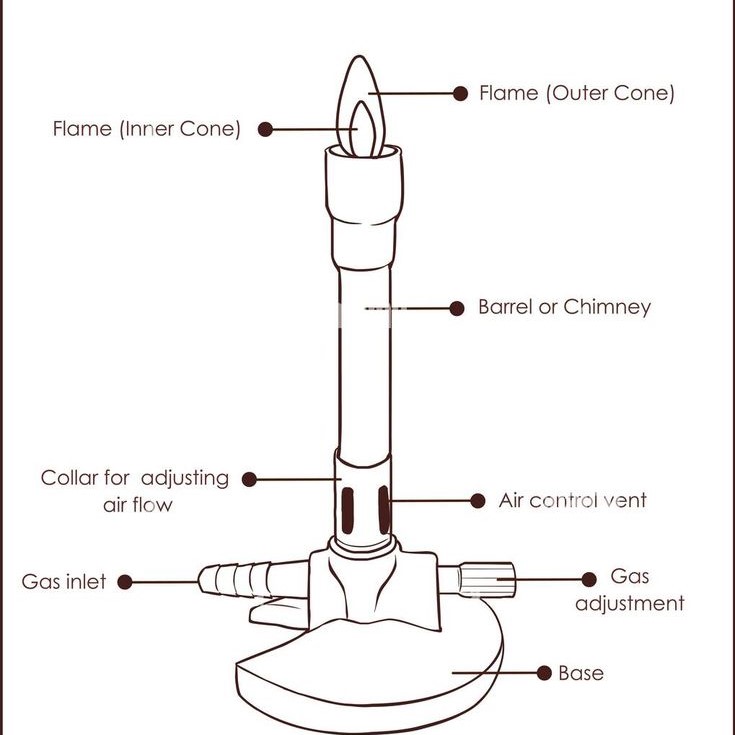
The Bunsen Burner Diagram Explained
The Bunsen burner diagram provides a visual guide to understand its structure and operation. It helps users identify parts and comprehend how the burner functions. Examining the diagram is crucial for safe and effective usage during experiments.
Overview of the Diagram
The diagram shows all components of a Bunsen burner with simple labels and connections. It includes the base, gas inlet, barrel, air holes, collar, and flame area. Each part is clearly illustrated to make it easy to recognize and understand. The diagram also highlights the path of gas and air flow within the burner.
Labeling Key Parts
Every part of the bunsen burner diagram needs accurate labeling for clarity. The base is usually shown at the bottom, ensuring stability. The gas inlet connects to the base and supplies gas to the burner. The barrel is displayed as a vertical tube, where the gas travels upward. Air holes near the base are marked to show their critical role in mixing air and gas. The collar surrounding the barrel is labeled to indicate its importance in airflow adjustments.
Understanding the Flow of Gas and Air
The Bunsen burner works by mixing gas and air for combustion. The bunsen burner diagram explains the flow of gas from the inlet to the barrel. It shows how air enters through holes near the base. The mixing process happens within the barrel, leading to the formation of a flame. The diagram also illustrates how adjusting the collar controls the air-to-gas ratio, which changes the flame type. Understanding this process ensures safe handling and optimal usage.
How a Bunsen Burner Works
The Bunsen burner operates based on simple mechanical and chemical principles. Understanding its function is key for performing safe and effective experiments.
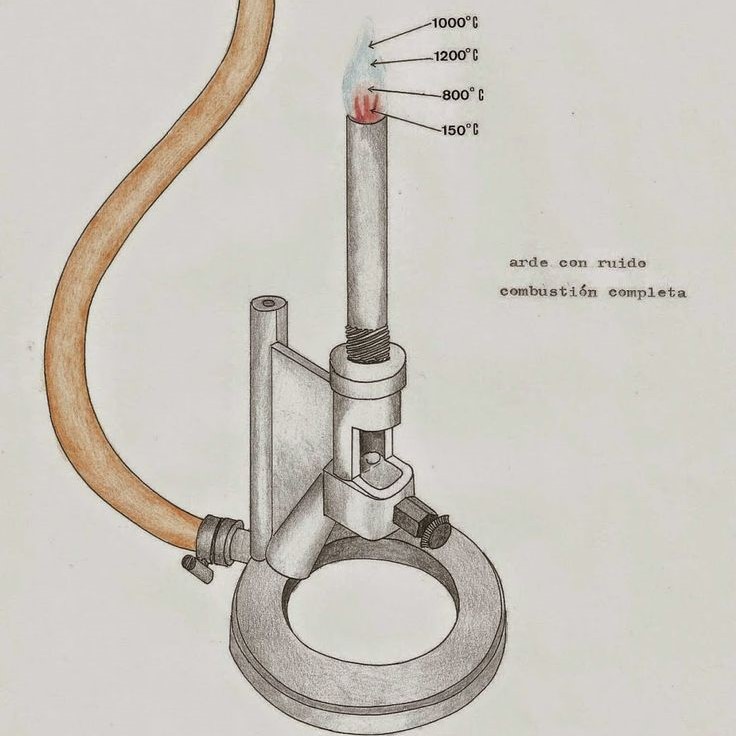
The Principles of Combustion
Combustion occurs when fuel reacts with oxygen and generates heat and light. In a Bunsen burner, gas serves as the fuel, while air provides oxygen. The barrel mixes the gas with air to ensure proper combustion. Adjusting the air intake controls the efficiency of the burn. A good mix creates a steady and controllable flame.
Adjusting the Air Supply for Different Flames
The flame type depends on the air-to-gas ratio. The collar controls this ratio by adjusting air holes. More air results in a blue flame, which is hotter and cleaner. Less air creates a yellow flame, which is cooler but produces more soot. Scientists adjust the collar for specific experimental needs.
Safety Mechanisms in Design
The Bunsen burner includes features that prioritize safety during use. The weighted base prevents tipping over. Tight connections at the gas inlet stop leaks. The adjustable collar allows safe flame management, reducing risks of overheating. These mechanisms make it suitable for controlled lab conditions.
Types of Flames Produced by a Bunsen Burner
A Bunsen burner produces different flame types by adjusting the air-to-gas ratio. These flames vary in color and temperature. Understanding these variations is essential for choosing the right flame for experiments.
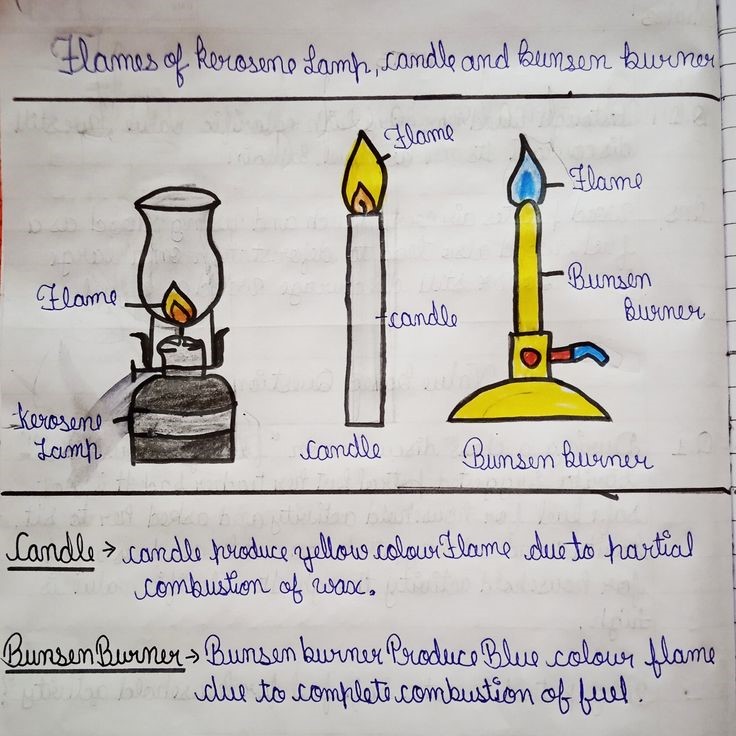
Yellow (Safety) Flame
The yellow flame, also known as the safety flame, is produced when the air holes are fully closed. This flame results from incomplete combustion. It is cooler and produces visible soot. The yellow flame is ideal for situations where a visible flame is needed. It is often used during burner setup or when not actively heating.
Blue Flame and Its Applications
The blue flame is produced by opening the air holes slightly. This ensures a better air-gas mix. It burns hotter and is smokeless compared to the yellow flame. The blue flame use in labs for heating, sterilization, and slow combustion. Its controlled nature makes it safer for delicate operations.
Roaring Blue Flame and Its Uses
The roaring blue flame is produced when the air holes are fully open. This allows maximum oxygen to mix with the gas. It is the hottest and most efficient flame type. This flame is suited for high-temperature applications like combustion studies or strong heat requirements. The distinct sound and intense blue color distinguish it from other flames.
Common Uses of Bunsen Burners in Labs
Bunsen burners are versatile tools in laboratories. They perform multiple functions in scientific experiments and procedures. Their adjustable flames make them suitable for various applications.
Heating and Sterilization
Bunsen burners are effective for heating substances. Scientists use them to boil liquids or melt solids. The blue flame provides consistent heat for precise temperature control.
Sterilization is another key application. Tools like inoculation loops are sterilized using the burner. The intense heat kills bacteria, ensuring contamination-free experiments.
Combustion and Chemical Reaction Studies
Chemists conduct combustion studies with Bunsen burners. This involves burning substances to study their properties. The roaring blue flame provides the heat needed for such reactions.
Chemical reaction experiments often rely on burners. They provide the energy for reactions requiring heat. Reliable flames ensure accurate results during these procedures.
Flame Tests for Metal Ions
Flame tests use a Bunsen burner to identify metal ions in compounds. Different elements produce distinct flame colors. These colors help scientists determine the presence of specific metals.
The burner’s controlled flame ensures clear observations during this test.
Safety Precautions When Using a Bunsen Burner
Safety is critical when using a Bunsen burner. Proper precautions ensure efficient and secure operations.
Proper Setup and Inspection
- Place the burner on a flat, stable surface. Ensure it’s away from flammable items.
- Check all connections before starting. Tighten the gas inlet to prevent leaks.
- Inspect the burner for damage. Ensure the barrel, air holes, and collar are clean and functional.
- Keep a fire extinguisher or safety blanket nearby. Always prepare for emergencies.
Handling Procedures During Operation
- Light the burner with a spark lighter, not matches, for better safety.
- Adjust the collar to control the flame. Start with the air holes closed, then open gradually.
- Avoid leaving the flame unattended. Always monitor it during experiments.
- Wear safety goggles and heat-resistant gloves. Protect yourself from accidental splashes or burns.
- Turn off the gas supply when done. Let the burner cool before moving or cleaning it.
Dealing with Emergencies and Hazards
- If the flame goes out, turn off the gas immediately. Relight only after clearing the gas area.
- For gas leaks, shut off the main supply and ventilate the room. Avoid using open flames.
- Treat minor burns immediately with cold water. Seek medical help for serious injuries.
- In case of fire, use a fire extinguisher or safety blanket. Alert others and evacuate if needed.
By following these precautions, you can minimize risks and use the Bunsen burner safely.
Troubleshooting Common Issues
Even with its simplicity, the Bunsen burner may face occasional issues. Addressing these problems ensures safe and efficient operation. Below are common challenges and their solutions.
Uneven Flame Issues
An uneven flame can disrupt experiments. This problem often arises from improper air or gas flow.
- Check the Air Holes: Make sure the air holes are not blocked. Clean them if necessary.
- Inspect the Collar: Ensure the collar is properly aligned. Adjust it for a balanced air-to-gas ratio.
- Secure Connections: Check the gas inlet connection. Tighten it to avoid leaks affecting the flame.
- Examine the Burner Barrel: Dirt or residue in the barrel can cause uneven flames. Clean it thoroughly using a brush.
Gas Flow Concerns
Gas flow issues can prevent the burner from producing a steady flame. These are often caused by blockages or leaks.
Inspect the Gas Hose
- Check for Kinks: Begin by examining the gas hose for any kinks or bends. Kinks can restrict gas flow, impacting the performance of the Bunsen burner or other gas-powered equipment. A thorough inspection should be done periodically to ensure that the hose is in good condition.
- Look for Holes or Damages: Inspect the entire length of the gas hose for any visible holes, cracks, or signs of wear. Damage to the hose can lead to gas leaks, which pose significant safety risks.
- Immediate Replacement: If the gas hose is found to be damaged in any way, it should be replaced immediately. Continuing to use damaged equipment can result in accidents, including fire hazards and gas exposure. Always have spare hoses available for such emergencies.
Tighten the Gas Inlet
- Monitor Connections: Loosely connected gas inlets are a common issue that can lead to inefficient gas supply. It’s crucial to regularly check all connections to ensure they are secure.
- Secure Attachment: When inspecting the gas inlet, ensure that it is tightly attached to the gas source. This prevents leaks and ensures that the gas flows properly into the Bunsen burner or the appliance in use.
- Regular Maintenance Checks: Make tightening the gas inlet part of your routine maintenance checks. A simple twist or turn can significantly improve gas supply and avoid disruptions during experiments.
Test the Gas Source
- Verify Gas Flow: After ensuring that all connections are secure, it’s important to test the gas source. This involves checking that gas is flowing properly to the burner or apparatus. The most common method is to attempt ignition in a controlled manner.
- Identify Issues: If you notice that the gas is not flowing as expected (for instance, no sound of gas escaping or inability to light the burner), identify the issue immediately. Look for any obstructions or further connection problems that might hinder proper flow.
- Report Problems: If any issues arise with the gas supply, report them promptly to lab staff or maintenance personnel. It’s critical to address gas supply problems quickly to ensure a safe working environment and prevent potential hazards.
Avoid Over-Tightening Valves
- Gentle Adjustments: When dealing with gas valves, it’s essential to open or close them gently. Over-tightening can restrict the flow of gas, leading to less effective performance of the equipment.
- Optimize Flow: Properly adjusted valves ensure a smooth flow of gas, which is crucial for maintaining consistent flame levels and achieving desired experimental results. Finding a balance in adjustment is key to effective operation.
- Regular Checks: Make it a habit to check the valves regularly. This practice will help you notice any adjustments needed before they lead to issues with gas supply and equipment performance.
Cleaning and Maintenance Tips
Regular cleaning and maintenance extend the life of the Bunsen burner. They also prevent potential issues.
- Clean After Each Use: Remove soot and debris from the barrel and air holes.
- Inspect Components: Regularly check the collar, air holes, and barrel for damage or wear.
- Store Properly: Keep the burner in a dry, safe place. Avoid exposure to chemicals or moisture.
- Schedule Professional Checks: Periodically have the burner inspected by a professional for hidden damages.
By addressing these common issues and adopting routine maintenance, you can ensure the bunsen burner diagram remains reliable and safe for use.


