Preparing Your Drawing Tools and Workspace
To create stunning pencil horse drawing, preparation is crucial. Setting up the right tools and workspace lays the foundation for your artwork. Let’s explore the essentials to get started.
Choosing the Right Pencil Types
Choosing the ideal pencils greatly affects your drawing precision. Use different pencils for varying tones and textures. For light sketches, opt for H-grade pencils. For darker, bold strokes, use B-grade pencils. Consider mechanical pencils for consistent lines and finer details.
Invest in quality erasers, too. A kneaded eraser is great for soft corrections, while precision erasers work for detailed areas.
Setting Up an Ergonomic Workspace
An ergonomic workspace boosts focus and comfort during drawing sessions. Choose a sturdy desk with ample space for materials. Make sure your chair supports proper posture.
Ensure lighting is balanced and adequate. Natural daylight is ideal, but adjustable lamps work well too. Organize your tools for easy access. Keep pencil sharpeners, erasers, and reference images close by.
A clean and clutter-free workspace minimizes distractions, ensuring smooth and enjoyable drawing processes.
Understanding Horse Anatomy for Accurate Illustrations
Learning horse anatomy is key to creating realistic pencil horse drawings. Knowing proportions and features helps artists depict horses accurately.
Study Proportions and Key Features
Focus on understanding the horse’s body proportions. Start by examining the balance between the head, neck, torso, and legs. The legs should feel sturdy and well-grounded. Study how the front and back legs differ in movement and structure.
Pay attention to joints like the knees and hocks. Observe the curvature of the neck, as it adds elegance to the drawing. Familiarize yourself with the horse’s head features, including the eyes, ears, and muzzle. Notice the prominent muscles and skeletal structures, especially in athletic breeds.
Use reference images or anatomy guides to sharpen your knowledge. The better you understand these features, the more accurate your drawings will be.
Common Mistakes in Horse Anatomy and How to Avoid Them
Many artists make mistakes when drawing horse anatomy. Misaligned proportions are a common error. Avoid drawing legs too short or bodies too long. Use guidelines to check proportions early.
Another mistake is ignoring muscle details. Horses have powerful muscles that influence their appearance. Use shading techniques to highlight these muscles, but avoid exaggerating them.
Pay attention to the spacing and angles of features like the eyes and ears. Those details align closely with realism. In dynamic poses, mistakes in limb angles can make horses look stiff. Study how horses move to capture fluidity.
Practice regularly and use critiques to refine your skills. Correcting these errors will make your pencil horse drawings lifelike and professional.
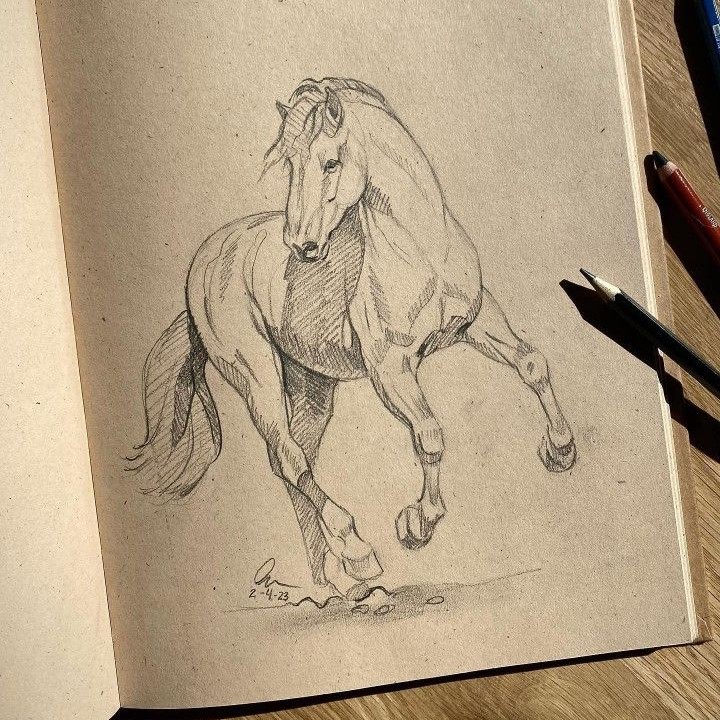
Sketching the Basic Outline of a Horse
Creating a strong foundation is vital in pencil horse drawing. Start by sketching a basic outline to capture the horse’s shape and posture. Breaking down the process into simple steps helps ensure accuracy and clarity in your artwork.
Using Light Strokes to Define Shapes
Begin by lightly sketching the horse’s basic forms using simple geometric shapes. These include circles for joints, ovals for the torso, and rectangles for the head. Keep your strokes soft and gentle to make them easy to adjust.
Avoid pressing too hard on the pencil during this stage. Light strokes help you erase and refine the drawing smoothly. Focus on capturing the overall proportions of the horse’s body.
Map out key points such as the shoulders, hips, and limbs. Pay attention to symmetry and alignment so the drawing feels balanced. Mark areas for major features such as the ears, nose, and eyes without adding too much detail yet.
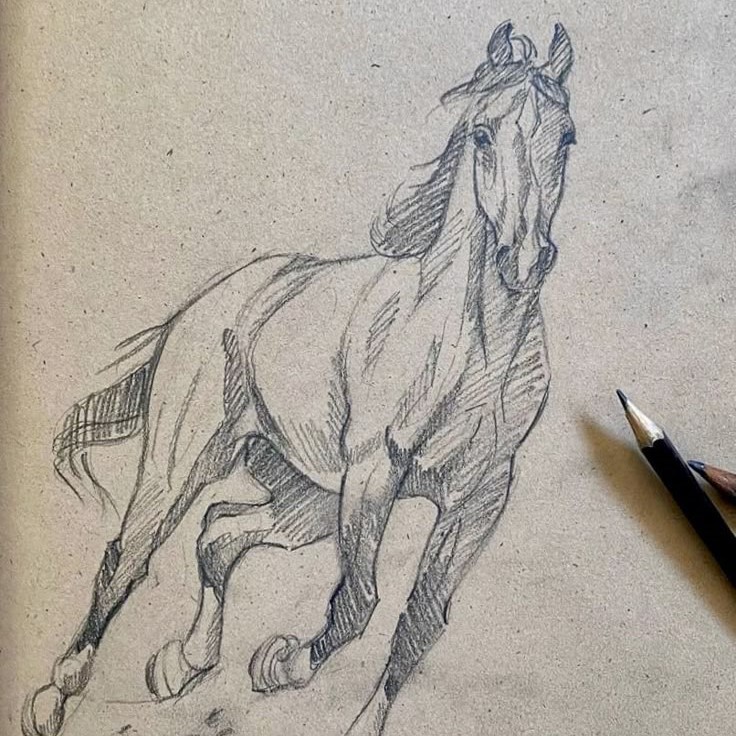
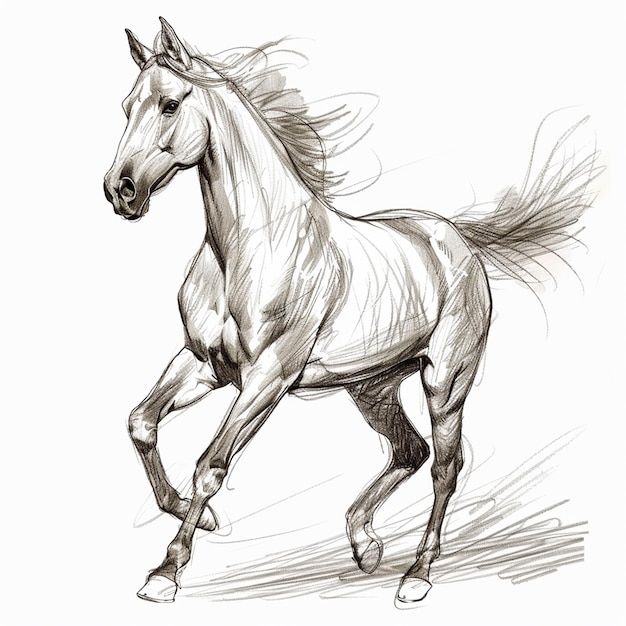
Establishing the Horse’s Pose and Movement
Decide on a pose that reflects the horse’s natural movement or personality. Observe how horses move or stand from reference images. Sketch the spine line first to set the flow of the pose.
Position the legs to reflect the chosen motion or resting stance. For a walking pose, alternate the leg placement to show motion. If the horse is standing, ensure the limbs are evenly spread for balance.
Use curved lines to sketch the neck and torso to convey flexibility. Ensure the head connects naturally to the neck and is aligned with the pose. Avoid stiff lines, as they can make the horse appear unnatural.
At this stage, focus on composing the entire silhouette. Remember, capturing the correct outline at the start will guide the entire drawing process toward a better result.
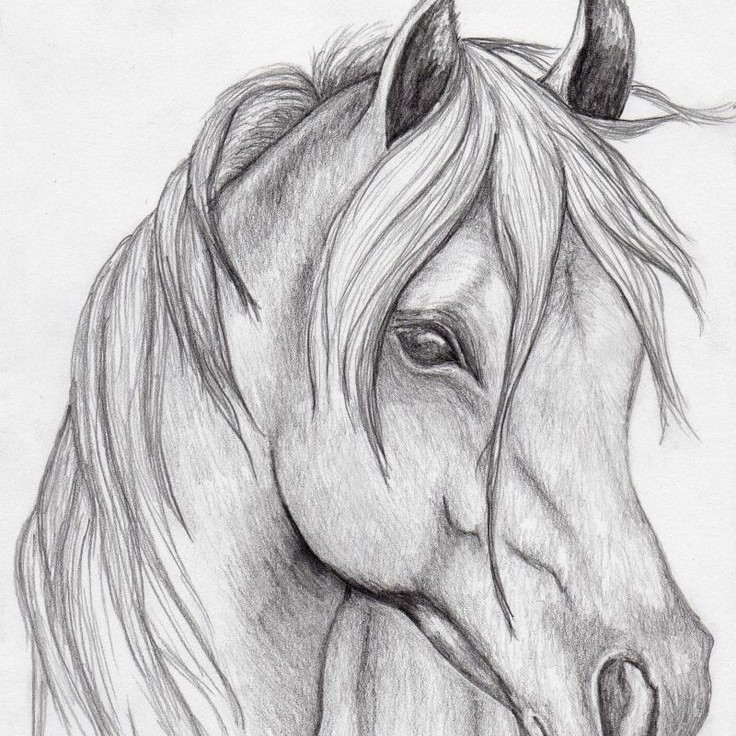
Adding Details to Your Horse Drawing
Adding intricate details can transform your pencil horse drawing from simple to remarkable. Pay attention to specific areas like the horse’s face, mane, and tail to make them stand out. Let’s break down the process into essential steps.
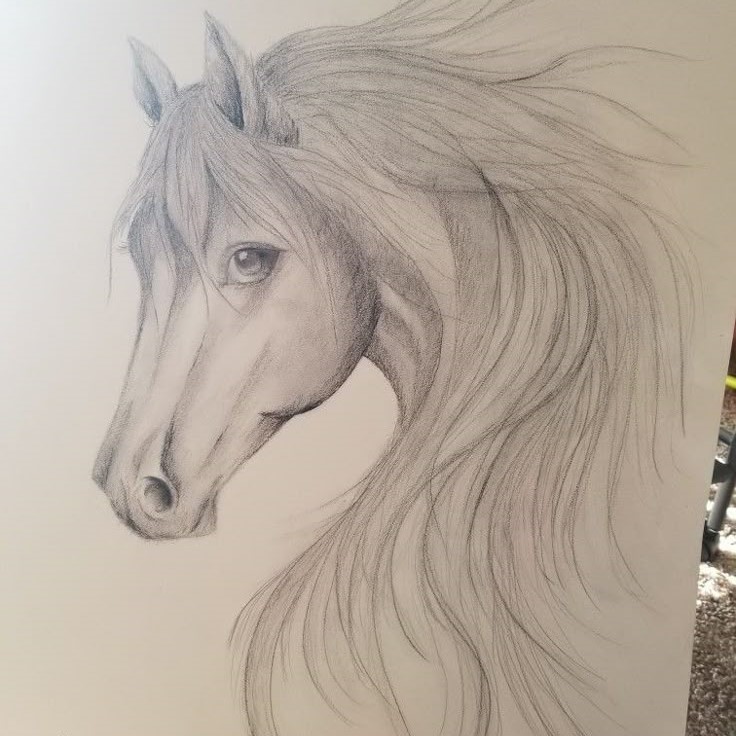
Refining Facial Features
The face defines the character of your horse drawing. Start by carefully observing reference images.
- Eyes: Draw the eyes with precision. Capture their almond shape and reflective highlights.
- Nostrils: Use soft shading for the nostrils to give them depth and volume.
- Ears: Sketch the ears to appear symmetrical. Use curved lines to show subtle folds.
- Muzzle: Pay close attention to the curves and texture of the muzzle. Use short, soft strokes.
Add details in layers, starting with basic shapes, then refine edges and add shading. Keep strokes light, so adjustments are simple if needed.
Capturing the Texture of the Mane and Tail
The mane and tail give the horse its elegance. Focus on flow, texture, and shading.
- Flowing Lines: Use long, gentle strokes to represent strands of hair. Direction is key for realism.
- Layering: Add layers to build volume. Begin with lighter strokes and gradually darken areas.
- Highlights: Leave some areas untouched to create natural highlights.
- Stray Strands: Add a few loose strands for a realistic touch. Keep them soft and natural.
Blend and shade carefully to avoid harsh lines while maintaining the texture. Use an eraser to emphasize highlights in both the mane and tail.
By focusing on these details, you can breathe life into your pencil horse drawing. Mastering the face and hair textures adds personality and charm to your artwork.
Achieving Realism Through Shading Techniques
Shading is key to making pencil horse drawings appear lifelike. Proper shading creates depth, texture, and realism. Learn how to use light, shadow, and shading tools effectively to bring your horse to life.
Implementing Light and Shadow
Understanding light and shadow is crucial for realistic shading. Follow these steps to use them effectively:
- Identify Light Source: Decide the direction of light in your drawing. This creates consistent shadows.
- Highlight Bright Areas: Use light shading for areas facing the light. Keep pencil strokes soft.
- Add Shadows: Darken areas opposite the light. Blend shadows smoothly into mid-tones.
- Use Gradient Shading: Transition gradually between light and dark areas for realistic depth.
- Blend for Smoothness: Use blending tools like tortillons to avoid harsh lines. This softens shadows.
Carefully observe your reference image. Note how light interacts with the horse’s muscles, face, and limbs.
Highlighting Muscles and Bone Structure
To capture realism, focus on the horse’s anatomy through shading. Highlight key features effectively:
- Accentuate Muscles: Shade muscles to show their shape and strength. Use soft gradients for realism.
- Emphasize Bone Lines: Highlight bone structures like the jawline and leg joints with subtle shading.
- Study Curves: Observe the curves of the neck, back, and legs. Follow them with your shading.
- Layer Shadows: Add layers of shading to create depth in muscular and bony areas.
- Maintain Balance: Avoid over-shading. Keep the horse’s body proportional and natural-looking.
Shading well requires practice and patience. Adjust your techniques based on the horse’s pose and lighting. Mastering light, shadow, and anatomy will make your pencil horse drawing more dynamic and realistic.
Enhancing Your Drawing with Advanced Techniques
Taking your pencil horse drawing further requires advanced techniques. These methods add depth, dimension, and complete composition to your artwork. Explore techniques that create dynamic drawings and polished results.
Incorporating Backgrounds and Settings
Adding backgrounds to your drawing enhances storytelling and context. Follow these simple steps:
- Choose an Appropriate Scene: Pick settings like meadows, stables, or forests that complement your horse.
- Sketch Lightly: Begin with light pencil strokes for background elements like trees, fences, or hills.
- Establish Perspective: Use guidelines to maintain depth. Distant objects should appear smaller and less detailed.
- Balance Focus: Ensure the horse remains the main subject. Avoid overcrowding the background.
- Blend Textures: Use softer strokes for backgrounds to differentiate them from the horse’s sharp details.
Carefully designed settings make your drawing complete, giving it a sense of environment and narrative.
Using Layering for Depth and Dimension
Layering techniques add realism and depth. This process ensures your drawing looks lifelike and textured:
- Build Gradually: Start with light layers and gradually darken areas for depth.
- Separate Planes: Use layers to distinguish between foreground, middle ground, and background.
- Enhance Shadows: Add multiple shading layers to emphasize depth and musculature.
- Refine Edges: Use crisp lines on the horse to differentiate it from softer background layers.
- Highlight with Erasers: Remove graphite gently to create highlights and the illusion of dimension.
Emphasize contrasts between layered areas to make your horse stand out effectively. Practicing these advanced techniques will elevate your drawing skills significantly.
Tips to Improve Your Horse Drawing Skills
Improving your pencil horse drawing requires targeted practice and learning from observations. With consistent effort, growth and refinement are achievable. Let’s explore some effective ways to enhance your skills.
Practice Exercises and Challenges
Engaging in regular practice is vital for progress. Try these exercises:
- Daily Sketches: Draw horses every day to boost accuracy and confidence.
- Simplify Shapes: Break the horse into geometric shapes like circles and ovals in quick studies.
- Speed Exercises: Set a timer and sketch rough poses in 5–10 minutes to improve eye-hand coordination.
- Detail Challenges: Focus on one area, such as eyes or hooves, and practice refining details.
- Dynamic Poses: Experiment with different action poses like running, grazing, or jumping.
Push yourself with creative challenges. Attempt complex poses or work on different breeds. Track improvements and celebrate progress.
Studying Reference Images and Live Models
Observation is a powerful tool for drawing improvement. Here are tips for using references effectively:
- High-Quality Images: Use images showing clear anatomy, textures, and accurate proportions.
- Angle Variety: Study horses from different angles, including front, side, and rear views.
- Live Observation: Watch horses in real life or videos to understand movement and muscle shifts.
- Focus on Breeds: Study multiple breeds to grasp unique traits and features.
- Create Reference Folders: Collect and organize inspiring horse images for quick access.
Regularly combine sketching exercises with observations. Compare your drawings to references and revise errors. Both practices sharpen your eye for realism and precision.
Common Mistakes and How to Overcome Them
Understanding common errors in pencil horse drawing can improve accuracy and style. Let’s address key mistakes and strategies to overcome them.
Misaligned Proportions
Incorrect proportions make horses look unrealistic. Focus on balance for a lifelike result.
- Start with Guidelines: Use light lines for the horse’s skeleton framework.
- Check Body Length: Ensure the torso isn’t overly long or short.
- Balance Legs: Keep leg lengths proportional to the torso’s size and pose.
- Align the Features: Place the head, neck, and limbs accurately using reference points.
- Use Comparisons: Compare basic shapes to anatomy reference images.
Use proportional tools like dividers or rulers to refine accuracy. Practice sketching geometrical forms using references.
Overworking Details
Overloading details can create a cluttered drawing. Keep it clean for better visual appeal.
- Focus on Key Features: Highlight areas like the face and mane instead of overdoing smaller elements.
- Avoid Excessive Shading: Use soft gradients. Avoid scribbling or darkening areas too heavily.
- Keep Edges Crisp: Define critical lines while keeping transitions smooth.
- Simplify Textures: Use light strokes for textures like the coat without exaggerating individual hairs.
- Step Back: Periodically view your drawing from a distance to spot overworked areas.
Break the process into steps. Work progressively, focusing only on essentials initially. Simplification helps balance creativity and precision.
By addressing these mistakes effectively, your pencil horse drawing will show improved accuracy and clarity.
Conclusion
Mastering pencil horse drawing techniques takes time, patience, and practice. Whether you’re a beginner or an experienced artist, there’s always something new to learn and explore. By understanding the basics of anatomy, shading, and movement, you can create realistic and expressive horse drawings that capture the beauty and spirit of these amazing animals.
Remember, the best pencil horse drawing comes from a combination of skill, observation, and dedication. Keep experimenting with different styles and techniques. Try drawing horses in motion, from different angles, and in various lighting conditions. Each new challenge will help you grow as an artist and deepen your connection to this incredible subject.
So grab your pencil, find a reference, and start drawing. With each stroke, you’re one step closer to mastering the art of pencil horse drawing. Let your creativity shine and enjoy the journey of learning and improving.