Introduction to Wax Sealing
Wax sealing is a fascinating craft with deep historical roots and modern applications. It combines artistry and function, making it a timeless and versatile practice. Whether you want to add elegance to your letters or elevate your packaging, wax seal kit offer endless possibilities.
History and Origins of Wax Sealing
Wax sealing dates back to ancient times, starting with the use of soft clay impressions. By the Middle Ages, wax seals became a primary method for authenticating documents. Royals, governments, and individuals used them to secure messages and signify authority. Each seal was unique, representing identity and ownership.
Over the centuries, wax seals evolved in craftsmanship and purpose. Elaborate designs and family crests became popular among aristocrats. With the invention of postal systems, wax seals ensured privacy during transit. Though technology replaced their functional need, their artistic and symbolic value persists.
Modern Uses of Wax Seals
Today, wax seals are cherished as a creative and personal touch. Weddings, parties, and milestone celebrations often feature sealed invitations. Businesses use custom wax seals to brand products and elevate packaging aesthetics.
Crafts enthusiasts enjoy making seals for scrapbooks, journals, and handmade cards. Wax sealing kits make this traditional art accessible to everyone. Their versatility allows you to explore endless ways to incorporate them into modern projects.
Understanding wax sealing’s history and applications helps appreciate its enduring charm. Whether for tradition or creativity, wax seals remain a meaningful art form.
Components of a Wax Sealing
Understanding the components of a wax sealing kit is crucial for beginners and enthusiasts. A complete kit ensures success in creating beautiful seals. This section breaks down the essential tools and materials, as well as the types of wax available.
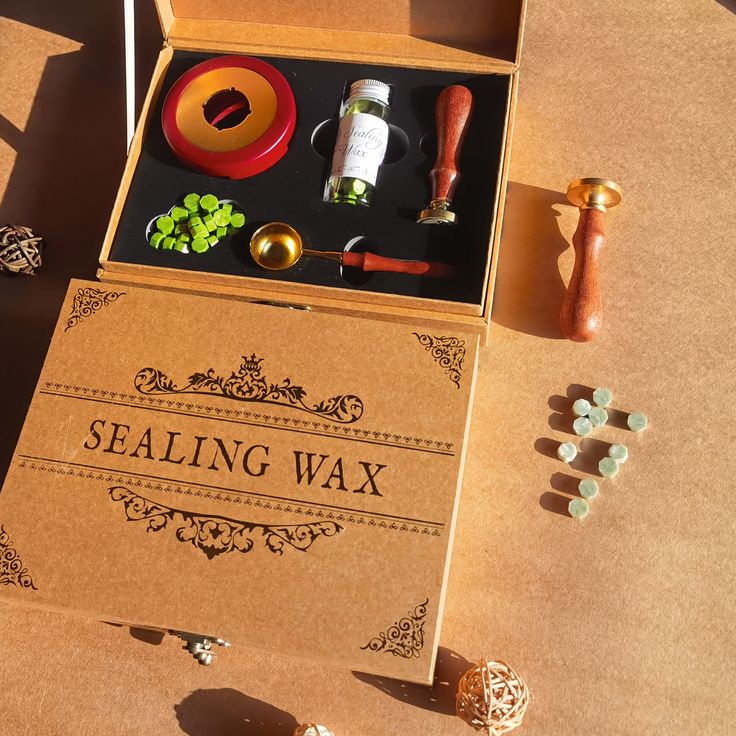
Essential Tools and Materials
Every wax sealing kit comes with a set of basic tools. Here are the essential items you’ll need:
- Wax Seal Stamp: The most important tool, the stamp creates the seal design. It typically has a metal head and a wooden or brass handle. Stamps come in various designs, both pre-made and customizable.
- Wax Sticks or Beads: Wax is the primary material for creating seals. Choose between traditional sticks or modern beads, depending on your preference.
- Heat Source: A heat source melts the wax. This can be a wax melting spoon with a tealight candle or a glue gun for wax sticks.
- Wax Melting Spoon: This spoon holds and melts small amounts of wax beads over a flame for easy pouring.
- Seal Mat or Parchment Paper: Use a non-stick surface like a silicone mat to prevent wax from sticking during practice.
- Optional Accessories: Tweezers, metallic pens, or glitter can enhance your seal designs further.
Having these tools ensures a smooth and enjoyable sealing process.
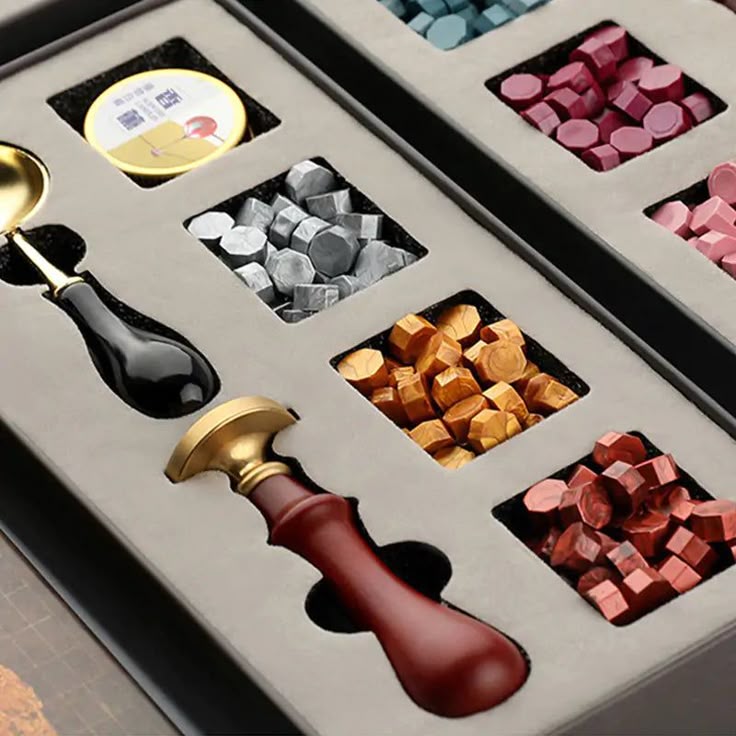
Different Types of Wax Sticks and Beads
Wax sticks and beads come in various styles to suit your creative preferences. Here are the common types:
- Traditional Wax Sticks: These sticks require an open flame to melt. They offer an authentic and vintage feel.
- Flexible Wax Sticks: These are designed for use with glue guns. They melt easily and create durable seals.
- Wax Beads: Small, colorful beads that melt quickly in a spoon. They provide excellent control for design and color blending.
- Premium Wax: High-quality wax that’s often softer and shinier. It adds elegance to special projects.
- Metallic or Glitter Wax: These have metallic pigments or glitter for a sparkly finish. They make your seals stand out.
Experimenting with different wax types allows you to discover your preferred style. Combining these materials with the right tools will help you achieve stunning results.
How to Use a Wax Sealing Kit
Mastering how to use a wax sealing kit is important for creating stunning wax seals. This section provides a detailed step-by-step guide and practical tips to help you achieve perfection.
Step-by-Step Guide to Making a Wax Seal
Follow these simple steps to create beautiful wax seals:
- Prepare Your Materials: Ensure your wax seal stamp, wax, spoon, and heat source are ready.
- Melt the Wax: Place a small amount of wax in the spoon. Hold it over the flame until fully melted.
- Pour the Wax: Pour the melted wax onto the surface where you want the seal.
- Press the Stamp: Firmly press the stamp onto the molten wax. Hold it for about 10 seconds.
- Remove the Stamp: Gently lift the stamp to reveal your wax seal design.
- Allow to Cool: Let the wax seal cool and harden completely before handling.
Tips for Achieving Perfect Seals
Use these tips to improve your wax sealing results:
- Choose the Right Wax: Pick quality wax suitable for your project. Flexible wax works well on envelopes.
- Heat Evenly: Avoid overheating or burning. Melt wax slowly for a smooth texture.
- Practice on Scrap Material: Use parchment paper or a mat for practicing before final seals.
- Experiment with Colors: Combine wax colors for unique blends. Metallic wax adds a shiny effect.
- Clean Your Stamp Regularly: Wipe the stamp with a cloth after each use to avoid residue buildup.
- Work in a Controlled Environment: Avoid drafts that can cool the wax too quickly.
By following these steps and tips, you can create exceptional wax seals effortlessly.
Creative Uses for Wax Seals
Wax seals add charm and sophistication to everyday items. Their versatility opens doors to creativity. From enhancing correspondence to beautifying packaging, they offer unique ways to make your projects memorable.
Adding a Personal Touch to Invitations and Letters
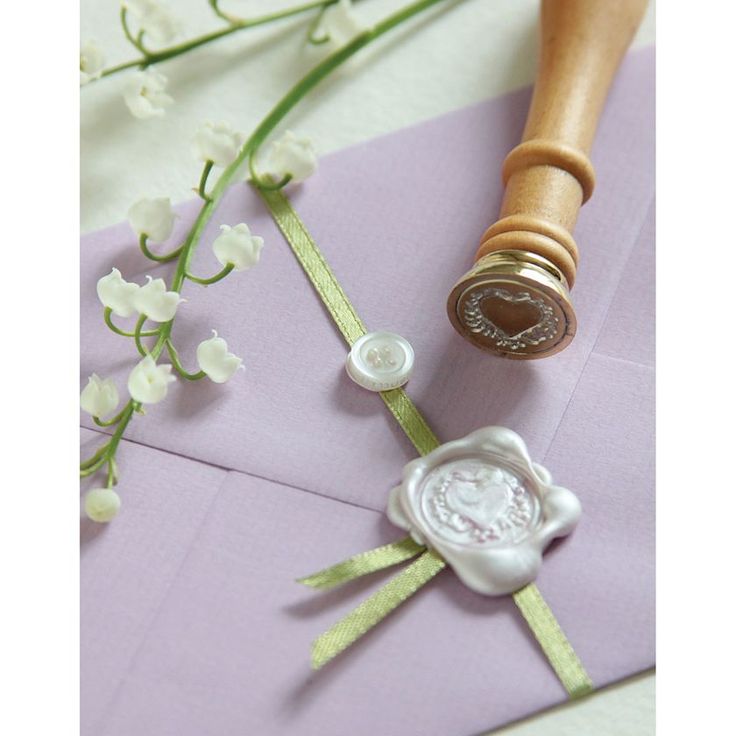
Wax seals elevate the look of invitations and letters. They add elegance and a sense of occasion. Use them for wedding invitations, birthday cards, or holiday greetings. Choose designs matching the theme, like floral patterns or monograms.
Hand-seal each envelope or card for authenticity and warmth. It shows care and attention to detail. Combining colorful wax or metallic finishes can also impress recipients. Wax seals make correspondence feel special and thoughtful.
Decorative Uses for Packaging and Gifts
Wax seals transform gift packaging into something extraordinary. Apply them to gift boxes, bags, or wrapping paper. They add a luxurious and handmade feel to presents. Use the seal and wax color that matches the occasion, such as gold or red for holidays.
Businesses can use wax seals for brand packaging. Custom stamps with a company logo leave a lasting impression on customers. Incorporate them with ribbons, tags, or dried flowers to create stunning visual appeal.
Beyond gifts, decorate jars, candles, or bottles with wax seals. They add an artisanal vibe to DIY crafts or homemade products. Wax seals are a way to make anything look polished and unique while creating a lasting memory.
Choosing the Right Wax Sealing
Selecting the perfect wax sealing kit is essential for enjoyable and successful crafting. A good kit ensures you have the tools and features to meet your needs. This section explores key factors to consider and highlights top recommendations for beginners and professionals.
Factors to Consider When Buying a Kit
Here are the important aspects to evaluate before purchasing a wax sealing kit:
- Tools Included: Check the kit for essential items like a wax seal stamp, wax sticks, and a melting spoon.
- Stamp Designs: Choose a kit with versatile or custom stamp designs matching your style.
- Types of Wax: Consider if traditional sticks, flexible wax, or beads will suit your projects best.
- Ease of Use: A beginner-friendly kit reduces learning stress. Look for clear instructions and practical tools.
- Durability: Ensure materials like stamp handles and melting spoons are sturdy and built to last.
- Price and Budget: Compare kits within your budget while not compromising on quality.
- Brand Reputation: Choose trusted brands that specialize in wax sealing supplies for reliability.
- Purpose and Projects: Decide what you’ll use it for—letters, packaging, or crafts—and pick a suitable kit.
By analyzing these factors, you can find a kit that is tailored to your requirements.
Recommended Kits for Beginners and Professionals
Here are some excellent wax sealing kits to kickstart your journey or enhance your skills:
- Beginner Kits:
- Include basic tools and easy-to-use wax types.
- Often feature simple stamp designs for newcomers.
- Affordable, making them great for starting out.
- Professional Kits:
- Offer a wider range of stamps with intricate designs.
- High-grade wax and advanced tools like glue gun-compatible wax sticks.
- Suitable for detailed and high-quality work.
- Customizable Kits:
- Provide options to design your own stamps.
- Allow mixing colors for unique wax blends.
- Ideal for personalized projects or brands.
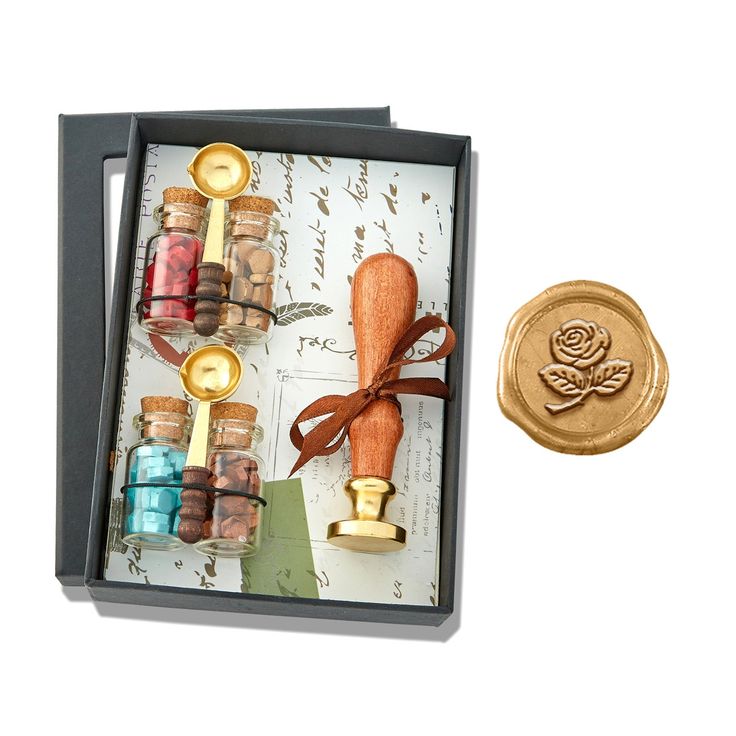
- Gift Sets:
- Elegant packaging for presenting to craft enthusiasts.
- Include decorative and premium accessories for special occasions.
Finding the right kit can elevate your wax sealing experience. Beginners can start simple, while professionals can explore greater customization and quality.
Maintenance and Care for Your Kit
Proper maintenance of your wax sealing kit ensures its longevity and consistent performance. Regular cleaning and correct storage keep your tools in top condition. By addressing common issues quickly, you can avoid frustration during projects.
Cleaning and Storing Your Tools
Keeping your wax sealing tools clean and organized is crucial. Here are some simple tips:
- Clean Your Stamp After Each Use: Wipe the stamp with a soft cloth while the wax is still warm. This prevents residue buildup.
- Remove Wax From the Spoon: Let the leftover wax harden in the spoon, then peel or scrape it off gently.
- Wash With Mild Soap: For stubborn residue, use warm water and gentle soap to clean the metal surfaces.
- Dry Thoroughly: Ensure all tools are dry before storage to prevent rust or corrosion.
- Store in a Protective Box: Use the kit’s original box or a separate container to avoid damage. Keep tools separated.
- Avoid Heat or Moisture: Store your kit in a cool, dry place, away from sunlight and humidity.
Regular cleaning and careful storage extend the life of your tools.
Troubleshooting Common Issues
Issues may arise with your wax sealing kit. Here’s how to quickly resolve them:
- Wax Sticking to the Stamp: Cool the stamp slightly before pressing it onto the melted wax. You can also lightly coat it with cooking oil.
- Uneven or Bubbly Wax Seals: Melt the wax more slowly to avoid bubbles. Stir the wax gently before pouring.
- Difficulty Melting Wax Beads: Ensure your spoon is held at the correct distance from the flame. Avoid direct, intense heat.
- Seal Lifting From the Surface: Clean the surface where you apply the seal. Ensure it’s dry and free from dust or oils.
- Damaged Tools: Inspect your kit regularly. Replace damaged tools to avoid mishaps during projects.
- Color Contamination: Clean the spoon thoroughly before switching to a different wax color.
Quick fixes ensure smooth sealing experiences and protect your tools from wear and tear. Proper care guarantees better results and an enjoyable crafting journey.
DIY and Customization Ideas
Customizing your wax seals adds a personal and creative flair to your projects. With simple techniques, you can turn standard seals into unique masterpieces. This section guides you through exciting ways to develop original designs and blend colors seamlessly.
Creating Unique Seal Designs
Personalized designs can set your wax seals apart and make them more meaningful. Here’s how to craft unique seal designs:
- Invest in Custom Stamps: Design a stamp with initials, logos, or symbols that reflect your personality or brand.
- Incorporate Add-ons: Add elements like dried flowers, leaves, or metallic flakes under the wax for texture.
- Overlay Patterns: Use small stamps or mold impressions on the wax for layered designs.
- Hand-Carve Details: For artistic enthusiasts, consider hand-carving designs onto blank brass stampheads.
- Use Decorative Accessories: Frame your wax seals with stickers, ribbons, or cutouts for added embellishment.
- Experiment with Pressing Techniques: Tilt the stamp slightly or rotate mid-press for creative effects.
Unique seal designs add charm and showcase your creativity. Take your time to experiment and perfect your art.
Mixing Colors for Custom Wax Blends
Blending wax colors opens up endless possibilities for customization. Follow these tips to master creative color combinations:
- Start with Primary Colors: Combine basic colors like red, blue, and yellow for endless shades.
- Melt Multiple Wax Beads: Mix beads of different colors in your spoon for harmonious blends.
- Create Gradient Effects: Layer melted wax on top of each other quickly before pressing the stamp.
- Incorporate Metallic Wax: Add a metallic bead to regular ones for a shimmering, elegant touch.
- Try Marbling: Swirl melted wax colors gently with a toothpick for marbled patterns.
- Keep a Color Palette Book: Record successful combos to recreate them for future projects.
Blended colors make seals truly one-of-a-kind. Let your imagination guide you to create stunning visuals.
By exploring unique designs and color mixes, your wax sealing projects will stand out for their individuality.
Where to Buy Wax Sealing
Finding the right place to buy a wax sealing kit is important. It ensures you get quality tools and value for your money. You can explore both online and retail options, depending on your needs.
Online and Retail Options
1. Online Stores:
- Many e-commerce platforms offer wax sealing kits. Websites like Amazon and Etsy provide numerous choices.
- Online specialty craft stores often carry high-quality kits. Look for sellers with positive reviews.
- Some brands have official websites where you can purchase directly. This ensures authenticity.
2. Brick-and-Mortar Retailers:
- Craft stores such as Michaels or Hobby Lobby stock various wax sealing kits.
- Stationery shops also carry kits, especially those focusing on wedding or event items.
- Artisan markets and fairs might have unique, handmade sealing tools and supplies.
3. Local Craft Boutiques:
- Small craft shops may offer locally-made kits with special, artistic touches.
- Visiting such stores allows you to see and feel the products before buying.
Having both online and retail options gives you flexibility. You can compare prices, quality, and styles.
Price Ranges and Budget-Friendly Choices
1. Beginner Kits:
- Basic kits for beginners cost $10–$25. They include simple tools for starting out.
- Affordable quality makes these ideal for casual or first-time users.
2. Mid-Range Kits:
- Kits priced $25–$50 have better tools and more design options.
- They often include additional wax sticks or beads in various colors.
3. Premium Kits:
- High-end kits cost $50–$100, offering professional-grade materials and intricate stamp designs.
- These are perfect for enthusiasts or business purposes.
4. Budget Tips:
- Look for discounts on online platforms like Amazon during sales events.
- Buy in bundles to save on shipping costs. Many retailers offer combo deals.
Choosing the right kit and shopping smartly ensures you get the most value. The wide price range caters to all needs and budgets.