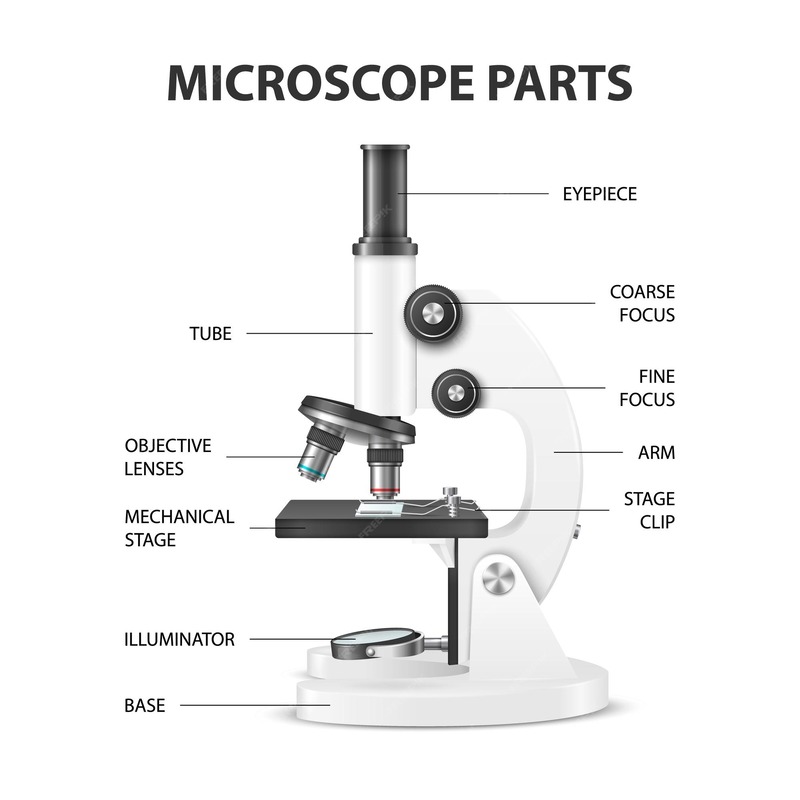
An Introduction to Microscope Anatomy
As you peer into the microscopic world, a good grasp of microscope anatomy is crucial. A microscope consists of various parts, each labeled and serving a specific purpose. By understanding these parts, you can use the microscope more effectively and take care of it properly.
From the eyepiece to the base, each component plays a role in bringing the unseen to your eyes. This guide will walk you through the main features of a microscope. We will look at how these parts work together to magnify specimens. Whether you’re a student, a hobbyist, or a professional, being familiar with the parts of a microscope labeled will enrich your viewing experience.
Learning microscope anatomy is like getting to know a new friend. You’ll discover how the eyepiece widens your view, how the objective lenses intensify the image, and how the stage supports the slide. You’ll also learn about the importance of the illuminator and light source in revealing details, the focus knobs for clarity, and the condenser and diaphragm for controlling the light. Each element has its named place in the microscope’s design.
In the upcoming sections, we’ll delve into each part. You’ll learn their names, functions, and how they contribute to the overall operation of the microscope. Let’s start with the very part you look through: the eyepiece or ocular lens.
Essential Microscope Parts and Their Functions
Understanding the parts of a microscope labeled is key to mastering its use. Each part has a distinct role in the magnification and viewing process.
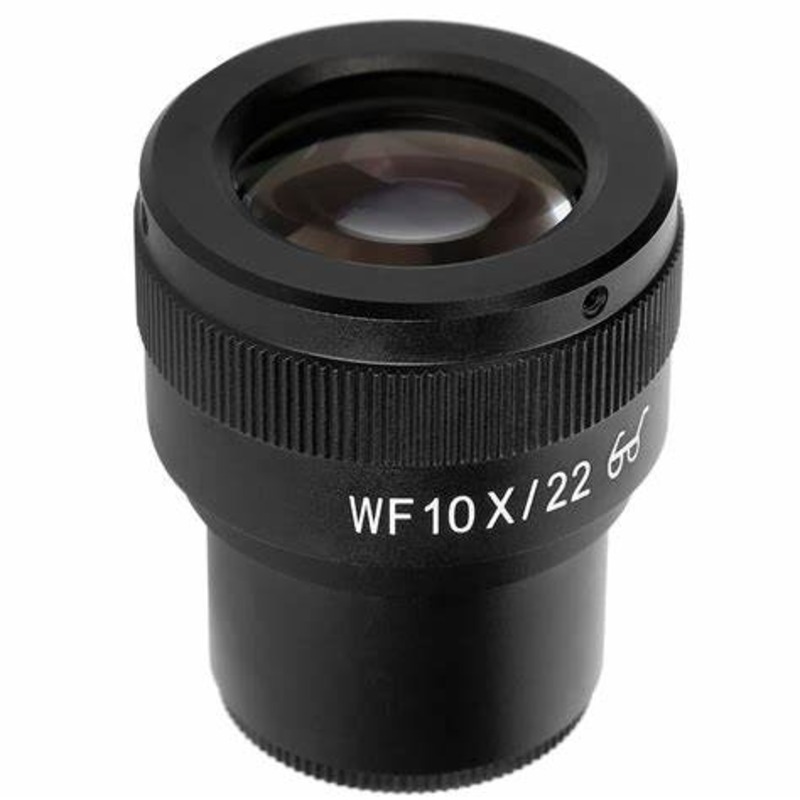
Eyepiece or Ocular Lens
The eyepiece, or ocular lens, is where you place your eye. It magnifies the image from the objective lenses. Usually, the magnification level is 10x.
Objective Lenses
Objective lenses are the primary source of magnification. They range from low to high power. You can rotate them to increase magnification as needed.
Stage and Stage Clips
The stage is the platform where you place your slides. Stage clips hold the slides in place. This ensures the specimen does not move during viewing.
Illuminator and Light Source
The illuminator lights up the sample. It works with the light source. They help you see the specimen clearly.
Focus Knobs
Focus knobs adjust the sharpness of the specimen’s image. There are two types: fine and coarse. Both knobs work together to bring the image into clear focus.
Condenser and Diaphragm
The condenser focuses light onto the specimen. The diaphragm controls the amount of light. These parts work together to improve the quality of the viewed image.
The Mechanical Parts: Base and Arm
The mechanical parts of a microscope play a vital role in its stability and usability. Among these, the base and the arm are imperative for the microscope’s structure. Here’s how they contribute:
Base
The base is the bottom-most part of a microscope. It acts as a sturdy foundation. This ensures that the microscope stays stable during use. The base typically houses the illuminator, providing a steady electricity source for the light. When handling the microscope, always start by gripping the base to prevent it from tipping over.
Arm
Attached to the base is the arm. This part supports the microscope’s body and is where you usually grip when carrying the device. The arm connects the base to the upper parts of the microscope, including the stage and the optical system. It’s designed to be strong, as it bears the weight of the microscope’s upper components.
Both the base and arm are crucial for proper microscope handling. Without a stable base, observations could be disrupted by unnecessary movements. Similarly, a robust arm ensures the delicate parts above are secure. It is always important to handle these parts with care to ensure the longevity and reliability of the microscope. This understanding of the parts of a microscope labeled will help in the proper usage and maintenance of this essential scientific tool.
Optical System Components
The optical system is a key part of a microscope, offering the ability to see tiny objects. It includes parts like lenses and mirrors, working together to magnify images.
Lenses
Lenses are vital in a microscope. They bend light to magnify the image of a specimen. The objective lenses work with the eyepiece to boost the size of the object viewed.
Mirrors and Prisms
Some microscopes use mirrors or prisms to direct light to the eyepiece. They guide the light path, keeping the image bright and clear.
Tube
The tube connects the eyepiece to the objective lenses. It keeps the light path aligned. This helps in delivering a sharp image to the viewer’s eye.
Understanding these parts of a microscope labeled, you can better use and care for the device. Each component in the optical system plays a role in bringing tiny worlds into view. Keep these parts clean and well-adjusted for the best microscope experience.
The Evolution of Microscope Design
The design of microscopes has evolved significantly over time. The first microscopes were simple magnifying glasses, with only a single lens. These early devices were not very powerful, but they opened up a world that was previously invisible to the naked eye.
As science and technology progressed, the microscope design improved. In the late 16th century, compound microscopes began to appear. These had more than one lens, which allowed for greater magnification and clearer images. The addition of the stage and focusing knobs made it easier to view specimens. Scientists could now see smaller details in their samples.
The 19th century saw further advancements in the parts of a microscope labeled. Optics improved, thanks to better grinding techniques. This led to sharper and more detailed images. The introduction of the condenser and diaphragm helped with the proper illumination of specimens.
In the 20th century, electron microscopes took magnification to a new level. They allowed us to see not just cells, but also the components inside them. This leap in technology transformed fields such as biology and materials science.
Today, microscopes continue to evolve with digital technology. Digital microscopes don’t require eyepieces. Instead, they display the image on a screen. This is helpful for educational settings where multiple people need to view the specimen at the same time.
With each advancement in microscope design, we gain a better understanding of the microscopic world. From simple lenses to complex digital systems, the evolution of microscope design reflects our continued curiosity and quest for knowledge.
Microscope Maintenance and Care
Keeping a microscope in top condition is essential for accurate observations. Just like any tool, microscopes require routine maintenance and careful handling. Here are tips for keeping the parts of a microscope labeled and functional:
Handle with Care
Always grip the arm and support the base when moving the microscope. Avoid touching the lenses with your fingers. Use lens paper for cleaning any smudges.
Clean Regularly
Wipe the external parts with a soft, lint-free cloth. Gently brush away any dust from the lenses and mirrors using a special lens brush.
Check for Alignment
Ensure the objective lenses and eyepiece are properly aligned. Misalignment can result in unclear images and strain on the eyes.
Store Properly
Cover the microscope with a dust cover when not in use. Keep it in a dry and cool place to prevent any damage from moisture or heat.
Annual Servicing
Consider getting the microscope serviced by a professional yearly. They will ensure all parts are lubricated and functioning well.
By following these simple steps, you’ll preserve the condition of the microscope. Good care extends its life and ensures it remains a reliable tool for exploration.

Practical Applications and Usage of Different Microscope Types
Even within the world of microscopes, diverse designs serve various purposes. Let’s look at some common types of microscopes and their practical uses.
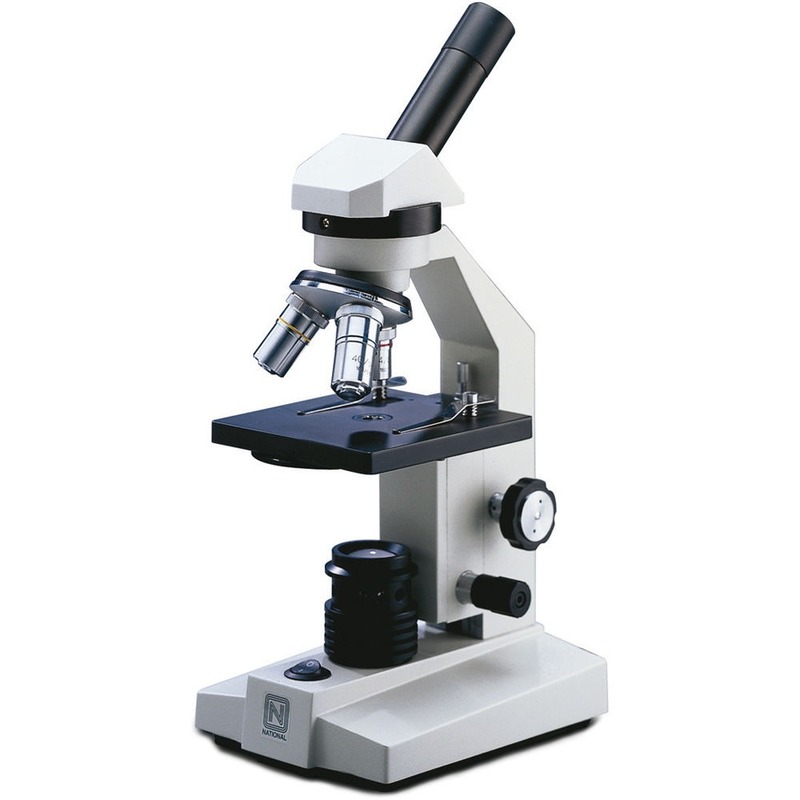
Compound Microscope
The compound microscope is a staple in many laboratories. Its ability to magnify small objects makes it ideal for studying cells and tiny organisms. Biologists often use it to observe the details of plant and animal tissues. In medical labs, it helps detect diseases by examining blood samples.
Stereo Microscope
Stereo microscopes, or dissecting microscopes, offer a three-dimensional view. This makes them perfect for examining larger, solid specimens. They are often used in electronics to inspect circuit boards. In education, they let students see the texture and details of biological samples.
Digital Microscope
Digital microscopes are a modern innovation. They connect to a computer or display screen. This allows for easy sharing and saving of images. Industries use digital microscopes for quality control. They examine the surface details of materials like fabrics and metals. In classrooms, they encourage interactive learning, as a group can view the specimen at once.
Each microscope type has its label for different parts that are fine-tuned for its unique applications. Understanding these can maximize their potential in various fields.
Purchasing Guide for Educational and Laboratory Use
Choosing the right microscope for educational or laboratory use is crucial. Every model has different features. To make the right choice, you should know what to look for. This guide will help you select a microscope that fits your needs. Here are key factors to consider:
Determine the Application
First, think about how you will use the microscope. For education, you may need a basic compound microscope. Labs might require more advanced features, like high magnification.
Consider the User
If children will use it, look for sturdy, user-friendly models. For advanced users, precision and extra features become important.
Opt for Quality Optics
Good lenses make a huge difference. Look for microscopes with quality objective lenses. They should offer clarity and detail.
Check for Mechanical Stability
A reliable microscope has a firm base and arm. It should be stable and durable, especially for frequent use.
Assess the Illumination System
Bright and adjustable light is key for clear images. LED lights are energy-efficient and provide good illumination.
Evaluate the Focusing System
Microscopes with fine and coarse focusing give you better control. This helps in getting a crisp image.
Accessories and Maintenance
Consider what comes with the microscope. Are slides or cover slips included? Think about how you’ll maintain it.
Price and Warranty
Balance your budget with the features you need. Check for a warranty that offers protection after purchase. A good warranty can save costs on future repairs.
By keeping these points in mind, you can find the right microscope. Whether for students or scientists, the ideal microscope should be a gateway to discovery. Make sure it’s labeled with clear instructions. This ensures that every part is properly used and maintained.


