What is a Bright Field Microscope?
A bright field microscope is a fundamental tool in biology. It uses light to make specimens visible. This type of microscopy shows specimens against a bright background. The term ‘bright field’ comes from its bright view field.
Scientists and students often use these microscopes. They are suitable for viewing cells and tissues. We can see living or stained sections with them. They cannot show very small or transparent samples very well. For those, we need other forms of microscopy.
Using a bright field microscope is easy. It is an excellent choice for beginners. In our blog, you will learn more about its parts and uses. We will cover specimen preparation and how to operate this tool. Stick around for tips on maintenance as well.
Core Components of a Bright Field Microscope
A bright field microscope has several key parts. These are crucial for its function. Here’s an introduction to the core components of a bright field microscope.
Optical System: Lenses and Objectives
The optical system is the heart of the microscope. It includes lenses and objectives. These parts magnify the specimen. They also focus the light onto it. There are usually multiple objectives on a revolving turret. They range from low to high power. Beginners should start with the lowest magnification. This helps to locate the specimen. Then, they can switch to a higher power to see finer details.
Illumination Source
The illumination source lights up the sample. It is usually a bright lamp beneath the stage. The light passes through the specimen. This makes the details visible. A condenser lens focuses the light. It ensures even illumination. Too much light can cause glare. You can adjust the light’s intensity. This helps to see different types of samples.
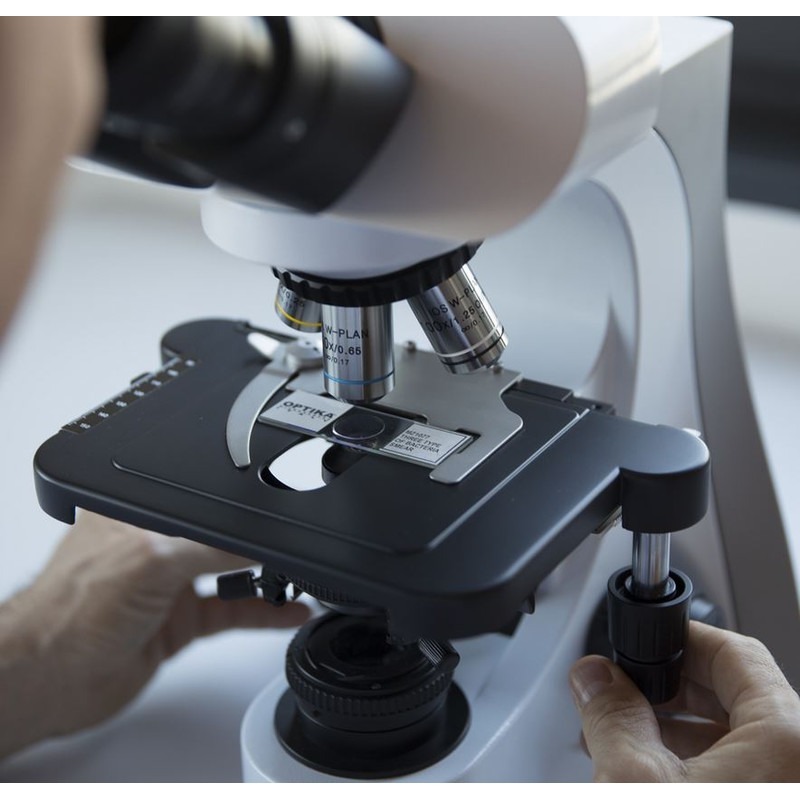
Stage and Specimen Holders
The stage is the platform where you place the slide. It has a hole in the center. Light shines through this hole. Specimen holders, or clips, keep the slide in place. Accuracy is key when positioning a slide. The slide must be flat and centered over the hole. This allows the light to pass through uniformly. Some stages are mechanical. They allow fine movement of the slide. This becomes helpful for scanning large areas or when you need precise control over the slide’s position.
How to Prepare a Specimen for Bright Field Microscopy
Preparing a specimen is a critical step in bright field microscopy. A proper preparation ensures clear images and accurate results. Here’s how you can make sure that your specimen is ready for observation.
- Start Clean: Ensure all slides and coverslips are free of dust and debris. Use alcohol wipes or lens paper to clean them.
- Sample Slicing: If you are working with solid samples, slice them thinly. This allows light to pass through. Use a microtome if available, for even, thin sections.
- Staining: Some specimens might need staining. Transparent samples often require a dye to enhance contrasts. Common stains include methylene blue and iodine.
- Mounting: Place your sample on the slide. Then, carefully drop a coverslip over it. This reduces air bubbles and protects the specimen.
- Securing: Use the specimen holders on the microscope’s stage. They will keep your slide from moving during observation.
- Final Check: Before you place the slide on the stage, check again for dust. Adjust the specimen so it’s right over the stage hole.
Following these steps will help you in getting the best possible results from your bright field microscope viewing.
Operating a Bright Field Microscope
After preparing your specimen, the next step is operating the bright field microscope. Proper operation is essential to view your sample correctly and ensures you obtain clear images. Here’s a guide on how to operate your microscope effectively.
Setting Up the Microscope
- Place the Microscope on a Stable Surface: Avoid vibrations that could disturb your view.
- Check the Lens: Ensure that the objective lenses are clean. Wipe off any dust with lens paper.
- Plug In and Switch On: Connect your microscope to a power source and turn on the illumination source.
- Adjust the Diaphragm: Regulate the amount of light using the diaphragm, to prevent overexposure.
- Position the Slide: Secure the slide on the stage using the specimen holders, ensuring it is centered.
Once you have set up your bright field microscope, you are ready to move on to viewing the specimen.
Adjusting Magnification and Focus
- Start with Low Power: Begin with the lowest magnification to find your specimen.
- Center the Specimen: Once you locate the specimen, make sure it is centered in your view.
- Increase Magnification: Gradually switch to a higher objective lens to see more details.
- Use Coarse Focus: Adjust the coarse focus knob to get the specimen into basic focus.
- Fine-Tune with Fine Focus: Use the fine focus adjustment for a sharp and clear image.
By carefully setting up the microscope and adjusting magnification and focus, you can explore the microscopic world with clarity. Remember, practice makes perfect, and the more you work with your bright field microscope, the more skilled you’ll become in operating it.
Common Applications of Bright Field Microscopy
Bright field microscopes are widely used in many fields. Here are some common applications to consider:
- Cellular Biology: Researchers use bright field microscopy to examine cells. They look at shape, structure, and processes with this tool.
- Microbiology: It helps scientists to identify microorganisms. They can study bacteria, fungi, and protozoa in detail.
- Pathology: Medical professionals observe tissues. They can detect abnormalities and diagnose diseases using bright field microscopy.
- Education: It is a staple in classrooms. Students learn about cell biology and the microscopic world with these microscopes.
- Quality Control: Industries use it to inspect materials. They check for defects at a microscopic level.
- Environmental Science: Researchers observe environmental samples. They study pollutants and microorganisms affecting ecosystems.
These applications show the versatility of bright field microscopes. They are essential in many areas of science and industry. With this microscope, beginners can start exploring the microscopic universe. As you become more experienced, you’ll find more applications for this valuable tool.
Tips for Capturing Clear Images
Capturing clear images with a bright field microscope requires attention to detail and practice. Here are some valuable tips to help you capture the best possible images:
- Ensure Adequate Lighting: Use the microscope’s illumination source effectively. Adjust the light so that it evenly illuminates the specimen without causing glare.
- Proper Staining Techniques: Apply stains correctly if required. This will bring out the details and make structures more visible.
- Avoid Over Magnification: Don’t use a higher magnification than necessary. It may reduce image clarity. Start with lower magnification and only increase as needed.
- Stable Environment: Make sure the microscope is on a steady surface. Any movement can blur the image.
- Clean Optics: Regularly clean the lenses and objective with lens paper. Dust and smudges can obscure details.
- Focus Carefully: Start with coarse focus and slowly use fine focus. Fine-tuning helps in capturing sharp images.
- Use High-Quality Slides: Invest in good slides and coverslips. Poor quality can distort images.
- Control Sample Thickness: Ensure samples are thinly sliced. Thick samples can prevent light from passing through evenly.
- Minimize Air Bubbles: When placing the coverslip, avoid trapping air. Bubbles can obstruct the view.
- Keep Practice: The more you use the bright field microscope, the better your technique will become.
By following these tips, beginners can significantly improve the quality of their bright field microscopy images.
Maintenance and Care for Your Bright Field Microscope
Proper maintenance is critical for your bright field microscope’s longevity and performance. Below are key steps to keep your microscope in top condition.
- Regular Cleaning: Wipe the exterior with a soft, lint-free cloth regularly to prevent dust accumulation.
- Lens Care: Clean the lenses gently with lens paper. Use a proper cleaning solution if needed to remove oils or residues.
- Avoid Moisture: Keep the microscope in a dry place. Humidity can damage the optical components.
- Cover When Not In Use: Use a dust cover to protect against airborne particles when it’s not in use.
- Check the Illumination: Ensure the light source works well. Replace bulbs or LEDs if they dim or burn out.
- Inspect the Moving Parts: The fine and coarse focus knobs and stage controls should move smoothly. Apply lubricant if they begin to stick or become difficult to adjust.
- Handle with Care: Always lift the microscope from the base, not by the stage or optical parts.
- Scheduled Maintenance: Have a professional service your microscope annually to check for alignment and any wear and tear.
- Storage: Store the microscope in a cool, clean, and safe place to avoid accidental drops or bumps.
- User Training: Ensure anyone using the microscope knows the proper handling and care procedures.
Following these recommendations will help ensure that your bright field microscope remains a reliable tool for exploration and discovery. Regular attention to maintenance can prevent issues that might otherwise impair image quality or damage the microscope.


