Introduction to Microscope Components
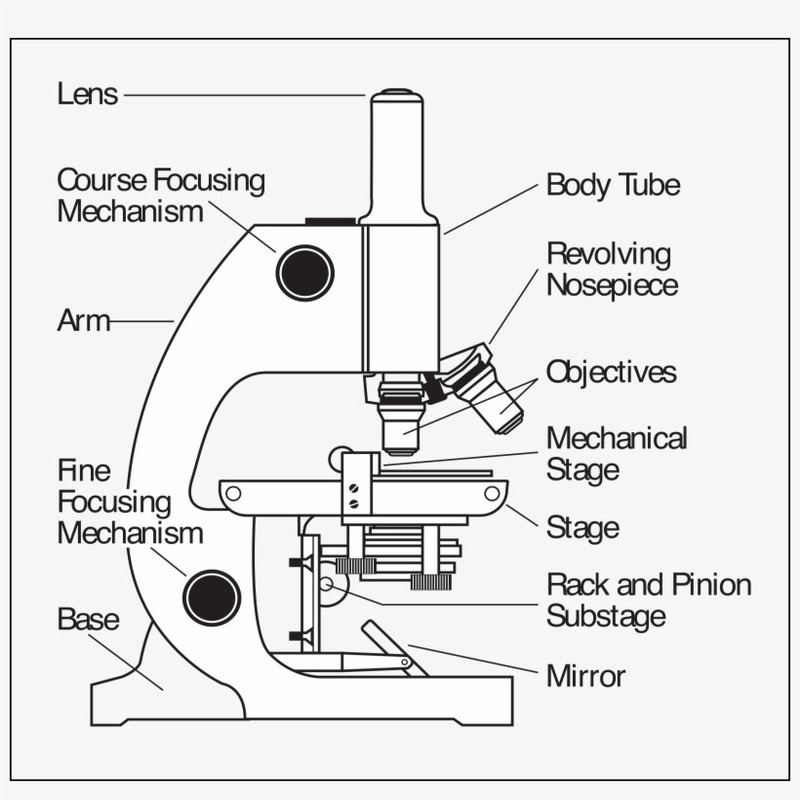
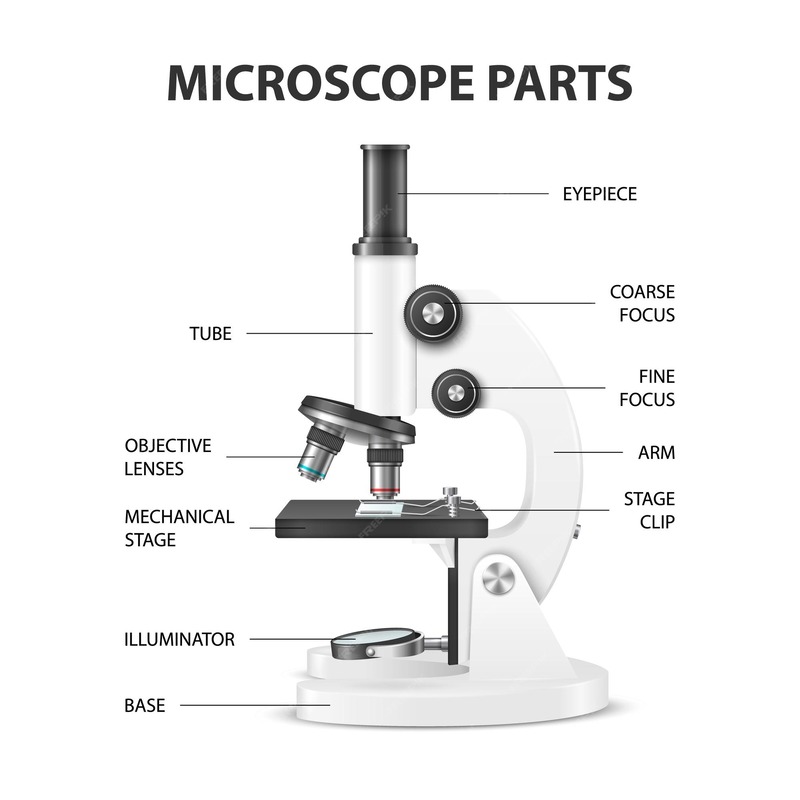
Understanding the various parts of a microscope is crucial before delving into microscope labeling. Each component plays a specific role in the magnification and observation of specimens. The main parts include the eyepiece or ocular lens, objective lenses, stage, illuminator, and focus knobs.
- Eyepiece or Ocular Lens: This is where you look through to see the magnified image. It usually contains a lens with 10x magnification.
- Objective Lenses: These are the primary lenses that magnify the specimen. They often come in different magnifications, commonly 4x, 10x, 40x, and 100x.
- Stage: The flat platform where the slides holding specimens are placed. It often includes clips to hold the slides in place.
- Illuminator: A steady light source that helps illuminate the specimen being observed. It’s usually found at the base of the microscope or built into the condenser.
- Focus Knobs: These knobs adjust the focus of the microscope. They include coarse and fine focus options to sharpen the image at different magnification levels.
Familiarity with these parts is essential because proper microscope labeling ensures that users can quickly identify and use each component correctly. Labels make it easier to follow instructions for use and maintenance, avoiding damage and errors in observation. Accurate microscope labeling contributes to the tool’s longevity and reliability in various fields, like education, research, and medical diagnosis.
Importance of Proper Microscope Labeling
Proper microscope labeling is a critical practice for several reasons. Firstly, labels on microscope components guide users through the correct operation of the device. This guidance is especially important for beginners who might not be familiar with the functions of each part. Accurate labeling also helps in avoiding misuse, which could lead to damages or inaccurate results in experiments or diagnostics. In educational settings, labeled microscopes assist both teachers and students. They provide a clear understanding of which part is which, facilitating the learning process.
In research and medical laboratories, microscope labeling is fundamental for precision. Scientists and healthcare professionals depend on exact magnifications to make critical observations. If labels are missing or incorrect, it can result in misinterpretation of data or misdiagnosis, which have serious consequences. Moreover, labeling aids in equipment maintenance. Knowing which part needs servicing or replacement is made straightforward when each component is properly identified.
Finally, microscope labels ensure compliance with safety standards. They can carry essential information like magnification limits and usage instructions, which protect users from eyestrain or other physical harm. Labels also contribute to the organization of lab equipment, making it easier to inventory and manage multiple microscopes. All these factors demonstrate that well-implemented microscope labeling is not just a matter of convenience; it is vital for accuracy, safety, and efficiency in the use of microscopes.
Step-by-Step Guide on Labeling Your Microscope
Labeling a microscope properly is a detailed process. This guide simplifies it into manageable steps. By following these instructions, you can ensure every microscope in your lab is correctly labeled. This enhances usability and safety for all users.
- Clean the Microscope: Before you start, make sure the microscope is clean and dust-free. This ensures labels adhere well and remain visible.
- Gather Necessary Materials: You will need labels that are durable and resistant to chemicals. Permanent markers are also useful for writing on labels.
- Identify All Parts: Refer to the manual or educational resources to know all the microscope parts. Include components like the eyepiece, objective lenses, and stage.
- Write Clear Labels: Use simple, bold lettering that is easy to read. Write the name of each part and its key characteristic, like the magnification power for lenses.
- Place Labels Carefully: Stick the labels near the corresponding parts without obstructing the view or hindering the use. Ensure labels for knobs and switches do not interfere with their operation.
- Check Labels for Accuracy: Double-check the labels to ensure they match the parts. Correct magnifications and names are crucial for usability.
- Seal the Labels: To prevent labels from fading or peeling, cover them with a clear tape or a sealant that can withstand regular cleaning.
- Educate Users: Inform all microscope users about the new labels. Offer a quick session on reading and understanding them.
Remember, the visibility and placement of labels are as important as the information they carry. Microscope labeling must be precise to facilitate effective use and maintenance.
Common Labels and Their Significance
Microscope labeling plays a vital role in the functionality and user-friendliness of the instrument. Let’s explore some common labels you’ll encounter and their significance in the lab setting.
- Magnification Labels: These indicate the magnifying power of the ocular and objective lenses. Knowing the magnification is crucial for accurate observation and analysis.
- Model and Serial Number: This label provides the microscope’s identification. It is essential for inventory, service, and maintenance records.
- Voltage and Power Requirements: Safety labels that show the electrical specifications to prevent damage to the microscope or injury to the user.
- Manufacturer and Brand: Identifies the maker of the microscope. It helps in sourcing parts, claiming warranties, and adhering to the manufacturer’s guidelines.
- On/Off Switch Label: Guides users to power the microscope safely. It’s a fundamental label for operating the equipment.
- Light Intensity Regulator: Indicates the control for adjusting the brightness of the illuminator. Proper lighting is key to a clear view of the specimen.
- Focus Knobs Labels: These labels identify coarse and fine focus knobs, helping users achieve precise focusing without confusion.
- Cautionary Labels: These may include handling instructions or warnings about sensitive components. They help prevent misuse and accidents in the lab.
Each label on a microscope ensures users operate the equipment efficiently and safely. The significance of these labels cannot be overstated as they guide new and experienced users alike, promoting accurate analysis and prolonging the life of the microscope. Thus, attention to microscope labeling greatly impacts the effectiveness of the tool in any scientific endeavor.
Labeling Tips for Maintaining Microscope Efficiency
Good microscope labeling not only helps in easy identification but also maintains efficiency. Here are some tips:
- Use High-Quality Labels: Choose labels that can withstand lab conditions. They should resist moisture, chemicals, and frequent handling.
- Consider Label Size: Ensure labels are big enough to read at a glance but small enough not to interfere with the operation of the microscope.
- Employ Color Coding: Use different colors for labels to categorize parts like focusing knobs, and magnification levels. This saves time and reduces errors.
- Keep Labels Consistent: All microscopes in your lab should have a consistent labeling system. It streamlines processes and training.
- Update Labels Regularly: Review and update labels as needed to reflect any changes in components or functionality.
- Avoid Jargon: Use layman’s terms on labels whenever possible. This makes them accessible to all users, including students and novice operators.
- Position Labels for Visibility: Place labels where they can be easily seen without moving the microscope too much. Hidden labels might as well not exist.
- Interactive Labels: If possible, consider using QR codes or interactive labels that users can scan to get more information on their smartphones.
- Train Users: Finally, always educate users on the new labeling system. Teach them how to read and interpret each label correctly for optimal microscope use.
Remember, effective microscope labeling can greatly enhance the efficiency and longevity of your equipment. It’s an investment in both quality control and user-friendliness.
How to Read a Microscope Label Correctly
Proper interpretation of microscope labels is pivotal for effective use. Here’s how to read them accurately:
- Start with Magnification: Look for numbers followed by an ‘x’ to identify lens magnification.
- Identify Part Names: Read the bold, clear text that indicates each component’s name.
- Check Voltage Information: For electrical safety, confirm voltage specifications on labels.
- Locate Focus Controls: Find labels like ‘coarse’ or ‘fine’ to adjust focus knobs appropriately.
- Model and Serial Number: Use these details for records and servicing needs.
- Observe Cautionary Notes: Heed any warnings to prevent misuse or damage.
Always ensure you understand each label before using the microscope. This knowledge prevents errors and enhances your experience.
Troubleshooting Mislabeling Issues
When it comes to microscope labeling, even minor mistakes can lead to significant problems. Mislabeling can result in incorrect usage, which can damage the equipment and affect the accuracy of observations. It’s imperative to address any labeling issues immediately. Here’s how you can troubleshoot common mislabeling issues.
- Double-Check Labels After Application: Immediately after applying labels to your microscopes, recheck them to ensure accuracy. Compare the labels with the microscope manual to verify that each label is in its correct place and has the right information.
- Regular Audits: Schedule regular audits of the labels on your microscopes. Look for faded, incorrect, or peeling labels and replace them as needed.
- Involve Multiple Checks: Have more than one person check the labels for consistency and accuracy. This helps catch errors that the initial labeling person might have missed.
- Correct Mistakes Promptly: If you find a mislabeled part, correct it right away. Fast action prevents the spread of incorrect information and potential damage from incorrect usage.
- Keep a Log: Maintain a log of all labeling activities. Record details like who labeled the microscope, when it was done, and any issues that were corrected. This will help to track labeling consistency and identify repeated mistakes.
- Train and Inform: Make sure all users understand the importance of correct labeling. Train them to spot labeling issues and report them swiftly.
Troubleshooting mislabeling issues as soon as they appear is critical in preserving the functionality and integrity of the microscope. These steps will help maintain an error-free microscope labeling system.
Best Practices for Microscope Label Management
Efficient microscope label management is key to maintaining functionality and accuracy in the lab. Here are best practices to ensure optimum performance:
- Regularly Update Label Information: Keep information current by updating labels after repairs or upgrades.
- Use Standardized Label Formats: Adopt a uniform style for ease of identification across all microscopes. This helps in maintaining consistency.
- Implement Quality Control Checks: Schedule frequent checks to verify labels for clarity and correctness.
- Train Staff in Labeling Protocols: Ensure that all lab users understand best practices in label application and maintenance.
- Choose Durable Labels: Invest in labels that resist wear, chemicals, and cleaning processes.
- Store Label Supplies Properly: Keep your labeling materials in a secure place to prevent damage.
- Maintain a Labeling Guide: Create a reference document that outlines steps and standards for correct labeling.
- Ensure Labels are Easily Replaceable: Choose labels that can be removed or changed without leaving residue.
- Make Labeling Part of Onboarding: Include labeling training in your new staff onboarding process.
By following these best practices, you can substantially increase the lifespan and efficacy of microscopes in your facility. Effective label management plays a crucial role in the seamless operation of a lab and aids in achieving precise and reliable results.


