Introduction to Microscope Parts and Functions
Microscopes are vital tools in scientific research. They reveal the tiny details of samples unseeable by the naked eye. Understanding the parts of a microscope labeled is crucial for their effective use. Let’s dive into the basic parts and their functions.
Microscopes consist of two main systems: the optical system and the mechanical system. The optical system includes lenses that magnify the image. It has eyepiece lenses and objective lenses. The eyepiece is where you look through to see the magnified image. The objectives are close to the sample and come in different magnifications.
Light is fundamental for viewing. The illumination system controls the light that passes through the sample. It includes a light source, often an LED or halogen lamp, and various controls to adjust the brightness.
The mechanical system involves all the parts that let you interact with the microscope. This includes the focus knobs and stage controls. Focus knobs help to sharpen the image, while stage controls move the sample for better viewing.
Proper sample preparation and positioning are also key. Without correct placement on the slide, even the best microscope won’t show a clear image.
In essence, each part of a microscope plays a specific role. From lighting the sample to bringing minute details into focus, knowing these functions helps in proper operation and care. Understanding parts of microscope labeled is the first step in mastering microscopy. As we move on, we will explore each component in detail, enhancing your knowledge and skill in using this incredible instrument.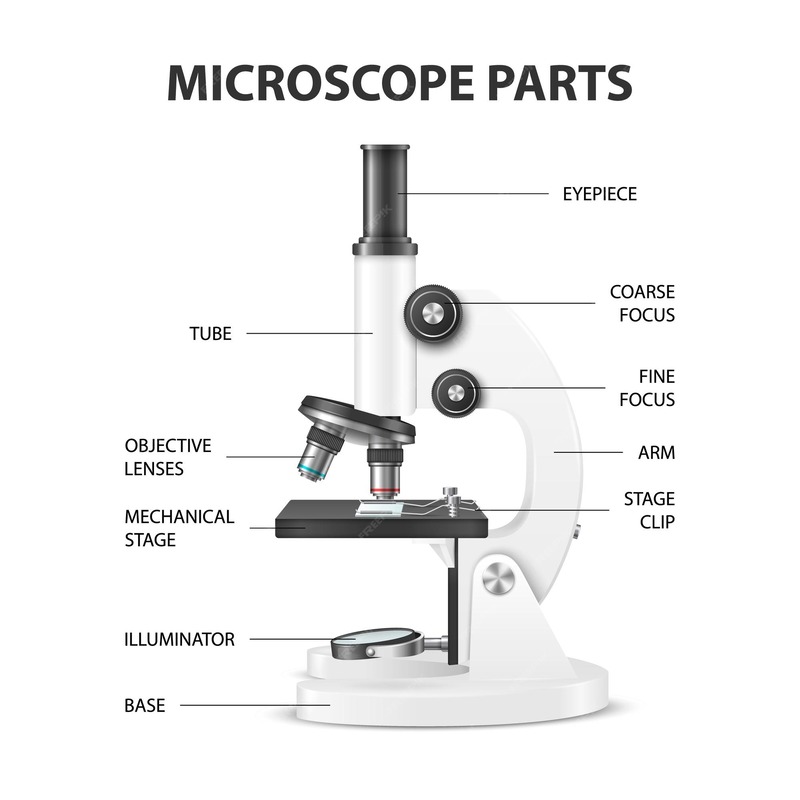
Anatomy of a Microscope: Key Components Explained
Moving beyond a general introduction, it’s time to delve deeper into the anatomy of a microscope. Familiarity with these key components is essential for anyone looking to use this instrument effectively. Each part of a microscope labeled serves a distinct purpose. Knowing these will enhance your comprehension and ability to operate a microscope proficiently.
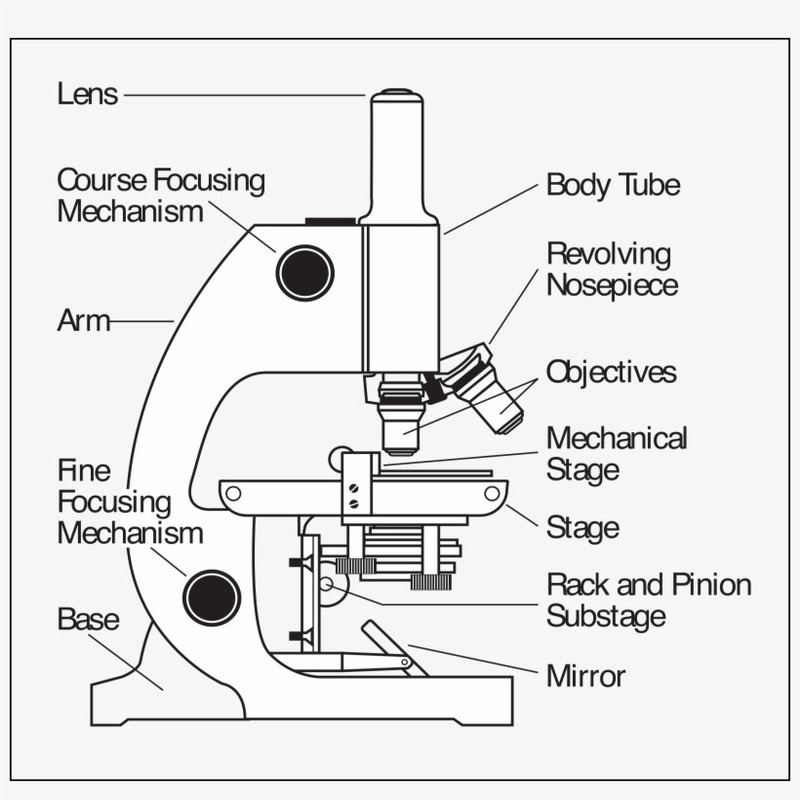
The anatomy of a microscope can be quite complex, but let’s break it down into simpler terms. Starting at the top, we have the eyepiece or ocular lens. This is the part you look through. It typically magnifies the image 10 times (10x). Next are the objective lenses. These are found on a rotating nosepiece and vary in magnification, often ranging from 4x to 100x.
Below the lenses, the stage is where you place your sample. It usually has clips to secure the slide. The stage can move, thanks to the mechanical system, for better viewing of the sample. Underneath the stage, you’ll find the condenser lens that focuses light onto the sample, and the diaphragm, which controls the amount of light reaching it.
Adjusting the focus is key to a clear image. Coarse and fine focus knobs are used for this. The coarse knob brings the object into a general focus; the fine knob tunes the clarity.
Each part of a microscope labeled works together. They allow you to view samples with precision and detail. As we progress through this guide, you’ll get to know these components even better. You’ll learn how to make the most out of these parts to achieve excellent microscopic observations.
The Optical System: Lenses and Light Path
The optical system is the heart of the microscope. It is here where the magnification of sample details occurs. This system includes several key parts of microscope labeled that work in conjunction to produce a clear image.
Firstly, the eyepiece lenses or ocular lenses sit at the top. They often provide 10x magnification. An observer looks through these to see the enlarged image formed by the objective lenses.
Moving down the microscope, the objective lenses are critical. Mounted on a rotating nosepiece, they vary in power. Typically, microscopes will have objectives ranging from 4x to 100x magnification. The choice of objective determines the level of detail visible.
The tube connects the eyepiece and objective lenses. It ensures the light path is aligned correctly. This path is vital for transmitting the magnified image from the objectives to the eyepiece.
At the base of this path, the light source works with optical elements to illuminate the sample. Precise lighting is essential for clarity and contrast in microscopic observations.
Together, these components of the optical system allow users to explore microscopic worlds. With each part of microscope labeled and understood, you can achieve better control over magnification and clarity. The anatomy of the optical system and how light travels through it is key to mastering microscopy.
Illumination System: Sources and Regulation
The illumination system is central for viewing samples under a microscope. It has two main parts: the light source and a method to control it. Light is key to making tiny details visible. The light source can vary, from bulbs like LED or halogen, to more advanced options.
Good lighting is critical. It helps us see the contrasts and textures of a specimen. The light often shines up from beneath the stage. This is called transmitted light. It makes the sample glow for easier viewing.
Regulation of this light is just as important. You can adjust it with the diaphragm and condenser. The diaphragm controls how much light passes through. The condenser focuses this light. Together, they help you manage the brightness and clarity of the image.
For delicate samples, too much light may cause damage. The ability to regulate light protects these samples. It also prevents glare that can obscure details. Users can tweak the light to suit the specimen and achieve the best image.
By understanding the parts of microscope labeled for illumination, we can view samples under the best conditions. Correctly adjusted light leads to enhanced details in microscopy. This guide will help you use the illumination system for optimal results.
Mechanical Systems: Focus and Stage Controls
When using a microscope, the mechanical systems are vital for detailed observation. Primary among these are the focus and the stage controls. Each has a role in positioning and clarifying the view of the sample.
Focus Controls include two types of knobs: coarse and fine. The coarse focus knob moves the stage up and down. It helps quickly bring the sample into general focus. Once in the ballpark, the fine focus knob takes over. It makes small adjustments, allowing for precise clarity. This knob is crucial for honing in on the finer details of the specimen.
Stage Controls let you maneuver the slide holding your sample. A stage with clips secures the slide in place. The controls move the slide left, right, forward, or backward. Proper use of stage controls is essential for scanning the entire specimen. It ensures you don’t miss any critical part of your sample.
In summary, the mechanical systems of a microscope play a crucial role. The focus knobs adjust the clarity while the stage controls enable precise slide movement. Together, they ensure a sharp, detailed image of your specimen. Knowledge of the parts of microscope labeled within these systems maximizes your ability to make precise observations.
Sample Preparation and Slide Placement
Preparing your sample and placing it correctly on the slide is crucial for microscopy. Proper sample preparation is the foundation of clear, accurate observations. Here are the key steps for optimal preparation.
Preparing the Specimen:
Before placing a sample on the slide, it generally needs some preparation. This might include staining, slicing, or mounting, depending on the type of specimen. Staining helps to highlight specific components of your sample, making them easier to see.
Creating a Slide:
Once prepared, the specimen is usually placed on a glass slide. A cover slip is then gently placed on top to protect the sample from damage. Ensure there are no air bubbles trapped as these can distort the image. The slides should be clean and free of smudges.
Slide Placement:
With the slide ready, it’s time to place it on the microscope stage. Secure the slide using the stage clips. Ensure it is centered so the light can evenly illuminate the specimen.
Focusing on the Slide:
After placing the slide, use the coarse focus to get a general focus. Then, fine-tune using the fine focus knob for a sharp image. Remember to start with the lowest magnification before switching to a higher objective lens to view the details. This procedure prevents damage to the slide or the microscope.
In conclusion, preparing your sample and slide carefully, and positioning them correctly on the microscope stage, are key parts of microscope labeled for success. Always handle slides and samples gently to maintain their integrity and your safety.
Maintenance and Care for Microscope Components
Proper maintenance is vital for a microscope’s longevity and performance. To maintain your instrument, you must care for each part of microscope labeled in this guide.
Regular cleaning is essential. Dust and oils can obscure lenses, hindering your view. Use soft, lint-free cloths to clean the lenses. Gentle lens cleaners or isopropyl alcohol can remove smudges.
Keep the microscope covered when not in use. This protects it from dust. Ensure your storage area is dry to prevent rust and corrosion.
Handle the mechanical systems with care. Avoid forcing the focus knobs or stage controls. Such actions can damage the gears and alignment.
By upholding these maintenance steps, you’ll preserve your microscope. And, by consulting this guide on parts of microscope labeled, you’ll ensure each component receives proper care.
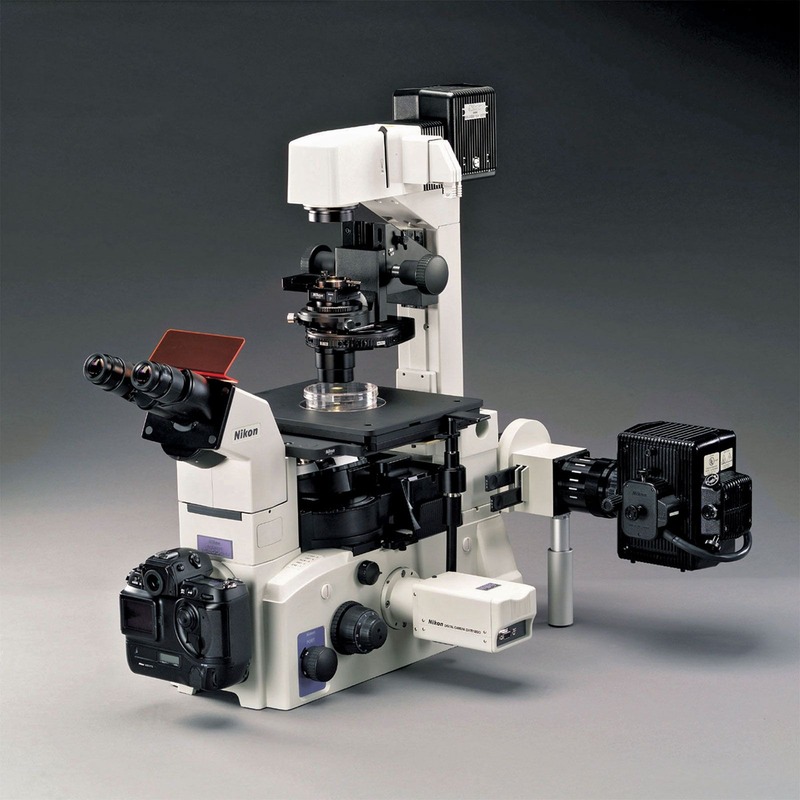
Advances in Microscopy: Enhancements and New Technologies
Microscopy has seen remarkable advancements in recent years. New technologies and enhancements have improved the functionality and capabilities of microscopes. Let’s look at some of the cutting-edge developments.
Enhanced Imaging Techniques
Modern microscopes now feature improved imaging techniques. High-resolution cameras capture detailed images with extraordinary clarity. Techniques like phase-contrast, fluorescence, and electron microscopy allow for even greater detail.
Digital Integration
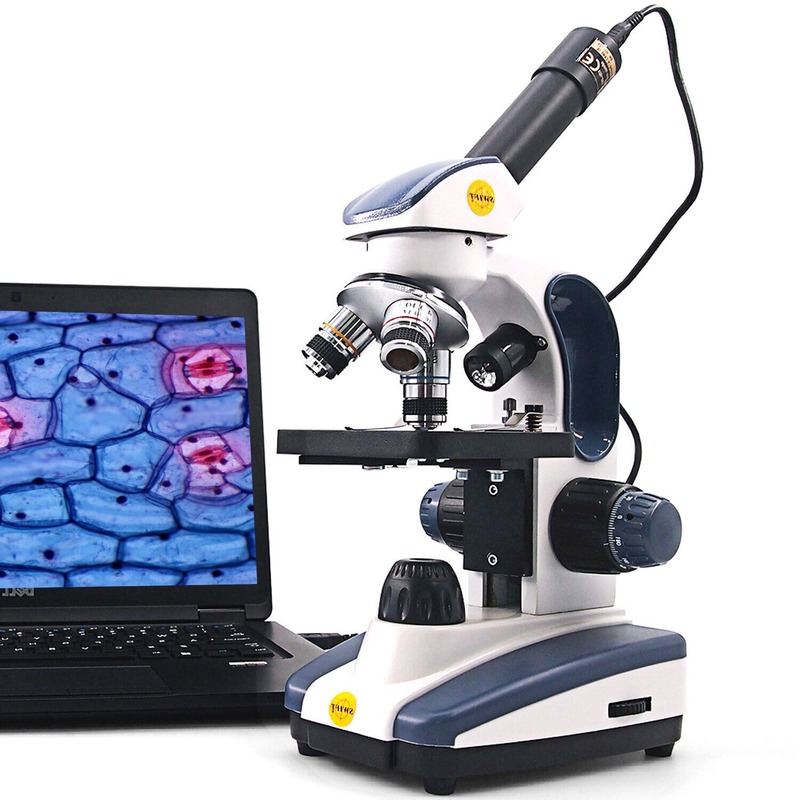
Digital integration is a major advancement. Microscopes can connect to computers for image analysis. This makes it easier to store, share, and study the data captured. Software can now directly control microscope settings, improving precision.
LED Illumination
LED lighting has replaced traditional bulbs in many microscopes. LEDs offer brighter, more consistent light. They also last longer and use less energy. This development is a boost for both viewing quality and sustainability.
Automated Systems
Automation in microscopes has grown. Autofocus and motorized stages save time and reduce human error. These systems can quickly and precisely adjust focus and stage position, enhancing user experience.
Portable and Compact Designs
Microscopes are becoming more portable and compact.
This allows for use in the field or in varying laboratory environments. Their designs have become more user-friendly without sacrificing quality.
3D Imaging and Reconstruction
3D imaging and reconstruction technology is a leap forward. It creates detailed three-dimensional models of specimens. Researchers can now examine samples from various angles, uncovering more information.
These advancements illustrate the ongoing innovation in the field of microscopy. Enhancements in parts of microscope labeled with new tech are pushing the boundaries of what we can observe. They make the microscopic world more accessible and easier to understand. The future of microscopy looks bright, with further technological improvements on the horizon.


