Part 1: Understanding Oil Pastels
Oil pastels are a unique medium that can create stunning, vibrant artworks. However, they are quite different from other art mediums like watercolors, acrylics, or colored pencils. Understanding their composition and characteristics is crucial to mastering the art of blending oil pastels.
1. Composition and Texture:
Oil pastels are composed of pigment, wax, and a non-drying oil, typically a mineral oil or linseed oil. This unique combination of ingredients gives oil pastels their creamy, buttery texture, which sets them apart from other art mediums. The high pigment concentration in oil pastels results in intense, vibrant colors, while the wax and oil components provide a smooth, rich consistency that allows for effortless blending and layering.

The creamy texture of oil pastels allows artists to achieve a variety of effects and textures with ease. Whether it’s creating soft, seamless transitions between colors or building up layers to add depth and dimension to an artwork, oil pastels offer a versatility that makes them ideal for a wide range of artistic styles and techniques. The ability to blend and layer oil pastels without the need for solvents makes them a convenient choice for artists who prefer to work without the hassle of additional materials.
Another advantage of oil pastels is their ability to adhere to a variety of surfaces, including paper, cardboard, canvas, and wood. This versatility allows artists to explore different textures and effects based on the surface they choose, adding an additional dimension to their creative process. Whether working on a smooth surface for crisp, clean lines or a textured one for a more tactile, dynamic finish, oil pastels offer the freedom to experiment and create unique artworks.
2. Understanding Color Mixing:
Understanding how colors mix and blend is essential for mastering the art of blending oil pastels. Unlike other mediums where colors can be easily mixed on a palette, oil pastels mix on the artwork itself. Blend two colors by layering them on top of each other and then using a blending tool or your fingers to create a smooth transition. Understanding color theory and how different colors interact with each other will help you create vibrant and harmonious blends in your oil pastel artworks.
Part 2: Techniques for Blending Oil Pastels
Blending oil pastels can be a challenging task, but mastering the following techniques will help you achieve smooth and seamless blends in your artwork.
1. Layering:
To begin, select your base color and apply it lightly to the paper using your oil pastel. This will serve as the foundation for the rest of your artwork. Then, carefully layer additional colors on top of the base, using light pressure to ensure a smooth and even blend. As you add more layers, you will start to see the depth and richness of the colors coming through.
Experiment with different color combinations and layering techniques to see how they interact with each other. You can try blending two contrasting colors to create a subtle gradient effect, or layering complementary colors to make certain areas of your artwork pop. Don’t be afraid to get creative and take risks with your layering – this is where the magic happens!
As you build up the layers, pay attention to the textures and effects that are emerging. You might notice interesting patterns and details forming as you work. Embrace these happy accidents and allow them to influence the direction of your artwork.
2. Blending Tools:
Blending tools are essential for achieving smooth and seamless blends in oil pastels. There are several options to choose from, including blending stumps, tortillons, blending brushes, and even your fingers. Each tool has its own unique effect, so it’s worth experimenting with different options to find the one that works best for you. Blending stumps and tortillons are great for creating precise details and soft transitions, while blending brushes can be used for larger areas and smoother blends.
Part 3: Tips for Blending Oil Pastels
Mastering the art of blending oil pastels requires practice and patience. Here are some tips to help you improve your blending skills and create stunning oil pastel artworks.
1. Use Quality Paper:
Choosing the right paper is essential for achieving the desired blending effects when working with oil pastels. A smooth surface is crucial as it allows the oil pastels to glide across the paper, facilitating smoother blending. Look for papers specifically formulated for oil pastel use, as they are designed to handle the unique properties of the medium.
In addition to a smooth surface, it’s important to consider the weight of the paper. Heavier weight paper is preferable as it prevents the oil pastels from bleeding through, ensuring that the colors remain vibrant and true to their original hue. The heavier weight also adds durability, allowing for multiple layers of oil pastels without causing the paper to warp or tear.
While a smooth surface is ideal for overall blending, a paper with toothy texture can also offer interesting opportunities for creating detailed textures and effects within your artwork. The texture can add depth and character to your pieces, enhancing the overall visual appeal.
Experiment with various types of paper to find the one that complements your blending techniques and artistic vision. Different papers can yield different results, so don’t be afraid to test out a few options to see which one best suits your style and preferences. Whether you prefer a smooth, sleek finish or a textured, detailed look, the right paper can greatly enhance the blending process and contribute to the success of your oil pastel artwork.
2. Experiment with Different Surfaces:
Oil pastels can be used on a variety of surfaces, including paper, canvas, wood, and even metal. Each surface will yield different results and textures when blending oil pastels. Experimenting with different surfaces will help you understand how the oil pastels behave and how to achieve the desired blending effects. For example, canvas may provide a more textured and rough surface for blending, while paper may yield smoother and more refined blends.
Part 4: Advanced Blending Techniques
Once you have mastered the basic techniques for blending oil pastels, you can experiment with more advanced techniques to take your artwork to the next level.
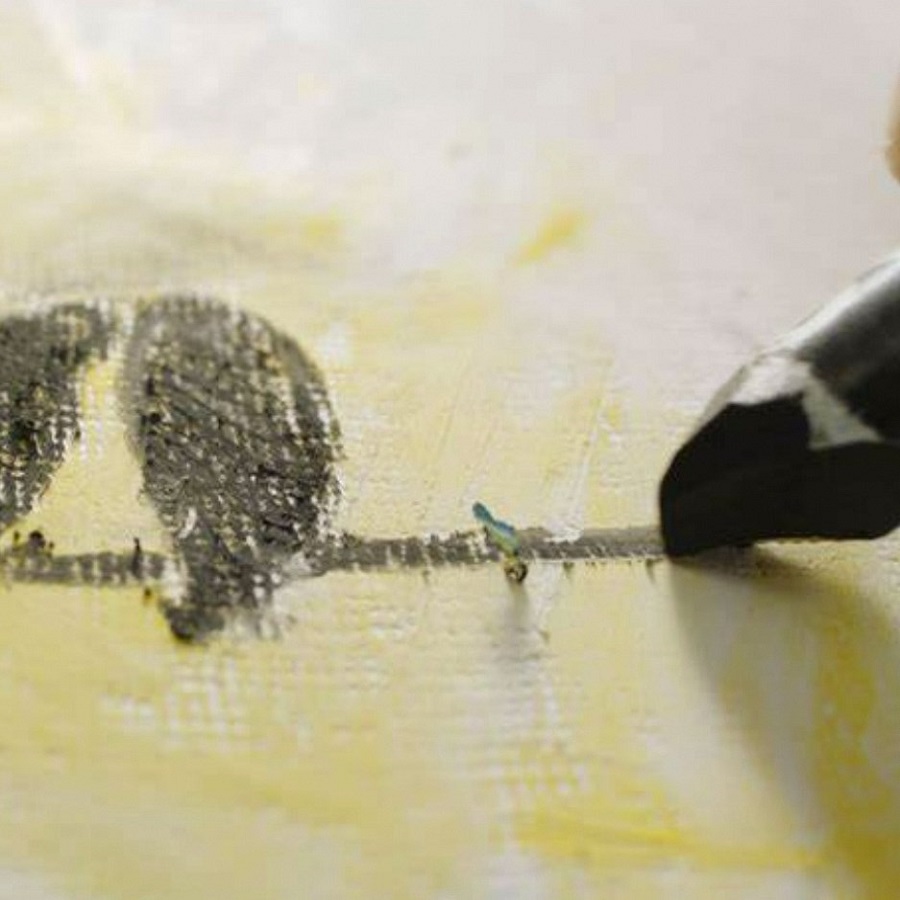
1. Sgraffito:
Sgraffito is a technique that involves scratching through layers of oil pastels to reveal the underlying colors. This technique can create interesting textures and patterns in your artwork and add depth to your blends. Use a sharp tool, such as a craft knife or a toothpick, to scratch through the layers of oil pastels and create intricate designs and details.
2. Heat Blending:
Heat can be used to blend oil pastels and create unique effects in your artwork. Use a heat gun or a hairdryer to heat the surface of the oil pastels, which will soften them and allow for smoother blending. Be cautious when using heat, as excessive heat can cause the oil pastels to melt and become runny. Experiment with heat blending on small areas of your artwork to understand how it affects the blending process and the final outcome.
In conclusion, mastering the art of blending oil pastels requires understanding their composition, practicing various techniques, and experimenting with different surfaces and tools. With patience and dedication, you can create stunning and vibrant oil pastel artworks that showcase your blending skills and creativity. So go ahead, grab your oil pastels, and start blending!